

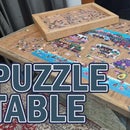
Introduction: Metal Measuring Tape Wine Tote


My husband salvaged 75 feet of measuring tape at the dump a couple months ago. He tucked it away until bringing it out the other day with the idea to create a basket. He struggled to create something for awhile before giving up and that's when I stepped in. I didn't think his idea was hopeless and so set to work in search of a way to make weaving with metal strips doable. After 1- 1 1/2 hours I had created a woven tote. It wasn't extremely difficult, but it did take a lot of patience.
Step 1: Tools & Materials

In order to create this tote you will need the following tools and materials:
50-75 feet of metal measuring tape
Wide masking tape
Rivets & a rivet gun
Leather hole punch
Epoxy resin
Small binder clips or clamps
Binding strap or something else you would like to use as a handle
Bottle of wine (but don't drink it yet)
Step 2: Base Strips

First you need to cut strips to be the main base for the tote. I cut my strips in about 2 1/2 feet strips (the metal actually doesn't need much cutting as it is pretty brittle and will break). I was using a wine bottle as my template for the base size, which led me to use 7 strips horizontally and 7 vertically. This however made an even amount of strips which caused me a slight problem later. I suggest you don't make a perfect square for the base so that when you weave there are no problems.
Step 3: Weave the Base


Lay the 7 strips down with the measuring side you like best, facing down. Then take the remaining 7 and weave them through the first 7. Make sure you alternate which strips are going under and over. When you are finished with that, make sure that the weave is in the middle of both sets of 7 and push the pieces together so that it's a tight weave.
Step 4: Forming the Tote


Weaving the body of the tote is the most difficult and time consuming part. In order to make this step easier I taped the ends of the strips together for each set of 7 and then pulled up the sides around a wine bottle and taped the tops of the strips together and to the bottle.
Step 5: Weaving the Body


Now you can start to weave the rest of the tote. I found it easier to weave from the top down as the first couple rows held the top together and made the weaving easier. It was a little annoying however to have to pull that much metal tape through a weave around and around the tote. Make sure that you stop and push the strips together every now and then so that your weave is tight. This will be important when you get to the bottom as there isn't much room left for your last strip. For the last strip I had to use a flat skinny object to help hold the base strips down or up so that I could get the weaving piece through.
During this step I realized that I had an even number of strips. This meant that every circuit around the tote I had to go over or under the same 2 strips at once. If I hadn't treated those 2 strips as one big strip I wouldn't have had a weave at all and it wouldn't have held together.
Step 6: Trim & Secure the Top Edge


Once you are done weaving, trim off the excess length of strip. Then you finish the top part of the tote a couple different ways. I first tried to rivet the end of the final weaving strip to the other base strip but the metal was too thin or I just didn't have the right kind of rivets. You could also tape the top using red or black electrical tape. I chose instead to use epoxy resin to seal the ends together. I use epoxy resin quite often, but for this small project I decided to use this small 2 in 1 plunger kit. It is far less mess than the big bottles I usually use. After I had the epoxy on, I then clamped the top edge to make sure that the pieces were held together. This epoxy takes 2 hours for a complete hard cure, so at this point I watched a movie, but I didn't drink the wine yet!
Step 7: Add a Handle


For the handle I chose a piece of binding strip that my husband had kept from the Bali, Indonesia airport. I measured the length I needed by putting in the bottle of wine and making sure I could get the bottle in and out. To attach the handle I put a hole in the binding strip using a leather hole punch. I then connected the handle using a rivet. I did not go through the metal as it is very brittle, but instead went between two strips. I had intended to put 2 rivets on each side, but my rivet gun broke after putting only 1 in on each side. It didn't seem to matter though when I used the tote.
Step 8: Finished
Lastly, I drank the wine and congratulated myself.
Now you have a unique tote with which to use or to gift. Make sure if you gift it that you thrown in a bottle of wine too.

Participated in the
Metal Contest


