

Introduction: Modular Knitting - Simple Scarf


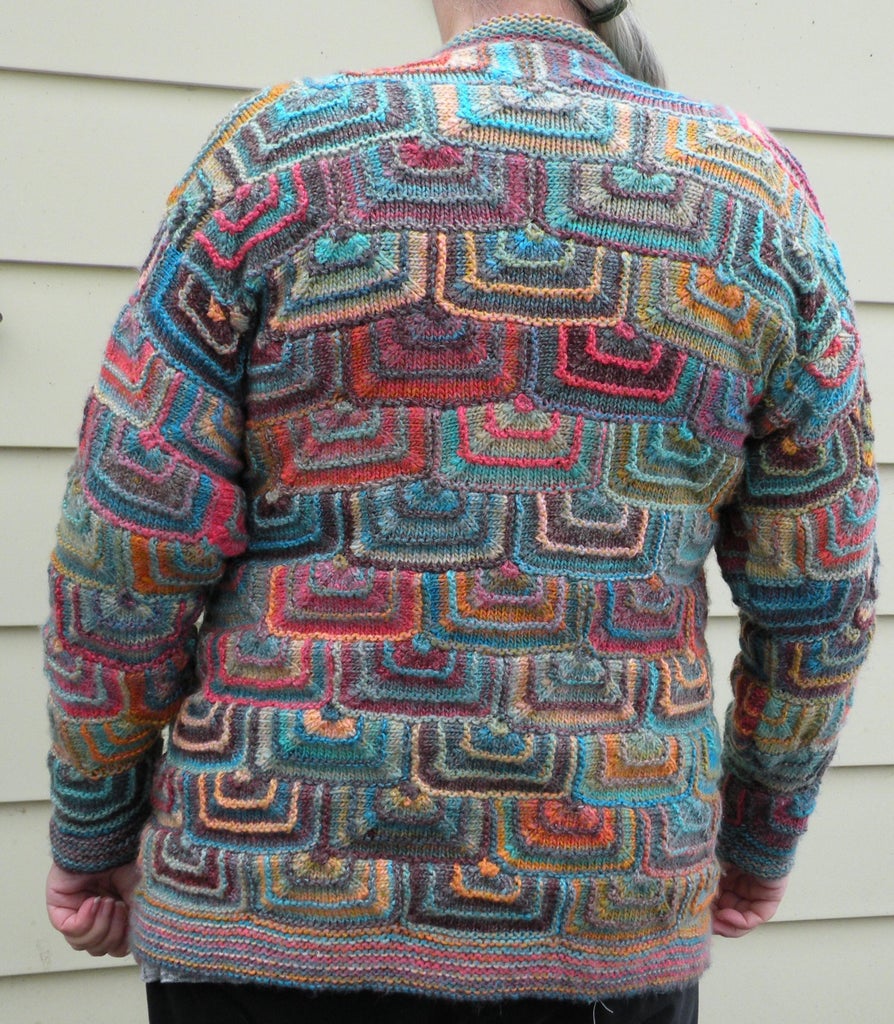


I fell in love with modular knitting a few years ago and have made many projects using different techniques.
I started by using patterns that other people designed and then moved on to designing my own.
Whenever I wear one of my creations, I get many compliments. When people find out that I knit it myself, they ask, "How did you do that?" This is usually followed by a comment like, "That looks so difficult to do."
The truth is that modular knitting is so much easier to do than most people think.
I decided to create some patterns to introduce people to modular knitting through easy to do knitting projects like this one.
The pattern for the hat shown in the pictures is available on Instructables at https://www.instructables.com/Stained-Glass-Modular-Knitting-Simple-Hat/
This pattern uses only a few basic skills
- Casting on
- Knit stitch
- Decrease by knitting 2 stitches together
- Using stitch markers
- Passing one stitch over another
- Picking up stitches
- Weaving in yarn ends
Supplies


This is what I used for this sample scarf:
Medium weight yarn- # 4 (worsted weight) - about 100 grams (3 1/2 ounces) for a 45" scarf
2 - 5 mm knitting needles
1 - 3 mm or 4 mm knitting needle for picking up stitches (double pointed works best)
Darning needle
Scissors
Stitch markers
Gauge does not really matter. You can use any weight of yarn and the appropriate needle size. Check the details on your ball of yarn to determine the recommended needle size.
I love using color changing yarn which creates color changes naturally as you knit, but you can use solid colors if you prefer.
This is a great pattern for using up all those leftover balls of yarn in your stash. I do recommend that you use only one weight of yarn for your scarf.
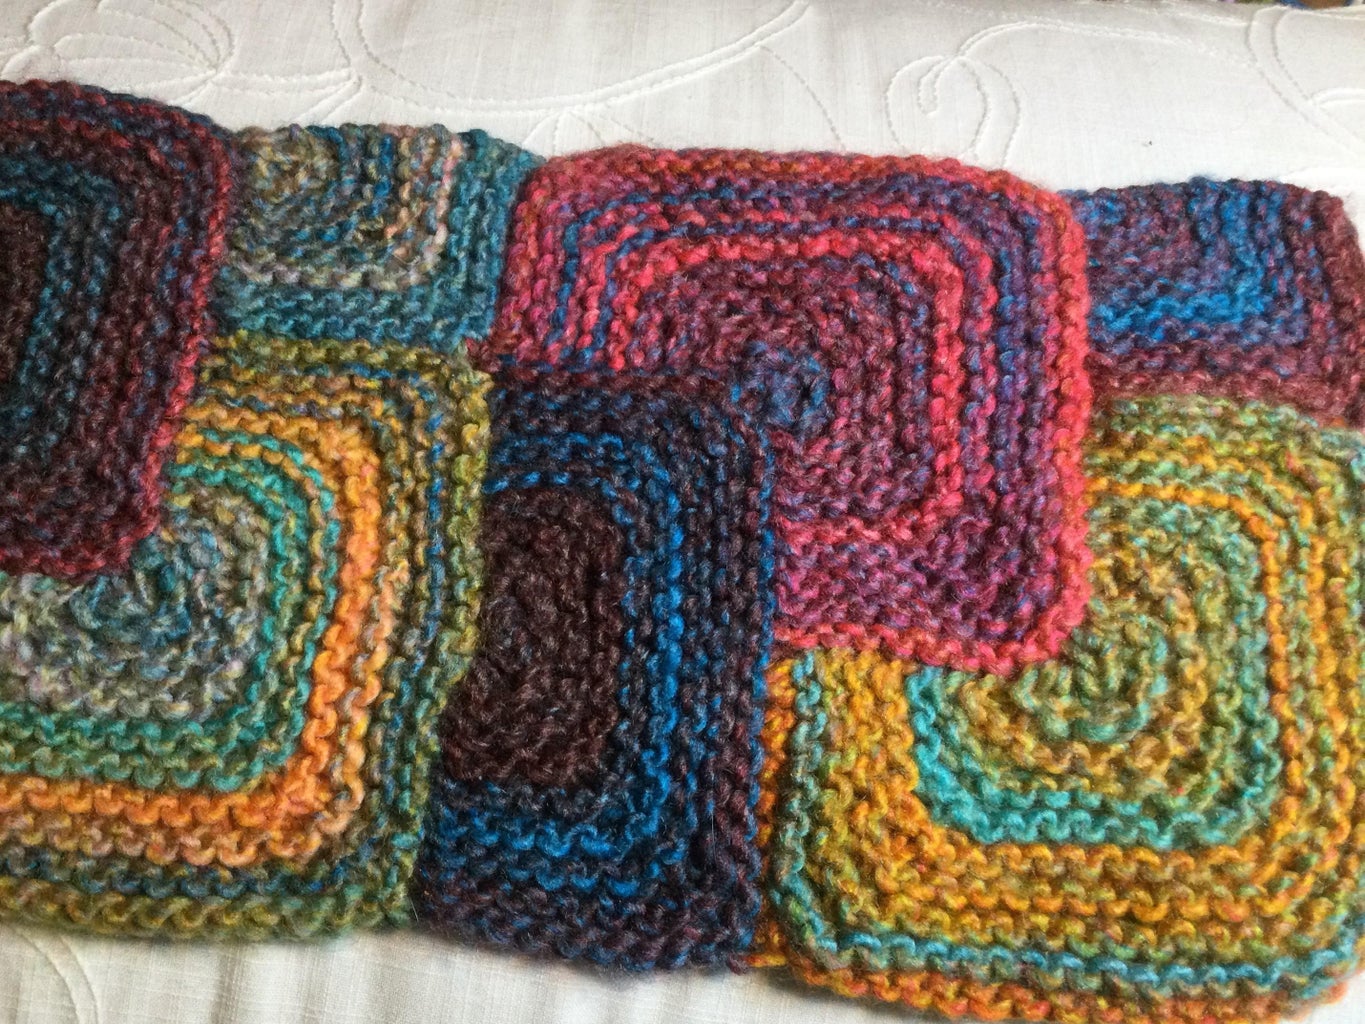
Each square that makes up the scarf in this sample measures 6 1/2'’ x 6 1/2” but your square may be a different finished size depending on what weight yarn you use and the needle size.
The solid colors sample square shown above is made using bulky yarn and 6mm needles. It measures 9” x 9”
The length of your scarf is up to you. Just keep adding squares until you have made the scarf the length you desire. In this sample, I completed 7 full squares to make the scarf 45” long. A longer scarf will require more yarn.
One option is to make less squares and join the last one to the first one to make a cowl.
Step 1: Abbreviations
Abbreviations
K - knit
K 2 tog - knit 2 stitches together
St - stitch
Sts - stitches
Step 2: The Basic Square


Each square is made up for 4 separate sections that are knit one at a time. Each section is identified as a section number and a color so you can see how the sections fit together to make up a square.
The color graphic shows the basic design of each square and the number of stitches that are used in each section.
Instructions that follow tell you how to make each section that makes up a square and how to join them as you knit.
Once you have finished your first square, follow the instructions for adding sections 1 (blue) & 2 (green) of your second and all other squares. Sections 3 (orange) & 4 (red) are the same in all of the squares.
If you print off the pattern, you can use the boxes at the beginning of each row to mark each row that you have completed. Use a pencil which you can erase as you begin your next section.
Counting the number of stitches at the end of each completed row can also help you keep track of what row you are on.
Once you get familiar with how the pattern works, instead of counting stitches in each row, you can just knit to 2 stitches before each marker and knit the last 2 stitches together.
I hate sewing things together which is part of why I love modular knitting.
The only downside of this technique is that you end up with a lot of yarn ends that need to be woven in. I'll tell you how to do that in a later step.
Step 3: Section 1 - Blue


Section 1 (Blue)
☐ 1. Cast on 54 sts
☐ 2. Knit 9 - place a marker, knit 18 - place a marker, knit 18 - place a marker, knit 9, turn = 54 sts
☐ 3. K 7, k 2 tog, slip marker, k 16, k 2 tog, slip marker, k 16, k 2 tog, slip marker, k 9, turn = 51 sts
☐ 4. K 7, k 2 tog, slip marker, k 15, k 2 tog, slip marker, k 15, k 2 tog, slip marker, k 8, turn = 48 sts
☐ 5. K 6, k 2 tog, slip marker, k 14, k 2 tog, slip marker, k 14, k 2 tog, slip marker, k 8, turn = 45 sts
☐ 6. K 6, k 2 tog, slip marker, k 13, k 2 tog,, slip marker, k 13, k 2 tog, slip marker, k 7, turn = 42 sts
☐ 7. K 5, k 2 tog, slip marker, k 12, k 2 tog, slip marker, k 12, k2 tog, slip marker, k 7, turn = 39 sts
☐ 8. K 5, k 2 tog, slip marker, k 11, k 2 tog, slip marker, k 11, k 2 tog, slip marker, k 6, turn = 36 sts
☐ 9. K 4, k 2 tog, slip marker, k 10, k 2 tog, slip marker, k 10, k 2 tog, slip marker, k 6, turn = 33 sts
☐ 10. K 4, k 2 tog, slip marker, k 9, k 2 tog, slip marker, k 9, k 2 tog, slip marker, k 5, turn = 30 sts
☐ 11. K 3, k 2 tog, slip marker, k 8, k 2 tog, slip marker, k 8, k 2 tog, slip marker, k 5, turn = 27 sts
☐ 12. K 3, k 2 tog, slip marker, k 7, k 2 tog, slip marker, k 7, k 2 tog, slip marker, k 4, turn = 24 sts
☐ 13. K 2, k 2 tog, slip marker, k 6, k 2 tog, slip marker, k 6, k 2 tog, slip marker, k 4, turn = 21 sts
☐ 14. K 2, k 2 tog, slip marker, k 5, k 2 tog, slip marker, k 5, k 2 tog, slip marker, k 3, turn = 18 sts
☐ 15. K 1, k 2 tog, slip marker, k 4, k 2 tog, slip marker, k 4, k 2 tog, slip marker, k 3, turn = 15 sts
☐ 16. K 1, k 2 tog, slip marker, k 3, k 2 tog, slip marker, k 3, k 2 tog, slip marker, k 2, turn = 12 sts
☐ 17. K 2 tog, slip marker, k 2, k 2 tog, slip marker, k 2, k 2 tog, slip marker, k 2, turn = 9 sts
☐ 18. K 2 tog, remove marker, k 1, k 2 tog, remove marker, k 1, k 2 tog, remove marker, k 1, turn = 6 sts
☐ 19. K 2 tog – repeat 2 more times = 3 sts
☐ 20. Slip 1, k 2 tog, pass slip stitch over = 1 sts
☐ Cut yarn leaving a 4” tail and pull through last st
*TIP - Mark the right side of the square. A safety pin or stitch marker pin works well for this. This will help you identify where to pick up the stitches needed for the sections .
Step 4: Section 2 - Green


Section 2 (Green)
☐ 1. Use 4mm needle. Starting at left hand side, pick up 9 sts along top edge of section 1
☐ 2. Using 5mm needles, cast on 9 sts, then k 9 picked up sts, turn = 18 sts
*TIP - Knit picked up sts through back loops if this is easier.
☐ 3. K 9, place a marker, k 9, turn = 18 sts
☐ 4. K 7, K 2 tog, slip marker, k 9, turn = 17 sts
☐ 5. K 7, K 2 tog, slip marker, k 8, turn = 16 sts
☐ 6. K 6, K 2 tog, slip marker, k 8, turn = 15 sts
☐ 7. K 6, K 2 tog, slip marker, k 7, turn = 14 sts
☐ 8. K 5, K 2 tog, slip marker, k 7, turn = 13 sts
☐ 9. K 5, K 2 tog, slip marker, k 6, turn = 12 sts
☐ 10. K 4. K 2 tog, slip marker, k 6, turns = 11 sts
☐ 11. K 4, K 2 tog, slip marker, k 5, turn = 10 sts
☐ 12. K 3, K 2 tog, slip marker, k 5, turn = 9 sts
☐ 13. K 3, K 2 tog, slip marker, k 4, turn = 8 sts
☐ 14. K 2, K 2 tog, slip marker, k 4, turn = 7 sts
☐ 15. K 2, K 2 tog, slip marker, k 3, turn = 6 sts
☐ 16. K 1, K 2 tog, slip marker, k 3, turn = 5 sts
☐ 17. K 1, K 2 tog, slip marker, k 2, turn = 4 sts
☐ 18. K 2 tog, remove marker, k 2 tog, pass right st over left sts = 1 st
☐ Cut yarn leaving a 4” tail and pull through last st
Step 5: Section 3 - Orange


Section 3 (Orange)
☐ 1. Use 4mm needle to pick up 9 sts along left hand side of section 2, 9 sts along top left side of section 1, and 9 sts along top of bottom left side of section 1 = 27 sts
* TIP - Refer to photos for reference
☐ 2. Using 5mm needles, cast on 27 sts, then k 27 picked up sts starting at top of section 2, turn = 54 sts
* TIP - Knit picked up sts through back loops if this is easier
☐ 3. K 9, place a marker, k 18, place a marker, k 18, place a marker, k 9 = 54 sts
☐ 4. K 7, k 2 tog, slip marker, k 16, k 2 tog, slip marker, k 16, k 2 tog, slip marker, k 9, turn = 51 sts
☐ 5. K 7, k 2 tog, slip marker, k 15, k 2 tog, slip marker, k 15, k 2 tog, slip marker, k 8, turn = 48 sts
☐ 6. K 6, k 2 tog, slip marker, k 14, k 2 tog, slip marker, k 14, k 2 tog, slip marker, k 8, turn = 45 sts
☐ 7. K 6, k 2 tog, slip marker, k 13, k 2 tog,, slip marker, k 13, k 2 tog, slip marker, k 7, turn = 42 sts
☐ 8. K 5, k 2 tog, slip marker, k 12, k 2 tog, slip marker, k 12, k 2 tog, slip marker, k 7, turn = 39 sts
☐ 9. K 5, k 2 tog, slip marker, k 11, k 2 tog, slip marker, k 11, k 2 tog, slip marker, k 6, turn = 36 sts
☐ 10. K 4, k 2 tog, slip marker, k 10, k 2 tog, slip marker, k 10, k 2 tog, slip marker, k 6, turn = 33 sts
☐ 11. K 4, k 2 tog, slip marker, k 9, k 2 tog, slip marker, k 9, k 2 tog, slip marker, k 5, turn = 30 sts
☐ 12. K 3, k 2 tog, slip marker, k 8, k 2 tog, slip marker, k 8, k 2 tog, slip marker, k 5, turn = 27 sts
☐ 13. K 3, k 2 tog, slip marker, k 7, k 2 tog, slip marker, k 7, k 2 tog, slip marker, k 4, turn = 24 sts
☐ 14. K 2, k 2 tog, slip marker, k 6, k 2 tog, slip marker, k 6, k 2 tog, slip marker, k 4, turn = 21 sts
☐ 15. K 2, k 2 tog, slip marker, k 5, k 2 tog, slip marker, k 5, k 2 tog, slip marker, k 3, turn = 18 sts
☐ 16. K 1, k 2 tog, slip marker, k 4, k 2 tog, slip marker, k 4, k 2 tog, slip marker, k 3, turn = 15 sts
☐ 17. K 1, k 2 tog, slip marker, k 3, k 2 tog, slip marker, k 3, k 2 tog, slip marker, k 2, turn = 12 sts
☐ 18. K 2 tog, slip marker, k 2, k 2 tog, slip marker, k 2, k 2 tog, slip marker, k 2, turn = 9 sts
☐ 19. K 2 tog, remove marker, k 1, k 2 tog, remove marker, k 1, k 2 tog, remove marker, k 1, turn = 6 sts
☐ 20. K 2 tog – Repeat 2 more times, turn = 3 sts
☐ 21. Slip 1, k 2 tog, pass slip stitch over = 1 sts
☐ Cut yarn leaving a 4” tail and pull through last st
Step 6: Section 4 - Red


Section 4 (Red)
☐ 1. Use 4mm needle to pick up 9 sts along left side of section 3, 9 sts along the left side of section 3 and 9 sts along top of bottom left side of section 1 = 27 sts
* TIP - Refer to photos for reference
☐ 2. Using 5mm needles, Knit 27 picked up sts starting from top left corner of this section, cast on 9 sts, turn = 36 sts
*TIP - Knit picked up sts through back loops if this is easier
☐ 3. K 9 - place a marker, knit 18 - place a marker, knit 9, turn = 36 sts
☐ 4. K 7, k 2 tog, slip marker, k 16, k 2 tog, slip marker, k 9, turn = 34 sts
☐ 5. K 7, k 2 tog, slip marker, k 15, k 2 tog, slip marker, k 8, turn = 32 sts
☐ 6. K 6, k 2 tog, slip marker, k 14, k 2 tog, slip marker, k 8, turn = 30 sts
☐ 7. K 6, k 2 tog, slip marker, k 13, k 2 tog, slip marker, k 7, turn = 28 sts
☐ 8. K 5, k 2 tog, slip marker, k 12, k 2 tog, slip marker, k 7, turn = 26 sts
☐ 9. K 5, k 2 tog, slip marker, k 11, k 2 tog, slip marker, k 6, turn = 24 sts
☐ 10. K 4, k 2 tog, slip marker, k 10, k 2 tog, slip marker, k 6, turn = 22 sts
☐ 11. K 4, k 2 tog, slip marker, k 9, k 2 tog, slip marker, k 5, turn = 20 sts
☐ 12. K 3, k 2 tog, slip marker, k 8, k 2 tog, slip marker, k 5, turn = 18 sts
☐ 13. K 3, k 2 tog, slip marker, k 7, k 2 tog, slip marker, k 4, turn = 16 sts
☐ 14. K 2, k 2 tog, slip marker, k 6, k 2 tog, slip marker, k 4, turn = 14 sts
☐ 15. K 2, k 2 tog, slip marker, k 5, k 2 tog, slip marker, k 3, turn = 12 sts
☐ 16. K 1, k 2 tog, slip marker, k 4, k 2 tog, slip marker, k 3, turn = 10 sts
☐ 17. K 1, k 2 tog, slip marker, k 3, k 2 tog, slip marker, k 2, turn = 8 sts
☐ 18. K 2 tog, remove marker, k 2, k 2 tog, remove marker, k 2, turn = 6 sts
☐ 19. K 2 tog - repeat 2 more times, turn = 3 sts
☐ 20. Slip st, k 2 tog, pass slip st over = 1 st
☐ 21. Cut yarn leaving a 4” tail and pull through last st
Step 7: Second Square - Section 1 - Blue


Second Square (And all subsequent squares) - Section 1 (Blue)
☐ 1. With 4 mm needle, pick up 18 sts along left side of section 4 of last square, cast on 9 sts, k 18 picked up sts starting at top edge, cast on 27 sts, turn = 54 sts
☐ 2. Knit 9 - place a marker, knit 18 - place a marker, knit 18 - place a marker, knit 9, turn = 54 sts
☐ 3. K 7, k 2 tog, slip marker, k 16, k 2 tog, slip marker, k 16, k 2 tog, slip marker, k 9, turn = 51 sts
☐ 4. K 7, k 2 tog, slip marker, k 15, k 2 tog, slip marker, k 15, k 2 tog, slip marker, k 8, turn = 48 sts
☐ 5. K 6, k 2 tog, slip marker, k 14, k 2 tog, slip marker, k 14, k 2 tog, slip marker, k 8, turn = 45 sts
☐ 6. K 6, k 2 tog, slip marker, k 13, k 2 tog,, slip marker, k 13, k 2 tog, slip marker, k 7, turn = 42 sts
☐ 7. K 5, k 2 tog, slip marker, k 12, k 2 tog, slip marker, k 12, k2 tog, slip marker, k 7, turn = 39 sts
☐ 8. K 5, k 2 tog, slip marker, k 11, k 2 tog, slip marker, k 11, k 2 tog, slip marker, k 6, turn = 36 sts
☐ 9. K 4, k 2 tog, slip marker, k 10, k 2 tog, slip marker, k 10, k 2 tog, slip marker, k 6, turn = 33 sts
☐ 10. K 4, k 2 tog, slip marker, k 9, k 2 tog, slip marker, k 9, k 2 tog, slip marker, k 5, turn = 30 sts
☐ 11. K 3, k 2 tog, slip marker, k 8, k 2 tog, slip marker, k 8, k 2 tog, slip marker, k 5, turn = 27 sts
☐ 12. K 3, k 2 tog, slip marker, k 7, k 2 tog, slip marker, k 7, k 2 tog, slip marker, k 4, turn = 24 sts
☐ 13. K 2, k 2 tog, slip marker, k 6, k 2 tog, slip marker, k 6, k 2 tog, slip marker, k 4, turn = 21 sts
☐ 14. K 2, k 2 tog, slip marker, k 5, k 2 tog, slip marker, k 5, k 2 tog, slip marker, k 3, turn = 18 sts
☐ 15. K 1, k 2 tog, slip marker, k 4, k 2 tog, slip marker, k 4, k 2 tog, slip marker, k 3, turn = 15 sts
☐ 16. K 1, k 2 tog, slip marker, k 3, k 2 tog, slip marker, k 3, k 2 tog, slip marker, k 2, turn = 12 sts
☐ 17. K 2 tog, slip marker, k 2, k 2 tog, slip marker, k 2, k 2 tog, slip marker, k 2, turn = 9 sts
☐ 18. K 2 tog, remove marker, k 1, k 2 tog, remove marker, k 1, k 2 tog, remove marker, k 1, turn = 6 sts
☐ 19. K 2 tog – repeat 2 more times = 3 sts
☐ 20. Slip 1, k 2 tog, pass slip stitch over = 1 sts
☐ Cut yarn leaving a 4” tail and pull through last st
Step 8: Second Square - Section 2 - Green


Second square (And all subsequent squares) - Section 2 (Green)
☐ 1. Use 4 mm needle to pick up 9 sts along top of section 1 & pick up 9 sts along left side of section 3 of previous square
☐ 2. Using 5 mm needles join yarn at top corner of section 3 of the previous square, k 9, place marker, k 9 = 18 sts
* TIP - Knit picked up sts through back loops if this is easier
☐ 3. K 9, place a marker, k 9, turn = 18 sts
☐ 4. K 7, K 2 tog, slip marker, k 9, turn = 17 sts
☐ 5. K 7, K 2 tog, slip marker, k 8, turn = 16 sts
☐ 6. K 6, K 2 tog, slip marker, k 8, turn = 15 sts
☐ 7. K 6, K 2 tog, slip marker, k 7, turn = 14 sts
☐ 8. K 5, K 2 tog, slip marker, k 7, turn = 13 sts
☐ 9. K 5, K 2 tog, slip marker, k 6, turn = 12 sts
☐ 10. K 4. K 2 tog, slip marker, k 6, turns = 11 sts
☐ 11. K 4, K 2 tog, slip marker, k 5, turn = 10 sts
☐ 12. K 3, K 2 tog, slip marker, k 5, turn = 9 sts
☐ 13. K 3, K 2 tog, slip marker, k 4, turn = 8 sts
☐ 14. K 2, K 2 tog, slip marker, k 4, turn = 7 sts
☐ 15. K 2, K 2 tog, slip marker, k 3, turn = 6 sts
☐ 16. K 1, K 2 tog, slip marker, k 3, turn = 5 sts
☐ 17. K 1, K 2 tog, slip marker, k 2, turn = 4 sts
☐ 18. K 2 tog, remove marker, k 2 tog, pass right st over left sts = 1 st
☐ Cut yarn leaving a 4” tail and pull through last st
Square 2 – Sections 3 & 4 are the same as square 1
Repeat second square to complete as many square that are needed to make the scarf the length that you desire.
Step 9: Weaving in Yarn Ends


As I said earlier, the downside of this modular technique is that you end up with a lot of yarn ends that need to be woven in. I am a bit weird and actually enjoy doing this although I know this is not what most people like to do.
I do recommend that you weave in yarn ends as you are making each square so it does not seem as overwhelming a task that it can be if you wait until you are done your project to start doing this.
If you are using most yarns, it is best to use a darning needle with a sharp point. If you are using a yarn like polyester blanket yarn, any suitable size needle is fine.
Work from the wrong side of your squares. Thread the end of your yarn onto the darning needle and run your needle through the middle of each strand of yarn along a row of the same color yarn so it blends in. Try to do this through at least 10 sts.
For yarns like polyester blanket yarn or chenille, do the same except instead for putting your needle through the yarn, you need to weave it in and out along a row of similar color sts.
Remove your darning needle and stretch your knit piece slightly, then cut off the remaining end of your yarn on the back side of your square.
Enjoy your new scarf and amaze your friends with what you created!

Second Prize in the
Fiber Arts Challenge


