

Introduction: Holy Grail Coconut Guy Patsy Costume


My friend made this costume and I thought it was so well done, he let me document it and show describe how he built it.
It doesnt take a lot of skill, but several hours. We had a Monty Python themed Halloween party and he was a big hit.
Patsy (the guy who follows the king around and claps the coconut shells together to make the horse sounds for the invisible horse) is kinda cool. He carries various backpacks, but the one used for the toy, is the king's chair, which will be the main component of the tutorial. He came up with the brilliant concept of making it entirely out of an old styrofoam cooler.
Materials:
styrofoam cooler
wood coloured paint for cooler and brushes
yellow paint in a couple shades for the "sun" heraldry logos on the flag and shirt
straps for the pack (here he used two camera bag straps) a kiddy backpack would work too
leather strips or shoelaces and twine
3 foot 1/4 inch dowel or so for flag pole
toy sword
chest shaped jewelry box
some rolled blankets/leather/furs
medium cardboard box wrapped in medieval looking fabric
old brown sweatshirt to wear
old brown sweatchirt to make the hood or similar material to sew one
old brown pants
socks with toe and heal patterns for indoors, or old beat up boots
loose fitting old white shirt to paint the sun on
scrap of white fabric to paint sun on for the flag
glue/ hotglue
dremel tool or some knives
scissors
screw driver, hacksaw, coconut, string for coconut
drill
Step 1: Step 1 Costume Overview


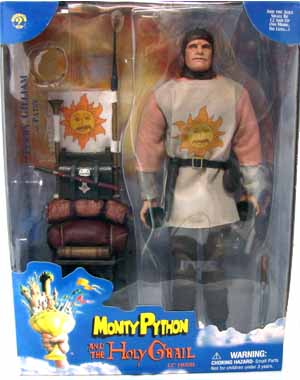
He based the costume on the toy of patsy,
http://craigmusselman.com/eraseme/patsy/doll1.jpg
http://craigmusselman.com/eraseme/patsy/doll2.jpg
since his costume changes constantly in the movie, the broadway play and various internet searches. It features a backpack with king's chair as the base, a ragged flag with the sun, and a ragged overshirt and drab pants. He also wears a rough skullcap.
Step 2: Step 2: the Coconut Clapper


Coconuts are easy to cut in half but messy.
Clamp the inner coconut and use a hacksaw or similar to cut a small cleft in the hard shell about a quarter way down.
Use a screwdriver to hold open the crack over the sink or outside to get the milk out of the inside.
You can then clamp it again and cut the rest of the way through.
Use a drill, screw, or large nail to put a hole in the ends of each half.
Put string or leather straps about 3 feet long and knot the ends so you can hang the coconuts on the backpack when you get sick of carrying them at the party.
Step 3: Step 3: Flag and Shirt Sun Logo Heraldry


The backpack and his overshirt have the same sun logo on them for the hearldry of the king.
They are hand drawn looking in the movie, so you can do them fairly basically. Just take a small brush and do the outline, then fill in with yellow. You could use some markers to do this step, or do an iron on transfer. Here it was just painted.
Cut out the flag with ragged ends, and leave enough gap, to hot glue it around the flagpole dowel on the backpack.
paint the sun on it.
repeat for the overshirt.
Step 4: Step 4: the Clothes.
Here we just used some oversized regular clothes from a thrift store.
Use scissors to hack up the ends of the sleeves of the white overshirt to the length shown with a brown sweatshirt underneath.
you can get it dirty dusting the house or doing some gardening in it, or let some kid wear it to play in.
The pants can have a few holes.
He didnt want to wear boots in the house, so he put some nice thick socks on his feet, that had contrasting toes and heels
His skullcap was actually the armpit of a second sweatshirt we found last minute. cut it off mid sleeve and at the shoulder.
Cut earholes once you have it on. You can stitch it up or hot glue it to fit to size.
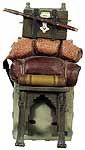
Step 5: Step 5: the Backpack. Featuring the King's Chair


http://craigmusselman.com/eraseme/patsy/doll1.jpg
I gave him a brilliancy prize for this construction. The chair is completely just the base and lid of an old styrofoam cooler.
Glued at right angles.
Take the cooler upside down, and cut out the zigzag pattern on all four sides.
Use a dremel tool or various knives to cut in a bit of a rough hewn wood stripes to make it look hand carved.
Use craft/latex/acrylic paint to cover the styrofoam a nice weathered wood colour of grey/brown.
He only had to make this last a few hours so he just glued the lid to the base, but you could do various pegs reinforced inside, or even duct tape in a pinch.
The flag pole goes through one side (drill holes in the lid and base) and glued or taped on.
The sword was just strapped on with leather strips through holes in the lid.
To make the backpack straps, he just used 2 camera bag straps tied on with twine. You could use a kiddie backpack strapped or glued on as well. A nice set of thick leather strips or leather belts would be good looking too.
Make sure the pack sits above your butt level so it sits nice. Try on a real back pack to see where it should sit and then duplicate that if you arent a backpack wearing kinda guy normally.
Optional waist strap could be added to fit.
Take the medium box, cover it with some medievalish rough fabric or leather and strap it to the lid with string through drilled holes.
Roll up some leather/fabric to make some bedroll looking items and put some strips around them to keep them rolled and then drill a few holes in the lid and tie on with twine or leather strips.
Add some other accessories if you want.
Step 6: Step 6: the Monty Python Party We Had.


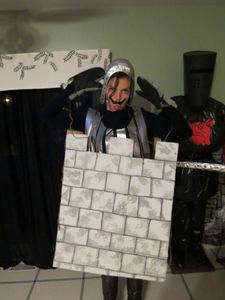


We had lots of fun costumes. The host had a fake wall to take pictures behind from the final scene (with the insulting french knights). We surrounded the house with plastic fake stone wallpaper, we had a full size black knight and lots of the accessories featured in the movie that the host made.

Participated in the
Halloween Costume Contest


