

Introduction: CNC Padded Jewelry Boxes


The frantic activity around the the holiday season (you would think that with a full 12 months notice it would be less so!) leaves very little time for making gifts. This year I managed to find the time and made jewelry boxes from wood boards. The boxes have an inlaid brass plate which are personally engraved to add a touch of personalization and old world charm. The interior is lined with thick felt, covered with patterned fabric to give the boxes a luxurious feel, and provide a soft protective surface for the jewelry. Your jewelry deserves a padded and protected environment, just like it's owner does!

I made two jewelry boxes so for some pictures you will see a circular jewelry box, others a wine shaped box. The process for constructing both boxes is the same.

Fair warning :- I used a homemade DIY CNC Router for this project. This also meant that I needed to use a CAD and CAM program to create the individual parts that make the jewelry boxes. I fully realize that this level of tooling is beyond the reach of most, but I have the tools and like to use them.You can replicate this project with hand tools.
Step 1: Basic Construction


The jewelry boxes are constructed from 3/4" thick poplar boards so multiple levels are required to create an internal cavity of sufficient volume to hold jewelry. The base and the core are glued together to create the box and the lid encloses and protects the contents. The following animation shows the 3 key parts of the assembly - the base, the core and the lid. The base and the lid are hollowed out using a pocketing operation on a DIY CNC router, which is a lot quicker and more accurate than a hammer and chisel. However, if hammer and chisel are all that you have, then working with care will result in the same outcome.

The boxes are sanded smooth and stained or painted depending on your preference. The insides are lined with a fabric/felt layer. They are personalized by engraving a small brace plate which is inset into a recess on the lid.
Step 2: Tools and Supplies


- 6"x1"x8' Poplar board. This will get cut down into pieces long enough for each of the individual parts that make up the jewelry boxes.
- 5/8x1/8x6" brass bar for custom nameplates
- 1 Yard of fabric. Any pattern. This is a personal choice.
- 1 Yard of thick felt. I used the felt as padding underneath the fabric to give a thicker more luxurious feel.
- 1 x Sheet Poster Board - used to create the form work for the padding
- Utility or Xacto knife for cutting the poster board and fabric
- Scissors
- Straight edge/ruler to assist in cutting straight lines and for measuring
- CNC Machine with 1/4" Router Woodcutting End Mill and an engraving bit
- Hacksaw for cutting the brass nameplates to size
- File for shaping the brass nameplates to fit the pocket in the lid
- 1000 or 1200 Fine sandpaper for removing slight scratches from the brass prior to polishing.
- 120 or 200 Grit sandpaper for smoothing the jewelry boxes. The more coarse the grit, the darker the stain will be as the stain penetrates the wood deeper.
- Metal polish for final polishing of the brass nameplates. I used Meguiar's Finishing Polish
- Wood clamps for the glue-up
- Wood stain. I used MinWaxDark Walnut. The smallest can you can find will be plenty.
- Small 1" chip brush to apply the stain
- A clean lint free cloth to remove excess stain from the surface of the wood.
- Measuring tape
If you have access to a CAD program, you can model your own unique design. I used Cubify Design CAD software, converted to gcode with CamBam and used Mach3 for the actual CNC machine control. All of these software packages cost money but you can get everything done with freeware using Freecad.org and LinuxCNC.org. I have built my collection of tools and software up over many years. If I sit and look at my worksapce objectively, I have a lot of tools, but the weird thing is that I am always finding that I don't have the tools I need for a particular project, which usually means that I will improvise until the need for the tool dissipates, or the budget allows for purchase of the tool. Anyway, I digress - we have work to do.
Step 3: 3D Modeling


I use software from 3D Systems called Cubify Design for all the design work. This software follows the Solidworks parametric user interface paradigm. It is not as sophisticated as Solidworks, but for a hobbyist, this is a really good piece of software. The only downside I found is that it will only export STL files. Great for 3D Printing, but not so good for interchanging data with other CAD systems. 2D drawings can be exported from Cubify as DXF which is what I use to do the CAD - CAM conversion.
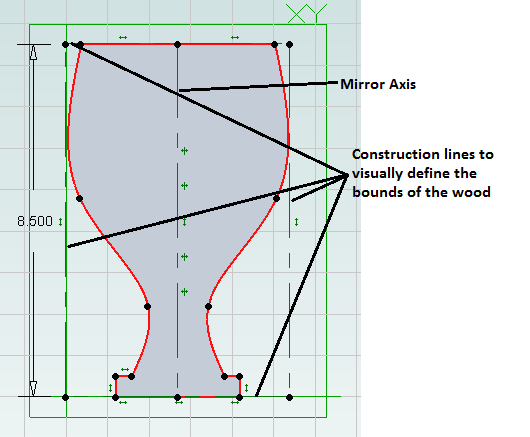
To create a model, first draw the outline of the object (called "sketching" in most 3D CAD programs), then extrude it to the require thickness. In my case, the outline is that of a wine glass sketched using splines to give the smooth shape. To ensure symmetry of the design, it is better to sketch the left half, and then use the "mirror" feature to mirror the sketch to the right side.

Once the first sketch is complete, this gets extruded to 5/8" thick.
The next step is to create a pocket in the lid to increase the internal cavity space of the final jewelry box. Draw another sketch at a 0.375" offset from the edges and use the "extruded Cut" tool to remove material to a depth of 3/8". This leaves a remaining lid thickness of 0.25" which is plenty.

The next step is to create the ridge that fits the lid to the box and prevents the lid from sliding. This is done by creating a set of lines and then extruding them 1/8" from the surface which brings the top surface of the ridge to 0.75" which is the the thickness of the polar board.

The pocket for the nameplate is cut into the front side of the lid. The sketch is cut into the lid 1/8" to match the thickness of the brass stock.

The final step is to filet the edges to match the radius of the cutting tool. This ensures that inside and outside corners match properly on the final jewelry box. I forgot this on the one I made.... so had to make adjustments with a file and chisel. For the round jewelry box, this is not an issue.
The modelling of the core and bottom is similar. I have added the the Cubify CAD files to this step.

Step 4: From CAD to CAM


Once the 3D model is complete, the model needs to be converted to g-code. G-code is the language that the CNC controller understands. In it's most basic form, the language is processed one line at a time by the CNC controller which sends movement commands to the cutting tool in 3 axis. G-code is human readable and writeable, but there is a lot of complexity getting a manually written program to do the right thing. Fortunately, this task has been largely automated by CAM software which will assist humans in the creation of g-code. The CAM software I used is called CamBam. It will take a 2D drawing, and allow you to define the cutting action for each line in the drawing.
To get to a 2D drawing, the Cubify Design software will automatically create a 2D drawing from your 3D model. This drawing is then saved as a DXF file and then imported into CamBam.
In CamBam, each line has to be processed according to your need. For example, the following image shows the innermost line highlighted in red. This line is the border of the area within the top that will be removed by milling a pocket to the depth specified. The CAM software has built in algorithms that understand what code needs to be generated in order to remove all the material from the inside of the line. Doing this by hand would be a massive chore involving many move commands.
Use of the CamBam software is best understood following the tutorials on their web site. I have provided the resulting g-code for your use.
Step 5: From CAM to CNC


Now that we have the g-code files, all we need to do is load the wood into the CNC machine, load the g-code into the CNC Controller Software for which I use Mach3, and let it rip. It sounds easy but there is a lot of alignment and setup you need to go through. The most important thing is to ensure that the workpiece matches the extent of the cutting tool, so that you don't end up cutting air, or worse, start cutting into your hold downs or work surface (not that that ever happens to me!).
Step 6: From CNC to Assembly


After all the parts are cut out, it's time for assembly. The assembly step is simply to glue the base and the core together, Any wood glue will work here. I used Elmers Wood Glue which claims to be stainable. This is handy if you have a small amount of squeeze out that you don't notice. It is better to clean up the squeeze out as thoroughly as you can using a damp rag before the glue sets. Once set, the only way to get it off is to sand it which is hard work even if the glue manufacturer claims that it's "sandable". The glue gets into the fibers so a lot of sanding is required.
Step 7: Brass Nameplates


The brass name plates are engraved on the CNC. I made both names on the same length of brass and then used a hack saw and file to fit each one into the recess milled into the lid. This is a trial-and-error process accomplished using sandpaper, files and patience. It would have been quicker had I machine the parts completely on the CNC machine. The engraving tool was a 0.005" V bit which enables very fine features to be engraved.
The brass nameplates can be polished with a suitable metal polish. I used Meguires Metal Finishing Polish after sanding with 1200 grit sandpaper. Worked just fine.
Step 8: Staining


Staining is a very messy business. The stain gets on everything and is difficult to remove so use gloves and clothes that you don't mind discarding. I used Minwax Dark Walnut stain applied with a paintbrush. The process is very simple - apply the stain to the wood for 5-10 minutes and then wipe it off with a clean rag ( an old t shirt works best) when you have a color close to what you think is right. The longer you leave the stain the darker your wood will be but avoid letting the stain dry because you will end up with a sticky coating on the wood that is difficult to deal with. Stain can be reapplied to further darken the wood after a certain time - follow the instructions on the side of the can of stain. All the manufacturers of stains have a slightly different set of rules to get the best results. Stains require drying time after which you can apply polyurethane or acrylic coating to protect your project. I used water based poly acrylic because it is low VOC.
Step 9: Lining the Insides


The lining consists of a layer of poster board to which a layer of thick felt is glued. This is then covered with a layer of fabric.
Start by printing out a 1:1 scale of the 2D file which is attached here as a PDF file. Tape the page to the poster board and then using a pair of scissors or sharp knife, cut the shape out and transfer the shape to the felt using a piece of chalk as shown. Cut the shape about 1/16" inside the lines so that the poster board is smaller than the insides of the jewelry box. This will avoid it bulging up when you finally install the completed lining. Then cut the felt to shape and glue it to the poster board. I used Elmers glue for the first jewelry box but it takes a long time to dry. Hot glue is much faster so this was used for the round box.
Then cut a piece of fabric roughly 1/2" larger than the poster board/felt glue-up. Using the hot glue, fold the edges of the fabric over the edge of the board and glue them down. Take care to ensure that you avoid bunching on the visible side of the liner. Cut little darts into the fabric particularly around the curves to keep the front looking as good as possible.
Then cut a long 1" strip of poster board for the sides. Do a trial layout inside the jewelry box to get the right length and then repeat the process of a felt layer followed by a fabric layer. Don't worry too much about the back side as this will be against the wall of the jewelry box.
Then place the large shaped lining in the bottom of the jewelry box. You can use some hot glue to keep it in place but I didn't find it necessary. The long strip is then hot glued to the side. Take special care where the ends join - you want to fold over the fabric on the one end to make it nice and neat.
.

Step 10: Conclusion


All that's left to do is giftwrap and present to the recipient. You could of course fill the jewelry box with a fine jewelry selection to make it that much more special.

Runner Up in the
3D Design Contest

Participated in the
Homemade Gifts Contest

Participated in the
Wood Contest


