

Introduction: Paper Sundial Kits


A sundial can track the Sun's movement throughout the day and year, turning it into a clock, compass, and calendar. There are many types of sundials from relatively simple ones to ones that are quite complex.
My intent is not to teach you about these sundials and how they work but I want everyone to be able to enjoy making a sundial that will actually work. If you would like to learn more about a wide variety of sundials then I invite you to visit my web site. There you will find information on how to design and build many different sundials. The link to my site is provided in the last section of this instructable.
I have put together a number of universal paper sundial kits. No fancy mathematics is required to build these sundials. All you have to do is print the pdf file snd start building. Some of the sundials are quite easy to assemble but there are a couple that are a challenge. All are possible as can be seen from the models above.
The kits are available in models for both the Northern and Southern Hemispheres. All you need are scissors, glue and a "little" patience. Try them all!
Many of these sundials are illustrated with a 3-dimensional drawing that was created using an older version of AutoCAD. Once the sundial was drawn a light source was defined. This light source simulated the sun. To do this a latitude and longitude were entered to position the sundial anywhere in the world. A month, day and time were selected. The sundial must be positioned correctly in order for the sun to illuminate it as if it were in its actual location. The 3-dimensional drawing is then rendered. This process gives the drawing a photo-like finish. It also projects a shadow on the sundial that appears as it would if you were looking at a real sundial. In every case the time shown on the sundial images matched the time that was entered.
All of these sundials indicate local apparent or solar time when positioned correctly. To convert this to clock time a couple of corrections need to be applied. These corrections are discussed in a later section as well as the graphs I created that make this easy to do. Information is also provided on how to position the sundial correctly.
There are paper sundial kits available below for 21 different types of sundials: Equatorial Sundial, Polar Sundial, Cycloid Polar Sundial, Cross Sundial, Equatorial Ring Sundial, Star Sundial, Horizontal/Analemmatic Sundial, CD Sundial, Gnomon-less Equatorial Sundial, Universal Analemmatic Sundial, Digital Equatorial Sundial, Standard Time Equatorial Sundial, Globe Sundial, Universal Ring Sundial, Pinwheel Equatorial Sundial, Universal Horizontal Sundial, Universal Foster-Lambert Sundial, Universal Bifilar Sundial, Standard Time Equatorial Ring Sundial, Universal Hours Before Sunset Sundial
The number of models is more extensive.
I hope that you will enjoy making some of these models and learn just a little more about sundials along the way.
Supplies
Tools
The following tools are needed to complete the most complex paper sundial kit, with the simpler ones requiring fewer:
- Printer: to print the sundial kit pdf file at full scale.
- Scissors: very sharp and not too large to manage some of the small cuts.
- Exacto knife: for the cuts too difficult for the scissors.
- Utility knife: for cutting styrofoam.
- Wire cutters: for cutting wire coat hangers.
- Hack saw: for cutting threaded rod and wire coat hangers.
- Metal file: to remove sharp points from coat hanger and threaded rod after cutting.
- Cutting board: to protect the surface where cutting will take place.
Materials
- Paper: 8.5" by 11" regular and card stock. Card stock is required for some models as the 20 lb. printer/copier paper is too light in some cases.
- Clear printer transparency: for the Digital Equatorial Sundials and Standard Time Equatorial Ring Sundial.
- Clear vinyl sticker paper (optional): to laminate the cutouts for some of the more complex sundials.
- Craft glue: for gluing the paper together and to the syrofoam if no lamination is used.
- Cotton swabs: for applying glue.
- Silicone adhesive: for adhering laminated paper to styrofoam.
- Wire coat hanger: for making gnomons. One should be enough but make sure it is straight and not all bendy.
- 1/4" threaded rod (or smaller), nuts, washers: to make the adjustable bases for the sundials made with styrofoam.
- Drinking straw: and option for gnomons.
- Wood dowel: 1/2 inch dowel is needed for the PInwheel Equatorial Sundial.
- Styrofoam: 1/2 inch blue or pink and not the white flaky stuff.
- Cellophane (Scotch) tape: for taping stuff down.
- Metal foil duct tape (optional): comes in 2" wide rolls that will be cut down to a 1" width. This is used to finish the edges of the cut styrofoam and some flat areas just to make it look better.
- Thumb tacks: to hold things in place.
- Paper clips: also to hold things in place.
- 6" diameter styrofoam ball: for the Globe Sundial. This may be tricky to find but a craft store should have these available.
- Black (or other colour) paint or stain: to colour the styrofoam ball for contrast if it happens to be white. Be careful as some spray paints will eat the styrofoam.
Step 1: Modeling Tips and Techniques
While making these paper sundial models I learned a few things that just may help you when you make yours. Remember that these are only my suggestions. You may find some other ways that make bilding these sundials easier.
- DO NOT RUSH! The quality, and as a result accuracy, of your sundial model is directly proportional to the time and effort you put into making it.
- There are not very many instructions but if you find some please read them. They are there to help you and some are a result of the mistakes I made. I don't want them to happen to you.
- Print all the pages at full (100%, 1:1) scale. If you print to another scale make sure that you print all the pages of the kit at the same scale. Do not use "Fit to Page".
- Print the kits on a heavier weight paper like card stock. Ordinary paper is too light and the models may not hold their shape. The small sundial kits, such as for the cross and star sundials, can be made from ordinary paper and can be shaped quite well.
- Cut all the parts out very carefully. With a good pair of scissors you can easily follow all the lines. If a tag is lost when cutting a part out write it on the back. It may help later during assembly. Save the cut offs as you may be able to use them to reinforce joints if necessary.
- Fold all the parts along all the fold lines. Folding thicker paper like card stock can be a little tricky. Most of the folds are mountain folds and the fold line will be visible when the fold is complete. There are very few valley folds. To get an accurate fold, I start every fold as a valley fold. You will need a 6-inch plastic ruler. Align the ruler with the fold line. You will learn very quickly where to position the ruler for a good fold. Fold the paper up against the edge of the ruler until it stands straight up. This creates a valley fold that can be folded further to make a sharp edge. Check to make sure that the fold will be on the line. If you want a mountain fold remove the ruler and flatten the fold. The paper is now broken along the fold line and can be folded over following the line. The fold can be adjusted slightly, if required, by pushing with your thumbs. This technique will result in pretty much perfect fold lines.
- You are almost ready to glue. Before you start to glue the parts together try to dry fit them as you go along. This will help you to find the best sequence to use for assembly.
- Now you are ready to glue. I use an inexpensive mucilage glue. This glue comes from the seeds, bark or roots of various plants by making an infusion in water. The container may have a rubber top applicator. Do not use this unless you are gluing two large pieces of paper together. The only problem with this glue is that it shrinks as it dries and this may result in the paper warping. I find that once the glue and paper is completely dry you can work out most of the warps. Try applying glue to large areas in spots instead of spreading it over the entire area. For gluing together large pieces use a no wrinkle rubber cement. It works very well.
- To apply the glue use cotton swabs, which are small plastic or paper sticks with a bit of cotton applied to each end. This makes it very easy to control the amount of glue you apply to a part. If a lot of glue is applied it is easy to slide the two parts together to make alignment adjustments. A little glue will result in the parts sticking together more quickly and adjustment may not be possible. You will learn very quickly how much glue is the "right" amount of glue.
- Do not release the parts until the glue has set and do not go on to the next joint until the last one is securely fixed. This does not take a long time but if you hurry a joint will slip and set in the wrong position. Bad joints are usually hard to take apart without causing damage.
- Have patience and in no time your sundial will be complete and ready for use.
IMPORTANT: Spin a nut on the threaded rod before cutting and filing. When the nut is removed it will restore the threads on the rod. Otherwise you probably won't be able to get the nut on due to damaged threads.
Each step contains links to the pdf files for the particular sundial kit. They are labelled for the Northern and Southern Hemispheres so you can select the appropriate kit for your location.
Step 2: Equatorial Sundial Kit

Equatorial Sundial: a dial in which the dial plate is parallel to the equatorial plane and the polar-pointing gnomon is perpendicular to it.
The equatorial sundial is a universal dial and can be used anywhere in the world. All you have to do is position it correctly and it will tell you the time. The equatorial sundial is also used to draw a number of other sundials including horizontal, vertical and polar sundials. It is quite easy to make as the hour lines on the sundial are placed at intervals of 15° for every full hour.
The equatorial sundial is a very important sundial that can teach you many things and everyone should have one. Figure 1 shows the Kit that you will use to make your own equatorial sundial. There is another page that has the very easy to follow instructions.
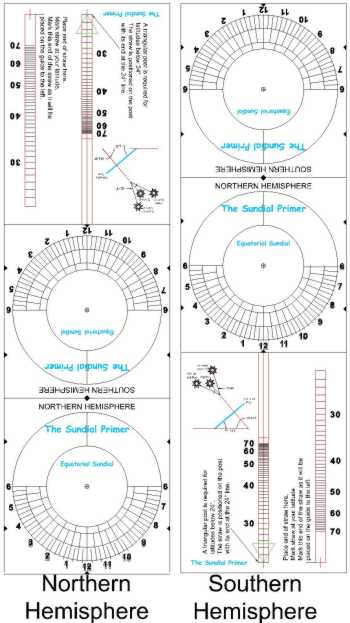
Figure 1: Equatorial Sundial Kit (CAD)
The sundial is designed so that you can build one for the Northern or Southern Hemisphere. The dial is a lot of fun to make and would be a great science project.
If you think that the sundial is too large or that it takes too many sheets of paper I have two more kits for you. This next file has small and smaller equatorial sundials. Your challenge will be to find a gnomon with a small enough diameter that the shadow is not too large. You will still need the large sundial kit if you want the instructions.
When you have completed the sundial all you have to do is set up and it will tell you solar time. Figure 2 shows you just how easy this is. All you have to do is point the gnomon to the north or south celestial pole. Because the dial plate of your equatorial sundial represents the equator the sun will be above it for half the year and below it the other half. The sun's position depends upon which hemisphere you live in. Summer in one - winter in the other. Now you can see why there is an upper and lower dial face.
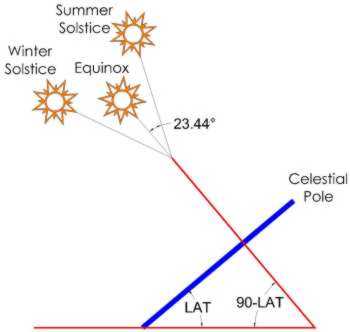
Figure 2: Equatorial Sundial (CAD)
An equatorial sundial will show the time between sunrise and sunset throughout the year. Find the earliest time of sunrise and the latest time of sunset for your location. You can use the "Dialling Buddy" for this. Using a compass and ruler you can draw additional morning and evening hour lines and customize your sundial for your location. You don't even have to measure any angles. Remember that the upper dial face will show more hours than the lower. Do this before you cut out the dial.
Here's what the sundial will look like once you have finished making it. There are two different sundials shown below. They are both positioned for a latitude of 40° but one is in the Northern Hemisphere and the other is in the Southern Hemisphere. You can see the shadows of the two equatorial sundials at different times of the year.

Northern Hemisphere - June - 1:00 P.M.
.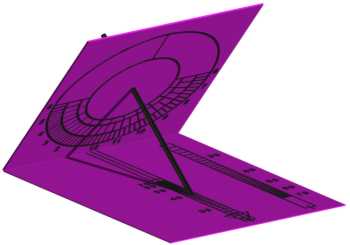
Southern Hemisphere - June - 1:00 P.M.
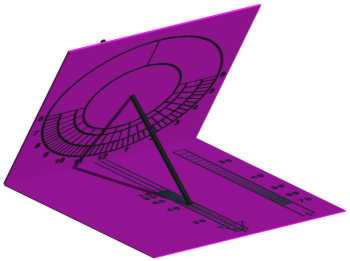
Northern Hemisphere - December - 11:00 A.M.

Southern Hemisphere - December - 11:00 A.M.
This sundial is very easy to build and a lot of fun to use.
Step 3: Pinwheel Equatorial Sundial KIt

Equatorial Sundial: a dial in which the dial plate is parallel to the equatorial plane and the polar-pointing gnomon is perpendicular to it.
The equatorial sundial and how to set it up is described in another kit and will not be repeated here.
This equatorial sundial is slightly different than one that uses a narrow gnomon and where the time is read at the centre of the shadow. The gnomon for this sundial is quite wide and the hour lines are laid out so the time is read using only one edge of the gnomon's shadow. The typical equatorial sundial has the hour lines originating from one point. The hour lines of this sundial are tangent to the circumference of the gnomon. Because of the way it appears, it is called a pinwheel equatorial sundial. Figure 1 shows the Kit you will use to make your own pinwheel equatorial sundial.

Figure 1: Pinwheel Equatorial Sundial Kit (CAD)
The sundial is designed so that you can build one for the Northern or Southern Hemisphere.
Pinwheel Equatorial Sundial Kit
When you have completed the sundial all you have to do is set up and it will tell you solar time.
Here's what the sundial will look like once you have finished making it. It is positioned for a latitude of 40° in the Northern Hemisphere. You can see the shadows of the equatorial sundial at different times of the year. Note that the time is read using the edge of the gnomon's shadow. This edge comes from a different part of the gnomon throughout the day.

Northern Hemisphere - June - 1:00 P.M.

Northern Hemisphere - December - 11:00 A.M.
This sundial is very easy to build and a lot of fun to use.
Step 4: Polar Sundial Kit
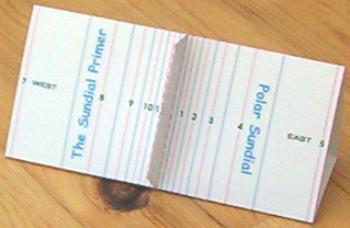
Polar Sundial: is a sundial in which the dial plate is set along the East-West direction and inclines so that it is parallel with the polar axis. The standard polar pointing gnomon is thus also parallel to the dial plate.
The polar sundial is a universal sundial and can be used anywhere in the world. All you have to do is position it correctly and it will tell you the time. The hour lines for this sundial are not laid out quite as easily as those of an equatorial sundial. Their spacing varies with time.
Figure 1 shows the Kit that you will use to make your own polar sundial. This Kit is actually easier to assemble than the Equatorial Sundial Kit. Follow the few simple instructions and you're done.

Figure 1: Polar Sundial Kit (CAD)
Polar Sundial Kit: Northern Hemisphere ............ Polar Sundial Kit: Southern Hemisphere
When you have completed the sundial all you have to do is set up and it will tell you solar time. Figure 2 shows you just how easy this is. All you have to do is point the gnomon to the north or south celestial pole. Make sure that it is perpendicular to the dial plate.

Figure 2: Polar Sundial (CAD)
Here's what the sundial will look like once you have finished making it. It's located in the Northern Hemisphere and positioned for a latitude of 50°.

Northern Hemisphere - September - 2:00 P.M.
This sundial is very easy to build and a lot of fun to use.
Step 5: Cycloid Polar Sundial Kit

Cycloid Polar Sundial: a variation of the standard polar sundial in which the gnomon has a cycloid shape, with the result that the hour lines are equally spaced.
The cycloid polar sundial is a very cool sundial. Because of the special shape that the gnomon takes on, a cycloid, the hour lines on the dial plate are equally space. Just like the polar sundial this sundial is universal and will work anywhere in the world.
The cycloid is a very interesting shape and you can visit The Sundial Primer to find out how it is created.
Figure 1 shows the Kit that you will use to make your own cycloid polar sundial. Just print it out on card stock or glue it on to cardboard. Cut it out very carefully with scissors. Follow the few simple instructions and you're done. You can construct a couple of cardboard right angled triangles that can be glued to the gnomon and the dial plate at the centre of the sundial. This will help to hold the gnomon in a vertical position. Styrofoam triangles would work well too. The joint line on the dial plate should be reinforced by gluing a strip of cardboard on the back.

Figure 1: Cycloid Polar Sundial Kit (CAD)
When you have completed the sundial all you have to do is set up and it will tell you solar time. This sundial is set up the same way as a polar sundial.
Cycloid Polar Sundial Kit: Northern Hemisphere
Cycloid Polar Sundial Kit: Southern Hemisphere
Here's what the sundial will look like once you have finished making it. This one is located in the Northern Hemisphere and positioned for a latitude of 50°. It is important to note that the gnomon lies in the equatorial plane. As a result the sun spends half the year above the gnomon's plane and the other half below. This is illustrated by the position of the shadows.

Northern Hemisphere - June - 4:00 P.M.

Northern Hemisphere - December - 11:30 A.M.
Step 6: Cross Sundial Kit

Cross Sundial (or cruciform or crucifix dial): a dial in the form of a cross, usually of stone, with the "front" surface of the cross parallel to the equatorial plane, and the top pointing south. The side surfaces of the cross can each form a dial plane, with its gnomon being a corresponding edge of the cross itself. Usually found as churchyard memorials. Rare. Portable cross dials have a long arm parallel to the polar axis and the short arm E-W.
The cross sundial is a universal sundial and can be used anywhere in the world. All you have to do is position it correctly and it will tell you the time. The cross sundial actually consists of three sundials that include:
- A polar sundial.
- A vertical direct east sundial.
- A vertical direct west sundial.
Figure 1 shows the Kit that you will use to make your own cross sundial. This Kit is a little more complex to assemble but with care and patience it can be done without too much difficulty. Just follow the instructions.

Figure 1: Cross Sundial Kit (CAD)
Cross Sundial Kit: Northern Hemisphere
Cross Sundial Kit: Southern Hemisphere
When you have completed the sundial all you have to do is set up and it will tell you solar time. Figure 2 shows you just how easy this is. All you have to do is point the gnomon to the north or south celestial pole. Now where is the gnomon? There are actually 6 separate styles or shadow casting edges. Can you find them? Each one will cast a shadow for a three hour period and only one will cast a shadow at any given time.

Figure 2: Cross Sundial (CAD)
Here's what the sundial will look like once you have finished making it. This one is located in the Northern Hemisphere and positioned for a latitude of 50°.

Northern Hemisphere - June - 11:30 A.M.

Northern Hemisphere - July - 7:00 P.M.
Step 7: Equatorial Ring Sundial Kit
Equatorial Sundial: a dial in which the dial plate is parallel to the equatorial plane and the polar-pointing gnomon is perpendicular to it.
The equatorial ring sundial is a universal sundial and can be used anywhere in the world. All you have to do is position it correctly and it will tell you the time.
The equatorial ring sundial is a modified equatorial sundial. The equatorial sundial has a flat upper and lower dial plate where the hour lines are positioned. The time is read from the upper plate for half the year and the lower plate for the other half. The equatorial ring sundial has a narrow band where the hour lines are positioned. The time is read from this band throughout the year.

Figure 1: Equatorial Ring Sundial Kit (CAD)
You will have a lot of fun putting this sundial kit together. It is made in three separate parts; the gnomon, the dial plate and the base. Once these parts are ready they are assembled to complete the sundial.
When you have completed the sundial all you have to do is set up and it will tell you solar time. The compass directions on the sundial pretty much tell you how it has to placed.
Equatorial Ring Sundial Kit: Northern Hemisphere
Equatorial Ring Sundial Kit: Southern Hemisphere
Here's what the sundial will look like once you have finished making it. This dial is positioned for a latitude of 50° in the Northern Hemisphere.

Northern Hemisphere - June - 11:30 A.M.
.
Northern Hemisphere - February - 4:30 P.M.
Step 8: Star Sundial Kit

Star of David Sundial: a monumental dial similar in concept to the cross dial, except that the six-pointed star with 60° angles gives opportunities for numerous dials.
The star sundial is a universal sundial and can be used anywhere in the world. All you have to do is position it correctly and it will tell you the time. The star sundial actually consists of any number of polar sundials.
This particular star sundial is called the Star Of David sundial. It has six points and twelve sides. Each point of the star is an equilateral triangle, with all three sides being equal, and as result each side will indicate the time for two hours before the shadow moves to another side. There will never be a shadow on more than one side at a time.
If the star sundial were located beyond the Arctic or Antarctic Circle, where the sun would illuminate it for 24 hours a day during periods of the year, hour lines would be shown on all the sides. In the case of the Star of David sundial each side would indicate the time for two hours (2x12=24 hours) with all sides being illuminated during the day. The edge of each point would cast a shadow on two specific sides.
Figure 1 shows the Kit that you will use to make your own star sundial. This Kit is a little more complex to assemble but with care and patience it can be done without too much difficulty. Just follow the instructions.

Figure 1: Star Sundial Kit (CAD)
When you have completed the sundial all you have to do is set up and it will tell you solar time. Check out the cross sundial for instructions on how to install your star sundial. It's exactly the same.
Star Sundial Kit: Northern Hemisphere
Star Sundial Kit: Southern Hemisphere
Here's what the sundial will look like once you have finished making it. This one is located in the Northern Hemisphere and positioned for a latitude of 50°.

Northern Hemisphere - June - 11:30 A.M.

Northern Hemisphere - July - 7:00 P.M.
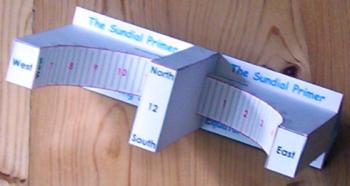
Step 9: Horizontal/Amalemmatic Sundials Kit
Horizontal Sundial: the common or garden sundial with a horizontal dial plate and polar-pointing gnomon.
Analemmatic Sundial: sundials consisting of hour points (rather than hour lines) laid round an ellipse, and a movable gnomon perpendicular to the dial plane. It may be on any plane, but the most usual form is horizontal. In the horizontal version of the dial, gnomon position lies on the straight North-South minor axis, at a point determined by the sun's declination (i.e. the date). The analemmatic dial may be regarded as a projection of the universal equatorial ring dial.
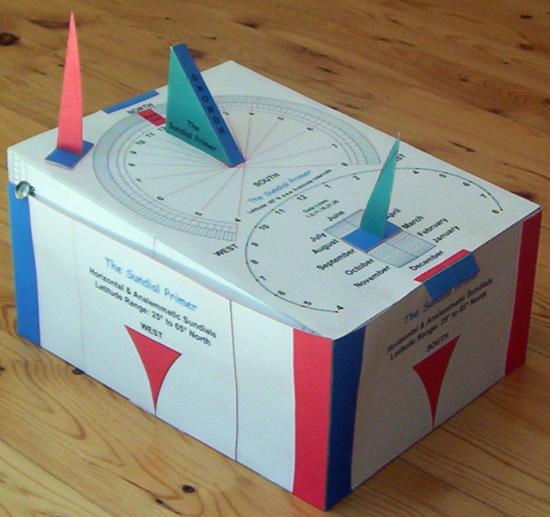
The combination horizontal and analemmatic sundial presented here is a very useful sundial. The sundial is self orientating and can be used to find the true north-south line. This is done very easily by turning the dial plate until both sundials read the same time. Now you can align your other sundial models!
Figure 1 shows the Kit that you will use to make your own combination horizontal/analemmatic sundial. The dial plate of this sundial is designed to fit on an 8-1/2" by 11" sheet of paper. It is purposely made as a large as possible so the hour lines and points can be drawn at 5-minute intervals. This allows for a more accurate setup. The sundials are designed for a latitude of 45° but the dial plate can be adjusted over the latitude range of 25° to 45° by raising the north or south end. As a result there are many pieces to the sundial but it is not difficult to put together.
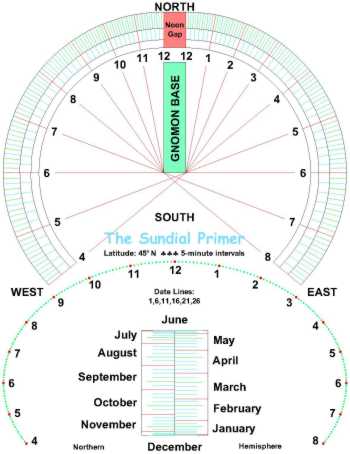
Figure 1: Horizontal/Analemmatic Sundials Kit (ZW2000/CAD)
When you have completed the sundial all you have to do is set up and it will tell you solar time. To set up the sundial for your latitude first determine if you must raise the north or south end of the dial plate. This is easily done by looking at the latitude scales. Place thumb tacks at your latitude on the scales. This will help to keep the dial plate from moving down. The tab at the opposite end of the dial plate will hold it at the top of the box. The dial is self orientating and all you need to do is rotate it until both the horizontal and analemmatic sundials read the same time.
When the sundial is correctly set up you can mark the north, south, east and west points using the arrows on the side of the box. You now have the true north-south or local meridian line as well as an east-west line. These can be used to set up all the other paper sundial kits you make as they all indicate solar time.
Here's what the sundial will look like once you have finished making it. This one is located in the Northern Hemisphere and positioned for a latitude of 50°. The pictures are intended to help you see the two parts of the sundial.

Northern Hemisphere - August 7

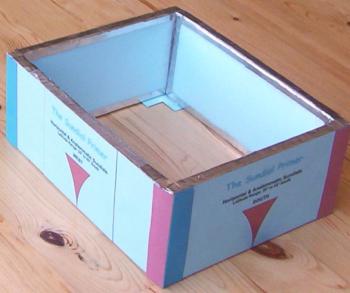
Outer Box: Direction Markers
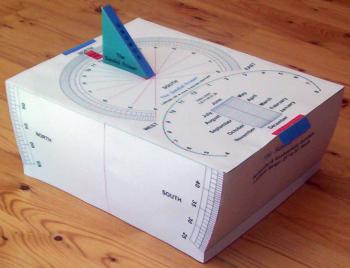
Inner Box: Latitude Scales & Dial Plate
Horizontal/Analemmatic Sundials - Completed Model
Horizontal/Amalemmatic Sundials Kit: Northern Hemisphere
Horizontal/Amalemmatic Sundials Kit: Southern Hemisphere
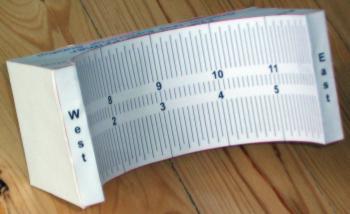
Because this sundial is so useful designs have been developed for a more rugged model. These models use laminated paper and rigid styrofoam board for the construction materials. It is very easy to build.
Horizontal/Amalemmatic Sundials Kit: Northern Hemisphere
Horizontal/Amalemmatic Sundials Kit: Southern Hemisphere
The following photographs show the completed styrofoam model. Check the fit of the outer box before gluing the sides together to ensure the inner box is not too loose or tight. Small adjustments can be made at this point that will be difficult after all the parts are glued. Note that the gnomon for the analemmatic sundial can be oriented in any direction. Only the vertical edge needs to be positioned on the centre line of the date scale and on the correct date line.


Step 10: CD Sundial Kit

Refraction Sundial: a dial invented in 1999 by M. Catamo & C. Lucarini. It has no gnomon, but the sundial consists of a circular diffraction pattern which forms a bright, multicoloured diametrical line pointing at the Sun when viewed perpendicularly to the centre of the dial plate. Horizontal, altitude and equinoctial versions are possible. The dial plate is usually made from a CD 9 Compact disc), hence "CD dial".
Diffraction Grating: a plate with a set of closely spaced slits (usually parallel and equi-distant), which disperses incoming light into its constituent wavelengths (i.e. colours). The surface of a CD acts a circular reflection diffraction grating.
The CD sundial presented here is an equatorial sundial and is easy to make and fun to use. Because you need to look perpendicularly to the centre of the dial plate this sundial includes only the top plate of the equatorial sundial. It will only work between the spring and fall equinoxes.
Figure 1 shows the Kit that you will use to make your own CD sundial. All you need to find is a CD. That shouldn't be too hard.

Figure 1: CD Sundial Kit (CAD)
When you have completed the sundial all you have to do is set up and it will tell you solar time. Check out the equatorial sundial for instructions on how to install your CD sundial. It's exactly the same.
CD Sundial Kit: Northern Hemisphere
CD Sundial Kit: Southern Hemisphere
Here's what the sundial will look like once you have finished making it. This one is located in the Northern Hemisphere and positioned for a latitude of 50°. It's pretty hard to simulate a CD in CAD, so because a picture is worth a thousand words...

Northern Hemisphere - August
Step 11: Gnomon-less Equatorial Sundial Kit
Equatorial Sundial: a dial in which the dial plate is parallel to the equatorial plane and the polar-pointing gnomon is perpendicular to it.
The gnomon-less equatorial sundial is a universal sundial and can be used anywhere in the world. All you have to do is position it correctly and it will tell you the time.
The gnomon-less equatorial sundial is a modified equatorial ring sundial. The equatorial ring sundial has a gnomon, which is usually a narrow rod, that casts a shadow on a narrow band displaying the hour lines. The gnomon-less equatorial sundial does not have a gnomon. Instead the two edges of the dial plate act as the styles, one for the morning and the other for the afternoon hours. These edges cast a shadow on a rather wide band containing the hour lines The time is read from this band throughout the year. A wide band is required in order to display the time telling shadow for the entire year. If the band is too narrow the shadow will move off the dial plate.

Figure 1: Gnomon-less Equatorial Sundial Kit (CAD)
This sundial kit is a bit of a challenge to put together but you will have fun. We have made up two kits so that you can build a gnomon-less equatorial sundial for the Northern or Southern Hemisphere.
When you have completed the sundial all you have to do is set up and it will tell you solar time. The compass directions on the sundial pretty much tell you how it has to be placed.
Gnomon-less Equatorial Sundial Kit: Northern Hemisphere
Gnomon-less Equatorial Sundial Kit: Southern Hemisphere
Here's what the sundial will look like once you have finished making it.

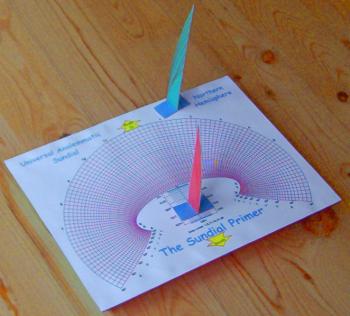
Step 12: Universal Analemmatic Sundial Kit
Analemmatic Sundial: sundials consisting of hour points (rather than hour lines) laid round an ellipse, and a movable gnomon perpendicular to the dial plane. It may be on any plane, but the most usual form is horizontal. In the horizontal version of the dial, gnomon position lies on the straight North-South minor axis, at a point determined by the sun's declination (i.e. the date). The analemmatic dial may be regarded as a projection of the universal equatorial ring dial.
A little adjustment to the equations for an analemmatic sundial will result in a date scale that is independent of latitude. Times are still read as points on an ellipse for a particular latitude. But now you can include ellipses for a series of latitudes using the same date scale. The resulting sundial is now universal with a unique and interesting layout. It is also very easy to make.
Figure 1 shows the Kit that you will use to make your own universal analemmatic sundial. The dial plate of this sundial is designed to fit on an 8-1/2" by 11" sheet of paper. It is purposely made as a large as possible to increase the resolution of the date scale and latitude lines.

Figure 1: Universal Analemmatic Sundial Kit (CAD)
When you have completed the sundial all you have to do is set up and it will tell you solar time. All you have to do it set it on a level surface and align the arrows with your local meridian. i.e. the true north-south line.
When the sundial is correctly set up you must set the gnomon on the date line for the current date. The lines are spaced at 5 day intervals so you will have to estimate the correct position for certain days. Make sure the gnomon's vertical edge is positioned on the centre line. Find the ellipse for your latitude. Solar time is read at the point the gnomon's shadow crosses the ellipse.
Universal Analemmatic Sundial Kit: Northern Hemisphere
Universal Analemmatic Sundial Kit: Southern Hemisphere
Here's what the sundial will look like once you have finished making it. This one is located in the Northern Hemisphere.

Step 13: Digital Equatorial Sundial Kit

Equatorial Sundial: a dial in which the dial plate is parallel to the equatorial plane and the polar-pointing gnomon is perpendicular to it.
The digital equatorial sundial is a universal sundial and can be used anywhere in the world. All you have to do is position it correctly and it will tell you the time.
The digital equatorial sundial lies parallel to the equatorial plane but does not have a dial plate with hour lines nor a gnomon. It does have a reading line that is located on the polar axis of the sundial. The hour numbers are cut through a semi-circular ring. These numbers and any other time indicators are located in the hour planes of the times to be indicated. The sun shines through these indicators and projects them as lighted images along the reading line. Thus the term digital in the descriptor.

Figure 1: Digital Equatorial Sundial Kit (CAD)
This sundial kit comes in four models that are 9 inches in diameter. The first model is made completely from paper and requires you to cut out the hour numbers and diamonds. This requires a sharp craft knife so be very careful not to cut yourself. Figure 2 shows this sundial. The second model is similar to the one described for the second transparent model below and still requires cutouts to be made. I am not sure how easy it will be to cut out some of the numbers. You can give it a try.

Figure 2: Digital Equatorial Sundial Paper Model
The next two models use clear transparency for the hour ring. No cutting of the numbers or diamonds is required. Figure 3 shows the first model. This sundial is identical to the one above but less dangerous to make.
![]()
Figure 3: Digital Equatorial Sundial Transparency Model
Digital Equatorial Sundial-Models 1, 2 & 3: Northern Hemisphere
Digital Equatorial Sundial-Models 1, 2 & 3: Southern Hemisphere
The final model is slightly different. The height of the numbers and diamonds are the same as those in Figure 3 but the width gets progressively narrower as they move away from noon. This change in width compensates for the distortion of the numbers when they are projected on to the reading line and make them appear more normal. You can see the change in the numbers and diamonds if you look carefully.
![]()
Figure 4: Digital Equatorial Sundial Transparency Model - Compensated
Digital Equatorial Sundial-Model 4: Northern Hemisphere
Digital Equatorial Sundial-Model 4: Southern Hemisphere
When you have completed the sundial all you have to do is set up and it will tell you solar time. The compass directions on the sundial pretty much tell you how it has to placed.
Step 14: Standard Time Equatorial Sundial Kit

Equatorial Sundial: a dial in which the dial plate is parallel to the equatorial plane and the polar-pointing gnomon is perpendicular to it.
Vernier: a small moveable scale for obtaining fractional parts of the subdivisions of a fixed scale. Invented by Pierre Vernier in 1631 (published Brussels, 1638). For circular scales, a Type A vernier has a central zero.
The equatorial sundial is a universal dial and can be used anywhere in the world. All you have to do is position it correctly and it will tell you the time. It is quite easy to make as the hour lines on the sundial are placed at intervals of 15° for every full hour. Because of the equal hour intervals it is possible to correct the sundial for longitude and the Equation of Time (EoT) just by rotating it. The longitude correction is constant but the EoT changes each day. The adjustment must be made every day for maximum accuracy. Once done the sundial will indicate standard or clock time.
Figure 1 shows the Kit that you will use to make your own standard time equatorial sundial. This kit only includes the upper dial plate of the equatorial sundial. It will only work in the summer, from the spring to the fall solstices.
The sundial is also different as it is not made completely from paper. The design is the result of a request for a sundial that could be used for outdoor events but could tell clock time. If you wish to build one for this purpose it is recommended that all the paper parts be laminated. All the structural parts of the sundial were made from 1/2 inch rigid styrofoam board. To give the edges a clean finish you can use metal foil duct tape. The tape has an adhesive backing and bonds well to the styrofoam. To glue all the parts together I recommend you use a silicone rubber adhesive called "RTV". It provides an excellent bond and does not warp.

Figure 1: Standard Time Equatorial Sundial Kit (CAD)
Standard Time Equatorial Sundial Kit: Northern Hemisphere
Standard Time Equatorial Sundial Kit: Southern Hemisphere
There is another version of this sundial that can be used all year. The one kit will allow you to build a "Standard Time Equatorial Sundial" for either the Northern or Southern Hemisphere. One difficulty with this sundial is keeping the lower dial plate from moving away from the back plate. A solution for this is to use a "Post-It" to hold the dial plate in position. Perhaps you can come up with a better idea.
Standard Time Equatorial Sundial Kit: Northern & Southern Hemispheres
There is a unique feature incorporated into this sundial...a vernier scale. A vernier scale allows you to measure or set linear or angular measurements much more accurately than you could do by eye. The measurement scale must be evenly divided whether it is straight or circular. This sundial has three vernier scales. One vernier scale is use to set longitude and EoT corrections to 1 minute on a sundial that has hour lines incremented at 5 minute intervals. A second vernier scale is used to set the angle of the dial plate to the nearest 1/4º for a latitude scale spaced at intervals of 1º. The third vernier scale is used to estimate the time to the nearest minute but has the limitation of only being able to work on the circular portion of the sundial.


Step 15: A Slight Intermission
Vernier: a small moveable scale for obtaining fractional parts of the subdivisions of a fixed scale. Invented by Pierre Vernier in 1631 (published Brussels, 1638). For circular scales, a Type A vernier has a central zero.
How To Use A Vernier Scale.
Let's look at a general example that will illustrate how to use the dial plate vernier scale to adjust the sundial for longitude correction and the Equation of Time. This applies to any other time that may need to be set.
Figure 1 illustrates the dial plate adjusted so the red arrow points to +20 minutes. This is a sundial that has been determined to be slow on a particular day. Now what if the sundial is 21, 22, 23, 24 or 25 minutes slow. By aligning the vernier +1, 2, 3 and 4 minute lines with the first line to the left on the ±60 minute measurement scale the sundial will be adjusted by 21, 22, 23 and 24 minutes respectively. The 25 minute adjustment results in the red arrow now pointing to the +25 minute line. This adjustment is easily and accurately made for any 1-minute time interval on the ±60 minute measurement scale. Be sure to use the + vernier scale when adjustments are made on the + side of the measurement scale and the - vernier scale on the - side.

Figure 1: Vernier Scale (CAD)
Figure 2 is a close-up of Figure 1 to better illustrate the use of the vernier scale. The spacing between the lines is equivalent to 1, 2, 3 and 4 minutes. When the 21 minute lines are aligned the spacing of the next 3 sets in the sequence are reduced by 1 minute. And so on.

Figure 2: Vernier Scale Close-Up (CAD)
You will find the vernier used in some of the other models and now you know how to use it.
Step 16: Globe Sundial Kit
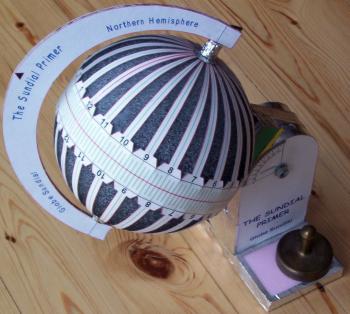
Globe Sundial: (or spherical dial): a class of dial in which the "dial plate" is a globe or sphere, usually set with its axis parallel to the Earth's polar axis and often with the observer's position at the top. The gnomon is in the form of a thin semi-circular vane, which can swivel around the globe about its axis. In use, the vane is rotated until the shadow is minimised and the time read from an equiangular scale around the equator. It indicates the meridian of longitude where it is currently noon.
The globe sundial presented here is an equatorial sundial and will work anywhere in the world. It is a challenge to make but not impossible to do. The kit is based on a 6 inch diameter styrofoam ball used in floral arrangements or crafts. The ball is not very expensive.
Figure 1 shows a portion of the Kit that you will use to make your own globe sundial.

Figure 1: Globe Sundial Kit (CAD)
The kit can be used to make a globe sundial for either the Northern or Southern Hemisphere. All the structural parts of the sundial were made from 1/2 inch rigid styrofoam board. To give the edges a clean finish you can use metal foil duct tape. The tape has an adhesive backing and bonds well to the styrofoam. To glue all the parts together I recommend you use a silicone rubber adhesive called "RTV". It provides an excellent bond and does not warp. The glues I used did not bond very well to the ball.
I soon discovered that a 6" styrofoam ball is not really 6 inches in diameter. The one I used was about 5-27/32". At this time I have only 2 models available.
Globe Sundial Kit: 6" ............ Globe Sundial Kit: 5-27/32"
The most difficult part is establishing the equatorial line on the ball. I taped the hour bands together and used the long hour line sections to help. There may be some other better ways. Dry fit the hour bands to get an idea of how you will put the sundial together and how well the fit is.
When you have completed the sundial all you have to do is set it up and it will tell you solar time. Just rotate the globe until the "Latitude Pointer" is aligned to the correct latitude. A vernier scale is used to set the angle of the globe to the nearest 1/4º for a latitude scale spaced at intervals of 1º.
To read the time just rotate the vane until its shadow on the globe is as thin as possible.
Here's what the sundial will look like once you have finished making it. This one is located in the Northern Hemisphere and positioned for a latitude of 50°.


Step 17: Universal Ring Sundial Kit
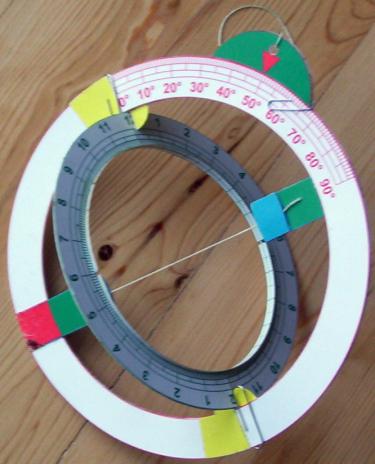
Universal Equatorial (Equinoctial) Ring Sundial: a portable dial which looks similar to a folding version of an armillary dial, but with a movable suspension point to provide latitude adjustment. In some versions, an aperture gnomon mounted on the central axis is used, the position of the aperture being adjusted to suit the sun's declination. This form is self-orientating.
Aperture: a small transparent hole in an opaque surface, designed to let a small beam of sunlight through to fall on a dial plate or alidade.
The universal equatorial ring sundial is a universal sundial and can be used anywhere in the world. All you have to do is position it correctly and it will tell you the time. This sundial is normally made of brass and is small enough to fit in your pocket. The following sundials are not pocket sized but are still fun to build and use.
Figure 1 shows the kit for a string gnomon and Figure 2 for an aperture gnomon. A vernier scale is included to accurately set the latitude pointer to the nearest 1/4°.

Figure 1: Universal Ring Sundial Kit with String Gnomon (CAD)
This first set of kits is for a universal equatorial ring sundial with string gnomon. There are three kits available; one for the Northern Hemisphere, one for the Southern Hemisphere and one for both combined.
Universal Ring Sundial Kit: Northern Hemisphere
Universal Ring Sundial Kit: Southern Hemisphere
Universal Ring Sundial Kit: Combined
Once the sundial is completed adjust the latitude pointer to your latitude. A paper clip can be used to hold the rotating ring in position. Rotate the hour ring until it is perpendicular to the latitude ring and use a couple of paper clips to hold it in position. The sundial is now ready to use. The sundial must be turned until the upper end of the string gnomon points to the celestial pole. If you would like to build a universal ring sundial that is self-orienting then read on.

Figure 2: Universal Ring Sundial Kit with Aperture Gnomon (CAD)
This sundial is also available with an aperture gnomon. There are three kits available; one for the Northern Hemisphere, one for the Southern Hemisphere and one for both combined.
Universal Ring Sundial Kit: Northern Hemisphere
Universal Ring Sundial Kit: Southern Hemisphere
Universal Ring Sundial Kit: Combined
Once the sundial is completed adjust the latitude pointer to your latitude. A paper clip can be used to hold the rotating ring in position. Rotate the hour ring until it is perpendicular to the latitude ring and use a couple of paper clips to hold it in position. Set the date scale slider to the correct date. The sundial is now ready to use. Hold the sundial by the string and turn it to the north and rotate the date scale towards the sun. Perform these two steps until a small beam of light passes through the aperture (hole) and strikes the hour band on the centre line. The sundial now indicates solar time.

This photo shows the universal ring sundials folded together. The sundial with the string gnomon is on the left with the Southern Hemisphere latitude scale visible. Note that in this position the Northern Hemisphere hour ring is visible. The other sundial has the aperture gnomon and has the Northern Hemisphere latitude scale and Southern Hemisphere hour ring visible. The Northern Hemisphere side of the aperture gnomon is visible.

This photo shows the sundials opened and ready to use. The latitude pointer is set to 50° N. A couple of paper clips help to hold the hour ring in position, perpendicular to the latitude scale. The 1/4° vernier scale is visible.
Step 18: Universal Horizontal Sundial Kit

Horizontal Sundial: the common or garden sundial with a horizontal dial plate and polar-pointing gnomon.
It is possible to create many variations of the universal horizontal sundial. There are three presented here and they all look very interesting and are very easy to make. In all cases a gnomon is required that can be adjusted to any latitude. The sundials are limited to a latitude range of 25º to 65º. To cover this range there are two gnomons available. One is for latitudes between 25º and 45º and the other for latitudes between 45º and 65º. Choose the one that best suits your needs. Use a couple of paper clips to hold the gnomon in place.
The dial plate of these sundials is designed to fit on an 8-1/2" by 11" sheet of paper. They are made as large as possible to make reading the time easier.
Figure 1 shows the first universal horizontal sundial Kit consisting of hour lines and latitude lines that are straight lines. The hour lines are all vertical but are not equally spaced.

Figure 1: Universal Horizontal Sundial #1 Kit (CAD)
Figure 2 shows the second universal horizontal sundial Kit. The hour lines are still vertical but now they are equally spaced. As a result the latitude lines are now curves.

Figure 2: Universal Horizontal Sundial #2 Kit (CAD)
Figure 3 shows the third universal horizontal sundial Kit. In the first two kits the hour lines converge as they approach 6 a.m. and 6 p.m. making them difficult to distinguish. In this sundial circles are used for the latitude lines and this results in a sundial that is easier to read. The hour lines are now curved.

Figure 3: Universal Horizontal Sundial #3 Kit (CAD)
I have made up a total of 6 kits so you can build any of the universal horizontal sundials for the Northern or Southern Hemisphere.
Universal Horizontal Sundial Kit #1: Northern Hemisphere
Universal Horizontal Sundial Kit #2: Northern Hemisphere
Universal Horizontal Sundial Kit #3: Northern Hemisphere
Universal Horizontal Sundial Kit #1: Southern Hemisphere
Universal Horizontal Sundial Kit #2: Southern Hemisphere
Universal Horizontal Sundial Kit #3: Southern Hemisphere
When you have completed the sundial all you have to do is set up and it will tell you solar time. The sundials are oriented like any horizontal sundial and a directional guide is provided to help. The gnomon is designed to slide between its two side supports. Align the desired latitude marker line with the top edge of the support. A paper clip can be used to hold it in place or it can be glued if you plan to use it in only one location.
Find the line for your latitude. Solar time is read at the point the gnomon's shadow crosses the line.
Here's what the sundials will look like once you have finished making them. These are located in the Northern Hemisphere.


Step 19: Universal Foster-Lambert Sundial Kit
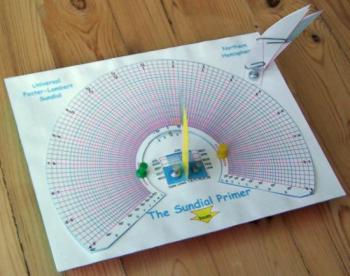
Foster-Lambert Sundial: a form of equatorial projection dial, with the projection arranged to produce a circular ring of equiangular hour points.
A little adjustment to the equations for a Foster-Lambert sundial will result in a date scale that is independent of latitude. Times are still read as points on a circle for a particular latitude. But now you can include circles for a series of latitudes using the same date scale. The resulting sundial is now universal with a unique and interesting layout. It is also very easy to make.
This sundial comes in two versions. One indicates solar time and the second is designed so it can be adjusted to indicate standard time. Both versions come with two kinds of gnomon. One is a fixed gnomon that is made to work at a single latitude. The other is an adjustable gnomon and can be set to any latitude in the range of 25º to 65º. Just take your pick or make both.
Figure 1 shows the Kit that you will use to make your own universal solar time Foster-Lambert sundial. The dial plate of this sundial is designed to fit on an 8-1/2" by 11" sheet of paper. It is purposely made as a large as possible to increase the resolution of the date scale and latitude lines.

Figure 1: Universal Solar Time Foster-Lambert Sundial Kit (CAD)
Universal Foster-Lambert Sundial Kit: Northern Hemisphere
Universal Foster-Lambert Sundial Kit: Southern Hemisphere
When you have completed the sundial all you have to do is set up and it will tell you solar time. Just set it on a level surface and align the arrow with your local meridian. i.e. the true north-south line.
When the sundial is correctly set up you must set the gnomon on the date line for the current date. The lines are spaced at 5 day intervals so you will have to estimate the correct position for certain days. Make sure the gnomon's sloped edge is positioned on the centre line. Find the circle for your latitude. Solar time is read at the point the gnomon's shadow crosses the circle.
Figure 2 shows the Kit that you will use to make your own universal standard time Foster-Lambert sundial.

Figure 2: Universal Standard Time Foster-Lambert Sundial Kit (CAD)
The dial plate consists of two parts. The stationary plate with the date scale is shown on the right. The rotating hour line plate is on the left. Because the hour lines are separated by equal intervals the hour line plate can be rotated to correct for both the Equation of Time and latitude. As the hour lines are drawn at 10 minute intervals a vernier scale is included to help adjust the correction to the nearest minute. Figure 3 illustrates the vernier scale and how to use it.

Figure 3: Universal Standard Time Foster-Lambert Sundial Vernier Scale (CAD)
Universal Standard Time Foster-Lambert Sundial Kit: Northern Hemisphere
Universal Standard Time Foster-Lambert Sundial Kit: Southern Hemisphere
The set up of this sundial is the same as described above for the solar time sundial. However, the corrections for the Equation of Time and longitude are done by rotating the hour line plate. These corrections are discussed in a section at the end of this instructable.
Here's what the sundial will look like once you have finished making it. This one will indicate standard time and is located in the Northern Hemisphere.

Step 20: Universal Bifilar Sundial Kit

Bifilar Sundial: invented in 1922 by Hugo Michnik in its horizontal form, although it can be on any plane. The time is indicated by the intersection on the dial plate, of the shadows of two wires (or other lines in space) stretched above and parallel to it. The wires often run E-W and N-S, with their (different) heights above the plane being a function of of the location of the dial. It may have equiangular hour markings, and hence can be delineated to show many kings of hours.
This sundial is a bit out of the ordinary and not too difficult to make. It is a bifilar sundial with equiangular hour markings.
Figure 1 shows the Kit that you will use to make your own universal solar time bifilar sundial.

Figure 1: Universal Bifilar Sundial Kit (CAD)
Here's what the sundial will look like once you have finished making it. The "wires" in this model are made from thin string and are attached to the latitude scales and north-south plates using clear tape. Note that the latitude scale marks are spaced for every 2 degrees to avoid having too many lines in such a short distance.
Universal Bifilar Sundial - Front View

Universal Bifilar Sundial - Rear View
(Note the latitude scales on the east and west sides.)

Universal Bifilar Sundial - Side View
Universal Bifilar Sundial Kit: Northern Hemisphere
Universal Bifilar Sundial Kit: Southern Hemisphere
When you have completed the sundial all you have to do is set up and it will tell you solar time. Just set it on a level surface and align the arrows with your local meridian. i.e. the true north-south line.
Step 21: Standard Time Equatorial Ring Sundial Kit

Analemmic Sundial: this term has sometimes been used to describe dials which have an analemmic shaped gnomon, or analemmas on the hour lines, enabling them to read mean time.
Equatorial Sundial: a dial in which the dial plate is parallel to the equatorial plane and the polar-pointing gnomon is perpendicular to it.
Heliochronometer: a precision sundial which incorporates some means to allow it to read civil (or mean) time.
Vernier: a small moveable scale for obtaining fractional parts of the subdivisions of a fixed scale. Invented by Pierre Vernier in 1631 (published Brussels, 1638). For circular scales, a Type A vernier has a central zero.
The equatorial sundial is a universal dial and can be used anywhere in the world. All you have to do is position it correctly and it will tell you the time. It is quite easy to make as the hour lines on the sundial are placed at intervals of 15° for every full hour. Because of the equal hour intervals it is possible to correct the sundial for longitude and the Equation of Time (EoT) just by rotating it. The longitude correction is constant but the EoT changes each day. The adjustment must be made every day for maximum accuracy. Once done the sundial will indicate standard or clock time. This sundial is also referred to as an analemmic sundial or heliochronometer.
Figure 1 shows the Kit that you will use to make your own standard time equatorial ring sundial. This sundial will work throughout the year.
The sundial is made using paper and styrofoam. Be careful when constructing this sundial to make sure the inside dimension of the ring shown on the right of Figure 1 is kept at 8 inches. The hour line ring is kept in place in its slot by maintaining a tight fit. This allows it to be rotated in either direction to correct for the Equation of Time and/or longitude. As the hour lines are drawn at 10 minute intervals a vernier scale is included to help adjust the correction to the nearest minute.

Figure 1: Standard Time Equatorial Ring Sundial Kit (CAD)
Standard Time Equatorial Ring Sundial Kit: Northern Hemisphere
Standard Time Equatorial Ring Sundial Kit: Southern Hemisphere
There are actually three versions of this sundial in one kit. The difference is in the gnomon. The gnomons are shown in Figure 2. The first and simplest gnomon is a straight rod. It can be easily made from a metal clothes hanger. When using this gnomon the hour line ring must be rotated to correct for both the Equation of Time and longitude. This gnomon requires adjustment every day. The other two gnomons are analemmic gnomons. They differ in how they project the analemma on to the hour line ring. One is solid and projects light through the analemma shaped cut out. The second is printed on a transparency and will project the analemma as a thin line. When using these gnomons the hour line ring is rotated to correct only for the longitude.

Figure 2: Standard Time Equatorial Ring Sundial Gnomons
In the photo the rod gnomon is in the centre. The analemmic gnomons are on the sides with the the transparent gnomon on the right. The two small rods on the left are used to secure the top and bottom of the analemmic gnomon in place and allow the gnomon to rotate. The date lines are spaced every 5 days as indicated on the gnomon.
To set up this sundial place it on a level surface and align it with you local meridian, i.e. the true north-south line. Rotate the sundial until the "Latitude Pointer" is aligned to the correct latitude. A vernier scale is used to set the angle of the sundial to the nearest 1/4º for a latitude scale spaced at intervals of 1º. When using the rod gnomon read the time indicated by the centre of its shadow, When using the analemmic gnomon rotate it so it faces directly at the sun. Read the time at the centre line of the hour line scale. Use the dates to determine which side of the analemma to read from on a particular day.
Here's what the sundial will look like once you have finished making it.
Standard Time Equatorial Ring Sundial - Front View
(Shown with the rod gnomon so the hour line ring and vernier scale can be clearly seen.)

Standard Time Equatorial Ring Sundial - Side View
(The latitude scale can be seen in this photo.)

Standard Time Equatorial Ring Sundial - Analemmic Gnomon

Standard Time Equatorial Ring Sundial - Transparent Analemmic Gnomon
Step 22: Hours Before Sunset Sundial Kit

This universal hours before sunset sundial is based on a design developed by diallist Mac Oglesby. This sundial does not tell the time but will tell you how many hours are left before sunset.
Figure 1 shows the Kit that you will use to make your own universal hours before sunset (HB4SS) sundial.

Figure 1: Hours Before Sunset Sundial Kit (CAD)
Hours Before Sunset Sundial Kit: Northern Hemisphere
Hours Before Sunset Sundial Kit: Southern Hemisphere
The hour line plate rotates about a fixed dowel at the centre. The dowel is fixed to a circular plate behind the hour line plate. During assembly the North arrow on the hour line plate must be aligned with a similar arrow on the back of the fixed circular plate. When the dowel is glued into the fixed circular plate the pointer must be positioned on the "0" line.
When you have completed the sundial all you have to do is set up and it will tell you just how much time you have before sunset. To set up this sundial place it on a level surface and align it with you local meridian, i.e. the true north-south line. Rotate the sundial until the "Latitude Pointer" is aligned to the correct latitude. A vernier scale is used to set the angle of the sundial to the nearest 1/4º for a latitude scale spaced at intervals of 1º. The dowel that holds the metal pointer will be aligned with the celestial pole.The sundial does not need to have the Equation of Time or longitude taken into consideration.
Figure 2: Universal Hours Before Sunset Sundial
The sundial in Figure 2 is set for a latitude of 50º N. The next step is to position the hour plane plate, which must be rotated to a horizontal position. Use a string level or other small level to do this. The sundial is now ready to use. The top of the cylinder must be parallel to the hour plane plate and the vertical line that was transferred to the outside must be aligned with arrow on the hour plane plate.
To determine the number of hours left until sunset rotate the hour line plate until all the sun's rays exit the top of the cylinder. At this point the top of the cylinder lies in the present hour plane and the pointer indicates the number of hours before sunset. The cylinder also has a small hole or aperture and a line drawn on the inside. When the light beam from the hole is positioned on the line inside this too indicates the hour plane plate has been rotated to the correct position. This feature is useful when light levels are low and it is difficult to determine when the sun's rays exit the top of the cylinder.
The following are additional photos of the sundial.

Universal Hours Before Sunset Sundial - Rear View
(The aperture, stationary circular plate and the latitude scale can be seen.)

Universal Hours Before Sunset Sundial - 3 Hours Before Sunset
See if you can get it to work.
Step 23: Getting Your Sundial to Work
Finding True North/South
To accurately tell time the sundial must be aligned with the celestial pole. To accomplish this in the Northern Hemisphere one must determine the position of the true North line at the place where the sundial is to be located. In the Southern Hemisphere one must determine the position of true South. There are a number of methods that can be used to do this, some more accurate than others. These methods are desribed on my web site: Finding True North/South
How to Get Clock Time
Most of the sundials presented here will indicate solar time. In order to adjust this time to read clock time corrections for longitude and the Equation of Time must be applied. To make this process simpler I have created a number of graphs that can be used to determine the number of minutes that need to be added or subtracted from the time indicated on the sundial to obtain clock time. These graphs can be found on my web site: Correct-A-Dial II

Figure 1: "Correct-A-Dial II" (CAD)
The graphs are available at longitude intervals of 1/4°. However, if you have built a standard time sundial the adjustment for longitude is done on the sundial and you only need a graph showing the Equation of Time. In this case choose the 0.00 graph.
The longitude corection to be applied is determined as follows:
a) Longitude of Sundial: ____________ ° (W/E)
b) Longitude of Local Time Zone Meridian: ____________ ° (W/E)
c) Longitude Difference: a - b = ____________
It is important that you enter all west longitudes as positive values and east longitudes as negative values.
d) Longitude Correction: (a - b) x 4 = ____________ minutes
Positive numbers are added to the solar time and negative numbers are subtracted. This tells you how the standard time sundial needs to be adjusted.
Step 24: MYSUNDIAL.CA
If you would like to learn more about sundials visit my web site: www.mysundial.ca
This site is divided into three major sections as follows:
This section has a lot of information on many different kind of sundials. You will not only learn about various sundials but also how to design and build them. There are many figures and tables that are used to illustrates various dialling concept. I have even created 3-D images of various sundials that include shadows cast by an artificial sun. There is an area called "Sunny Day U" that has some great projects for anyone interested in dialling. There are a number of interesting paper sundial kits. You just have to print them on card stock and then cut and glue them together. It's an easy way to start learning about sundials. Come and learn how to make your very own accurate sundial.
This section has photographs of sundials from many countries around the globe. These photos were sent to me by individuals who built some of the dials as well as others who have a keen interest in dialling. If you have a sundial that you would like to share send it to me and I will post it.
This section features a monumental horizontal sundial built in our community to celebrate the new millennium. It shows in detail the work involved in designing and building a large sundial. There are lots of photographs.

Runner Up in the
Clocks Contest

![Tim's Mechanical Spider Leg [LU9685-20CU]](https://content.instructables.com/FFB/5R4I/LVKZ6G6R/FFB5R4ILVKZ6G6R.png?auto=webp&crop=1.2%3A1&frame=1&width=306)


