

Introduction: Pinewood Derby Car With Working Headlights


***Updated***
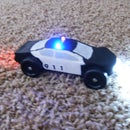
For the most resent pinewood derby I thought it would be cool to put LEDs for head lights and break lights. It turned out to be really cool. Hears how I did it. (Disclaimer) This instructable does not go into detail on how to win the race. I did not even worry about winning. I just wanted to have the coolest looking car there.
***Update. When I first made this instructable I did not get any pictures of the circuitry inside. Also this car was a one time use only. When the battery died that was it. I have just now decided to update the car with a rechargable battery. I am taking this opportunity to update this instructable as well with better pictures and documentation.***
Step 1: Designing and Creating the Car.


First you need to design and shape your car. This is up to you to designe. For my designe I wanted to make it look like a 2010 Camaro. It worked well because there was plenty of room inside to fit all the parts such as the batteries. A number to different tools can be used such as saws and sanders. I used a saw and a dremel with a sander attachment to sculpt my car.
Step 2: Make Room for Electrcal Parts


Now that you have the shape of your car you need to make a space to house the electrical parts that you are using. For my car I dug a cavity from the bottom. I used my dremel with a wood cutter to do this. I also used a sanding attachment to clean up the sides. This will house the batteries, wires and anything else you want to use. I also planned to used a switch to turn the circuit on and off.
Step 3: Drill Holes for LEDs


Now you need to drill the holes for the LED head lights. I used a drill bit for my dremel. The drill bit was to small to fit the LEDs so I used a cutting tool to widen the holes. You need to make sure you can fit the LEDs as well as the wires that go to the power source. For my car I chose to have two sets of LEDs for the front so I drilled the holes to fit them.
Step 4: Paint


If you want to paint the car this is the best time to do it. You don’t want to paint the car after you glue in the LEDs. You would have to be very carful to not paint over the lights and it would not look as good. Be sure to sand the car so the finish will be smooth. I like to use several coats of paint. Start with a good primer, followed by the color and then a clear coat makes the finish shine.
Step 5: Electrical Work


There are many other instructables on how to wire LEDs so I will not go into detail on how to do it. LEDs for Beginners is a good instrutable to learn how to wire LEDs. You should determine what LEDs you want to use and what kind of batteries can fit in the car. I chose to wire the LEDs in parallel so I only needed 4.5v to power them. I used 3 AAAA batteries that are found inside 9v batteries. (If you can fit AAA or AA the batteries will last longer). The LEDs had different voltages so I had to use several resistors to make the circuit work.
***Update***
I originally built this car with single use batteries. When the batteries died it was useless. I decided to rebuild the circuitry with a rechargeable battery form an old phone. I also retrieved the power plug of that phone so I can use the phone's power charger to recharge the battery. I made a circuit diagram to show the circuit. There is an extra LED which will light up when you plug in the power cord. I placed the power plug on the edge of the bottom cover.
Step 6: Final Steps
I used an extra piece of wood and used it as a cover for the hole on the bottom of the car. Drill a hole in the cover so you can have a switch sticking out to turn the LEDs on and off. Next add the wheels and if you want to add any weights to speed up the car you may. I did not add any weights, I was not going for stile more than speed.
At the race I got several comments about how cool my car was and was the highlight even though it did not win. No one there had ever seen a pinewood derby car with headlights.


