

Introduction: Play Video With Python and GPIO


Hello again. Today I am going to show an ongoing project I am working on. My company has bestowed upon me the pleasure to build a demo kit for one of our product lines. I work in the low voltage industry that includes fire alarm, security, video surveillance and structured cable (voice and data). While designing the demo kit, it was brought to my attention that there are many situations that we are unable to simulate at trade shows or at a customer site, especially when we are talking about releasing chemical agent or setting off sirens.
Anyways, a coworker came up to me and said that it would be cool if we could have video play when an alarm occurs on a panel. Immediately, I thought of a Raspberry Pi. Virtually all security and fire alarm panels are nothing more than microcontrollers on steroids, thus have no video capabilities. They do have IO though....lots and lots of IOs.
Step 1: BOM


Here is the bill of material you will need for this project:
HARDWARE
- Raspberry Pi (I used a Model B)
- SD card or micro SD card with adapter (I used a class 10 16gb micro SD card with adapter)
- Micro USB power cable (700ma minimum)
- Keyboard and mouse
- GPIO ribbon cable and cobbler
- you can use female to male jumpers if you have them
- Breadboard
- Jumper wires
- HDMI cable
- TV
- Computer
- SD card reader
- Internet connection (i used a usb wifi adapter but a hardwired connection is always better)
SOFTWARE
- Raspbian Jessie (my version is from 11/21/2015)
- omxplayer (built in to Raspbian)
- Python 3 (built in to Raspbian)
Step 2: Setting Up the Pi


GETTING THE OS
First things first, we need to set up the SD card with the OS for the Raspberry Pi.
On your computer, go to https://www.raspberrypi.org/downloads/raspbian/ to download Raspbian.
Once you have the file downloaded, unzip the file.
Follow the instructions Here based on your type of computer to install Raspbian onto your SD card.
I have followed the instructions for Windows and Mac and they have all worked great. I will try the Linux version when my Linux boxes are freed up from their duties.
POWER IT UP
Now, insert your SD card into your Pi and power it up. Make sure you have your keyboard, mouse, TV and internet connection all plugged in as well.
CONFIGURE THE PI
Go to the Menu dropdown
Menu --> Preferences --> Raspberry Pi Configuration
- Under the System tab, click the Expand Filesystem button
- Under the Performance tab, you can overclock your Pi if you want to. I have mine selected to Modest(800MHz). Be CAREFUL when selecting the overclock speed. If you go too much without heatsinks or some form of cooling, you can damage your Raspberry Pi. You have been warned.
- Under the Localisation tab, set your Locale, Timezone and Keyboard layout to match where you live.
Click OK and reboot your Pi.
After your Pi has rebooted, open the Terminal.:
Enter "sudo apt-get update"
When that is complete, enter "sudo apt-get upgrade"
If there are any upgrades needed, you will be prompted. Press "y" to install them. Reboot your Pi after that.
Now your Pi is set up and configured for what we need. On to the next task.
Step 3: Videos and Python
Before we can start to code, we need our material. To do this, you need some video files. As I am not a video editor in any sense of the word, I am leaving the creation of the required videos for the end-goal project to someone else in my company. I used .mp4 files as they are virtually universally played.
To test my code functionality, I transferred some music videos onto my Pi with a USB flash drive and saved them to the Videos folder.
There are other ways to transfer files to your Pi. One method is FTP. I did not use that method, but there are many good tutorials on it on this site and google.
Once you have your video files on your Pi, it is time to get down to coding.
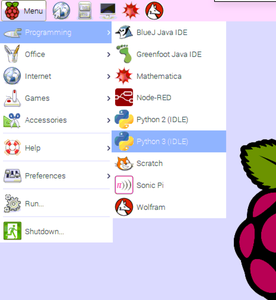
Go to Menu --> Programming --> Python 3 (IDLE)
In Python 3, Go to File -- New File
Save that file as "videoplayer.py"
Now for the code:
import the needed libraries
import RPi.GPIO as GPIO
import os
import sys
from subprocess import Popen
Set GPIO pin format
GPIO.setmode(GPIO.BCM)
Setup the GPIO buttons
GPIO.setup(17, GPIO.IN, pull_up_down=GPIO.PUD_UP)
GPIO.setup(18, GPIO.IN, pull_up_down=GPIO.PUD_UP)
GPIO.setup(24, GPIO.IN, pull_up_down=GPIO.PUD_UP)
Setup movie destination variable
movie1 = ("/home/pi/Videos/movie1.mp4")
movie2 = ("/home/pi/Videos/movie2.mp4")
Make boolean variables
last_state1 = True
last_state2 = True

input_state1 = True
input_state2 = True

quit_video = True
player = False
Now to put it all to work
while True:
	#Read states of inputs
	input_state1 = GPIO.input(17)
	input_state2 = GPIO.input(18)
	quite_video = GPIO.input(24)

	#If GPIO(17) is shorted to ground
	if input_state1 != last_state1:
		if (player and not input_state1):
			os.system('killall omxplayer.bin')
			omxc = Popen(['omxplayer', '-b', movie1])
			player = True
		elif not input_state1:
			omxc = Popen(['omxplayer', '-b', movie1])
			player = True

	#If GPIO(18) is shorted to ground
	elif input_state2 != last_state2:
		if (player and not input_state2):
			os.system('killall omxplayer.bin')
			omxc = Popen(['omxplayer', '-b', movie2])
			player = True
		elif not input_state2:
			omxc = Popen(['omxplayer', '-b', movie2])
			player = True

	#If omxplayer is running and GPIO(17) and GPIO(18) are NOT shorted to ground
	elif (player and input_state1 and input_state2):
		os.system('killall omxplayer.bin')
		player = False

	#GPIO(24) to close omxplayer manually - used during debug
	if quit_video == False:
		os.system('killall omxplayer.bin')
		player = False

	#Set last_input states
	last_state1 = input_state1
	last_state2 = input_state2
Now you should be able to run videoplayer.py and start triggering your videos via your GPIOs.
Attachments

Step 4: And....Action
It is time to put our code to use. If you want to run it through IDLE, press F5.
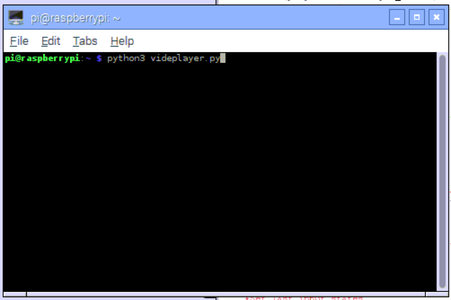
You can also run through the terminals by entering:
pi@raspberrypi:~$ python3 videoplayer.py
Now it it time for the test.
Start shorting out your GPIOs and watch the videos play!
How it works
When you short out GPIO 17, the appropriate video will play. If you short out the GPIO 18 while GPIO 17's movie is playing, the video will stop and start playing GPIO 18's video. If all GPIOs are not shorted, omxplayer will close.
Step 5: What's Next
Now that this part if done, the next step is to have this script run at startup.
After that, who knows? I just got this crazy idea to utilize a a windows box that will be connected to the TV/Monitor to host the videos and send the signals from the Pi via wifi. Who knows? Maybe another 'ible?
Thank you for viewing my instructable. If you like it, please vote for me.

Participated in the
Full Spectrum Laser Contest 2016

Participated in the
Digital Life 101 Challenge

Participated in the
Raspberry Pi Contest 2016

![Tim's Mechanical Spider Leg [LU9685-20CU]](https://content.instructables.com/FFB/5R4I/LVKZ6G6R/FFB5R4ILVKZ6G6R.png?auto=webp&crop=1.2%3A1&frame=1&width=306)


