

Introduction: Portable Workshop/ HomeMade Workshop


I was inspired to do this because my dad said I couldn't make a workshop in
the back yard so instead I decided to make my own portable workshop
Items:
Sheet of plywood
Mini Door Hinges
Nails( or Screws)
9 volt battery
Wire
Plastic shield
Light source
Door Knobs
Switch
___________________________________
Tools:
Hammer
Hot glue gun
Measuring Tape
Soldering Gun
Drill
Power Saw
Step 1: Mark Out the Wood

Here, you have a template I made that you can use to help you know what your
building
Take your measuring tape and mark it according to the sizes in the blueprint.
Also as you can see I have extension poles and wheels, originally, I wanted it to have height so I can work while standing or without putting it on top of something
Step 2: Cut the Wood


Next i had my dad supervise me as I took the power saw and
cut out the pieces of wood and had him trim it for me on his table saw since some of them were off measurement. So don't worry if you cut the wood just make sure that opposite side have the same size so cut them together. When it comes to the front panels they have to cover the front if their too small then you have to do it again.
Step 3: Nailing It In


Now its finally time to put it together, get your hammer and your nail and
start hammering, do everything except the front panels. be careful though, not to nail it in the wrong way for example;
I turned it over on its side and started nailing it in then when i was done I forgot to flip it back and started nailing in the other piece. I stopped half way and put it down,that's when I realized I nailed it the wrong way. So i ended pulling out the all the nails its annoying and time consuming.
Step 4: The Front Panels


The front panels is the most trickiest part, seeing as every thing has to
align perfectly. Its 3 panels so were going to do 3 different parts.
Right Panel:
Take one of the hinges from one of the packs and drill it in to the wood frame. Warning: DO NOT USE DRILL BIT TO MAKE HOLE FOR THE SCREWS, IT WILL MAKE THE SCREWS EASY TO COME OUT.
Next Cut a piece of wood to use as a holder for your tools(Soldering Gun, De-soldering Gun,Ect.) Drill holes big enough for your tools to fit in but small enough to keep them from going through, some holes might be bigger than the others.
Left Panel:
For the left panel well be making a cubby to hold your stuff like wires, solder and other stuff. First cut out a piece for the bottom and front both same size make them narrow but not small. Then cut two smaller pieces for the side and nail everything together.
Top Panels:
The top panel will have a light on it, so you can see when if its dark. First, screw on the hinges onto the frame and then the panel. Next take the battery and tape it onto the side of the box, then take a long piece of wire, about as long as the box and strip the ends. take one side and hook onto the battery and hold it down with some tape.
Then drill a hole through the top of the box and the top panel, and carry the wires through. Then take one wire and connect it up to the switch and the other wire and connect it to the light. Remember positive to positive and negative to negative. Cut a small piece of wire and connect it to the light and the switch and solder what needs to be soldered .
The switch should be in the off position, After that's done hot glue everything together. and put on the plastic shield. make sure its high enough so that the panel can close.
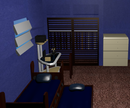
Step 5: Finishing Touches


Now all that needs to be done is to put on the door handles,
i took the opportunity to put a divider and make a next area to put my stuff. If you look on the blueprint earlier i had an extension pole and wheels,this is optional. If you want you can even spray paint it, but I'm going to leave it like this because its plain and simple. Now fill it up and your done.

Participated in the
Organization Contest

Participated in the
Portable Workstations Contest

Participated in the
Woodworking Contest


