

Introduction: RPi Physical Computing Using Jupyter Notebook


We all know that Jupyter Notebook is a fantastic tool, or better, an open-source web application that allows you to create and share documents that contain live code, equations, visualizations and narrative text. Jupyter notebook is largely used in Data Science, cleaning and transforming data, doing numerical simulation, statistical modeling, data visualization, machine learning, and much more!
But, how about to use Jupyter Notebooks to control Raspberry Pi GPIOs?
That's is what we will do in this tutorial. We will learn how to install Jupyter Notebook on a Raspberry Pi, and directly on it, we will read sensors and act on actuators.
The diagram gives us an an overview about the project:

And the movie can give you a hint of what is possible to get when the Pi meets Jupyter!
Step 1: BoM -Bill of Material

- Raspberry Pi V3 - US$ 32.00
- DHT22 Temperature and Relative Humidity Sensor - USD 9.95
- DS18B20 Waterproof Temperature Sensor - USD 5.95
- BMP180 Barometric Pressure, Temperature and Altitude Sensor - USD 6.99
- LEDs (3x)
- Push Button (1x)
- Resistor 4K7 ohm (2x)
- Resistor 1K ohm (1x)
- Resistor 330 ohm (3x)
Step 2: The HW

Let's follow the above electrical diagram and connect all 3 sensors, buttons and LEDs to Raspberry Pi.
The sensors used here in this project, are the same used in my previous tutorial:
IOT WEATHER STATION WITH RPI AND ESP8266
I suggest that you give a view on that tutorial, where I explain one by one, how to install the sensors and their libraries, testing them individually before running the complete program.
Step 3: Installing Jupyter

To install Jupyter on your Raspberry (that will run with Python 3), open Terminal and enter with following commands:
sudo pip3 install jupyter
sudo ipython3 kernelspec install-self
Now on your terminal, run the command:
jupyter notebook
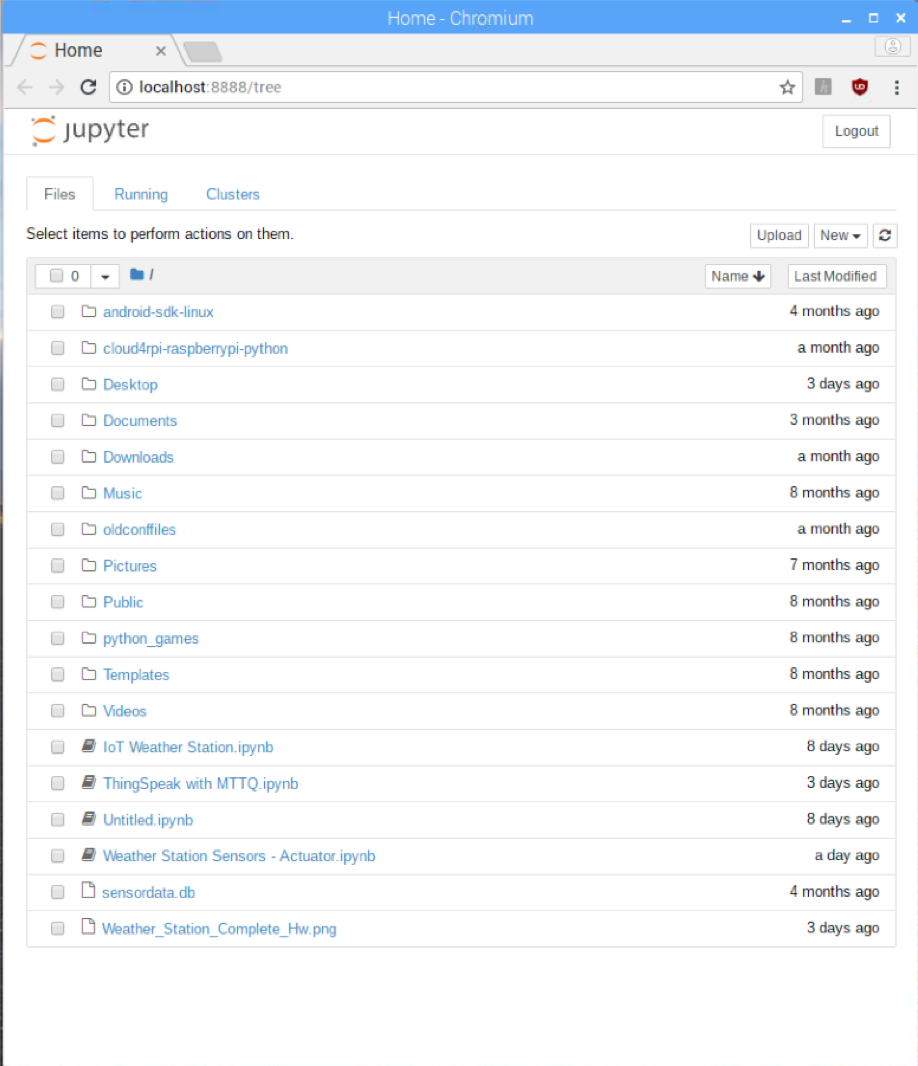
And that's it!!!! Amazing! very simple and easy. The Jupyter Notebook will be running as a server on:
http:localhost:8888
But, this is not really important for you to know, because, automatically your default browser will be opened on that address, running a "Home Page". The above pictures show the terminal and the home page.
To stop the server and close the "kernels" (the Jupyter notebooks), you must use [Ctrl] + [C] from your keyboard.
From now one, any time that you start your Pi and want use Jupyter Notebook, just type the command "Jupyter notebook" on your terminal and keep it running all the time. This is very important! If you need to use the terminal for another task as run a program, for example, open a new Terminal window.
Step 4: Running Python Scripts on Jupyter Notebook


We are assuming that you are familiar with Jupyter Notebook. It will work on your Pi exactly as it works on your desktop.
There are "tons" of good Jupyter Notebook tutorials available on the web, just goggle it and you certainlly will find one more suitable for you.
Let's play with a notebook that I have already created for this tutorial. Download it from my GitHub:
Weather Station Sensors - Actuators
Save the notebook on your Raspberry Pi. In my case, I save it on my main directory. See the homepage on the last step. Observe that exist 4 notebooks in my main directory (notebooks have a "small notebook" as an icon. Just click on it. The notebook will be loaded and will appear as the one above. If you see the homepage again, you will realize that the "notebook icon" is now "green", that means that it is running.
Also, note that there is a picture of the HW at first cell of my notebook. For the picture to appear correctly, you must have it in the same directory, that it is my case (or change its path on the notebook if you uses another directory to store the picture.
You can enter with Linux commands directlly on a Notebook cell, same as you do in your Terminal
For example, the command:
ls
Will list all your files in the current directory where the notebook is running, as you can see on above picture.
Step 5: Creating a Python Script on Jupyter Notebook and Importing Libraries (initialization 1)
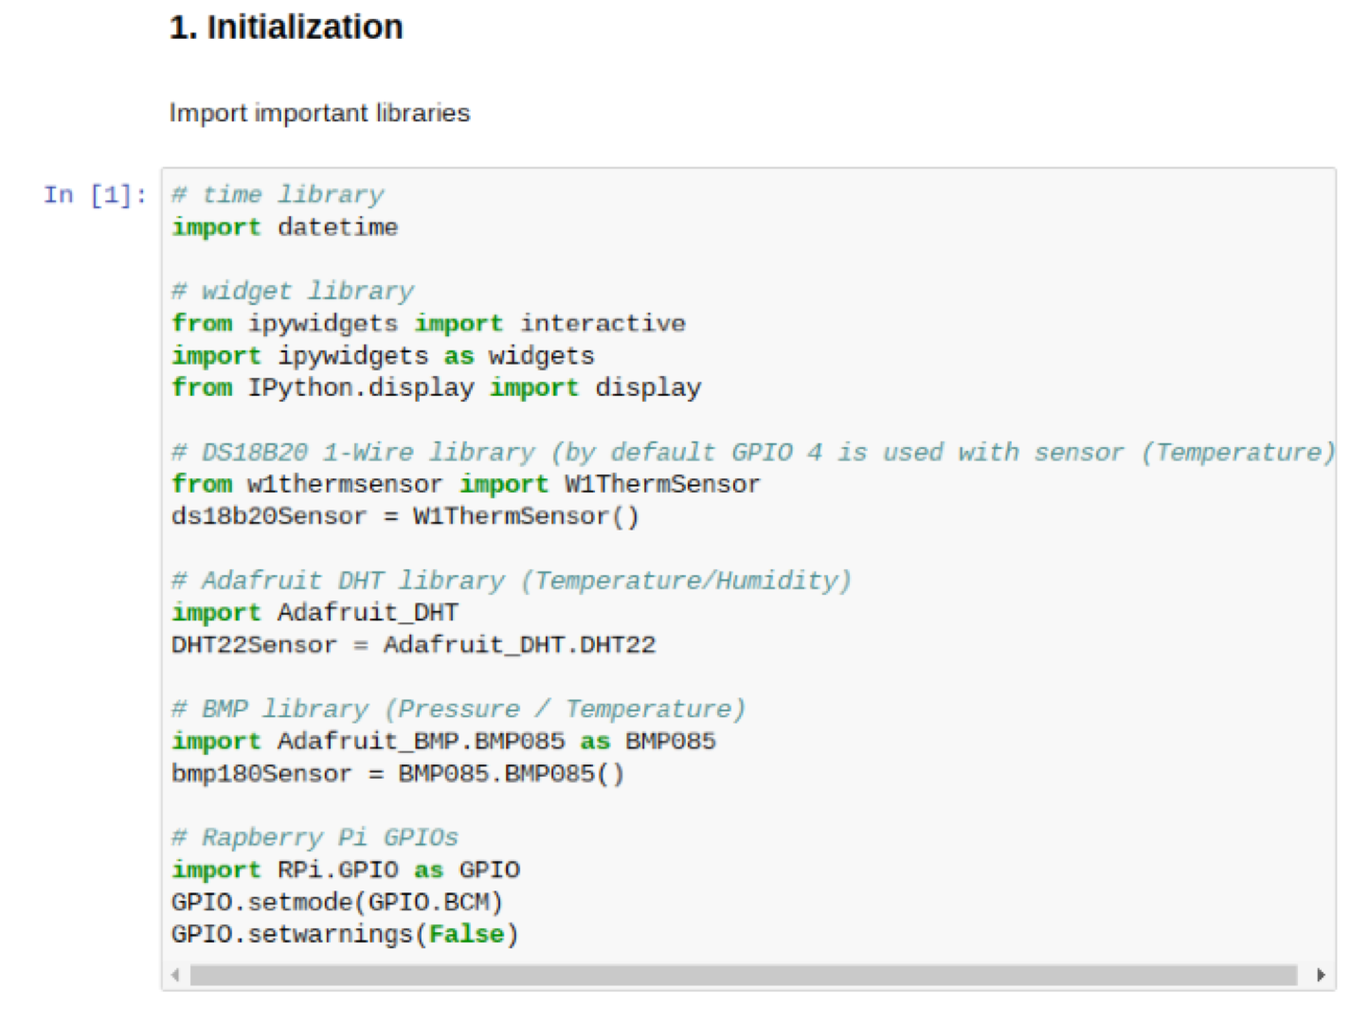
So, the idea is to start writing your script in the same way (and order) that are used to do with a Python IDE.
I will split my notebook into 3 phases, where we will do:
- Initialization
- Importing Libraries
- Defining GPIOs
- Initializing GPIOs
- Creating important functions
- Reading Sensors
- Reading and Acting on GPIOs (Button and LEDs)
Important to note that usually, you will run the Initialization phase only once. After that, you can play with your sensors and GPIOs, running only the pertinent cells (Phase 2 and 3 in this example).
Step 6: Initialization 2: Defining and Initializing GPIOs

Step 7: Initialization 3: Functions for Display Data

Step 8: Initialization 4: Functions to Handling Sensors

Step 9: Initialization 5: Functions to Handling GPIOs

Step 10: Getting Sensor Data and Handling With GPIOs

Running the Cell [11] you will get all sensors data:
Widgets
Here it is important to call attention to the "Widgets".
Widgets are eventful python objects that have a representation in the browser, often as a control like a slider, textbox, etc. You can use widgets to build interactive GUIs for your notebooks. You can also use widgets to synchronize stateful and stateless information between Python and JavaScript.
Here in this example, we are using widgets ("Sliders") to on cell [12}, control in REAL TIME the state of actuators, in this case, turning on or off the LEDs. Widgets are great to add more dynamic behavior on Jupyter Notebooks.
As you saw, on the code, we must run the cell [11] any time that we want an update value of sensors, but of course, a widget could also be implemented here to do it automatically, or by pressing a button, for example. I will leave it as a challenge for you! ;-)
Installation
In order to use Widgets, you must install the Ipywidgets library. For that use below commands:
sudo pip3 install ipywidgets
jupyter nbextension enable --py widgetsnbextension
After installation, only call the library on your Jupyter Notebook.
Note that we have done it, in the beginning, at initialization phase :
# widget library
from ipywidgets import interactive
import ipywidgets as widgets
from IPython.display import display
This Widget, "interactive", is very easing to be implemented and very powerful. You can learn more about Interactive on this link: Interactive Widget.
Step 11: DataScience, Machine Learning, Physical Computing, Computer Vision, IoT and ... the Future!

I am starting new journeys on this fascinating world of technology. Everything that we see today has data related and knowing better those data can be key to relevant projects that can help people. You will see more and more, here and on my blog, MJRoBot.org tutorials where DataScience is mixed with Physical Computing, Computer Vision, Machine Learning and IoT. This is the future!!!!
As an example, I got the data from a previous IoT project, the ArduFarmBot :
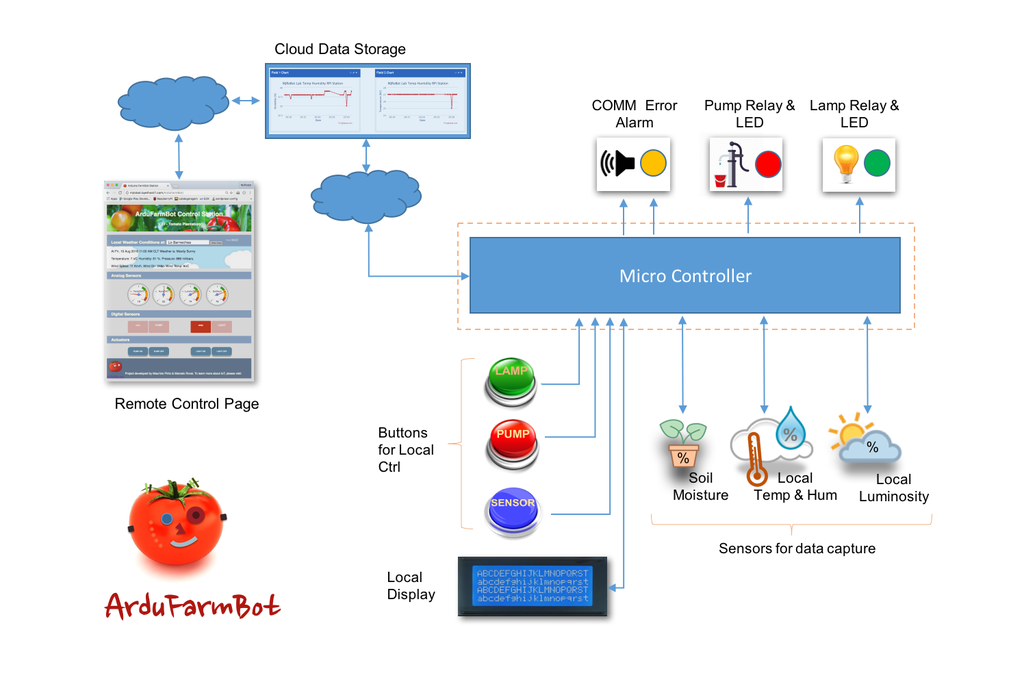
that was logged on a IoT Platform, the ThingSpeak and applied Machine Learn on those data to predict when the lamp and the pump should be turned on.
The results were amazing!!!!!!
You can see the Jupyter Notebook and the final report on my GitHub: ArduFarmBot_Data_Analysis
That's all, folks! ;-)
Step 12: Conclusion

As always, I hope this project can help others find their way into the exciting world of electronics!
For details and final code, please visit my GitHub depository: Pyhon4DS/RaspberryPi
For more projects, please visit my blog: MJRoBot.org
Stay tuned! Next tutorial we will send data from a remote weather station to a central one, based on a Raspberry Pi Flask Web server:

Saludos from the south of the world!
See you in my next instructable!
Thank you,
Marcelo

Participated in the
Microcontroller Contest

![Tim's Mechanical Spider Leg [LU9685-20CU]](https://content.instructables.com/FFB/5R4I/LVKZ6G6R/FFB5R4ILVKZ6G6R.png?auto=webp&crop=1.2%3A1&frame=1&width=306)


