

Introduction: Raspberry Pi RS232 Marine Compass Protocol Converter in Python


This is a project to demonstrate how to use the raspberry pi to interface to an industrial RS232 device and send it's data elsewhere over an ethernet WiFi link. This could be done over a hardwired ethernet link or as in this case over the WiFi.
Supplies
1x Raspberry Pi
1x USB 232 adapter or other raspberry Pi 232 HAT etc e.g. https://piio.co.uk/piio-232-h/
1x RS232 device to interface to
Step 1:

This is a project to demonstrate how to use the raspberry pi to interface to an industrial RS232 device and send it's data elsewhere over an ethernet WiFi link. This could be done over a hardwired ethernet link or as in this case over the WiFi to a computer several metres away.
Industrial protocol converters are quite expensive so it makes sense to do this with something as powerful as the raspberry Pi.
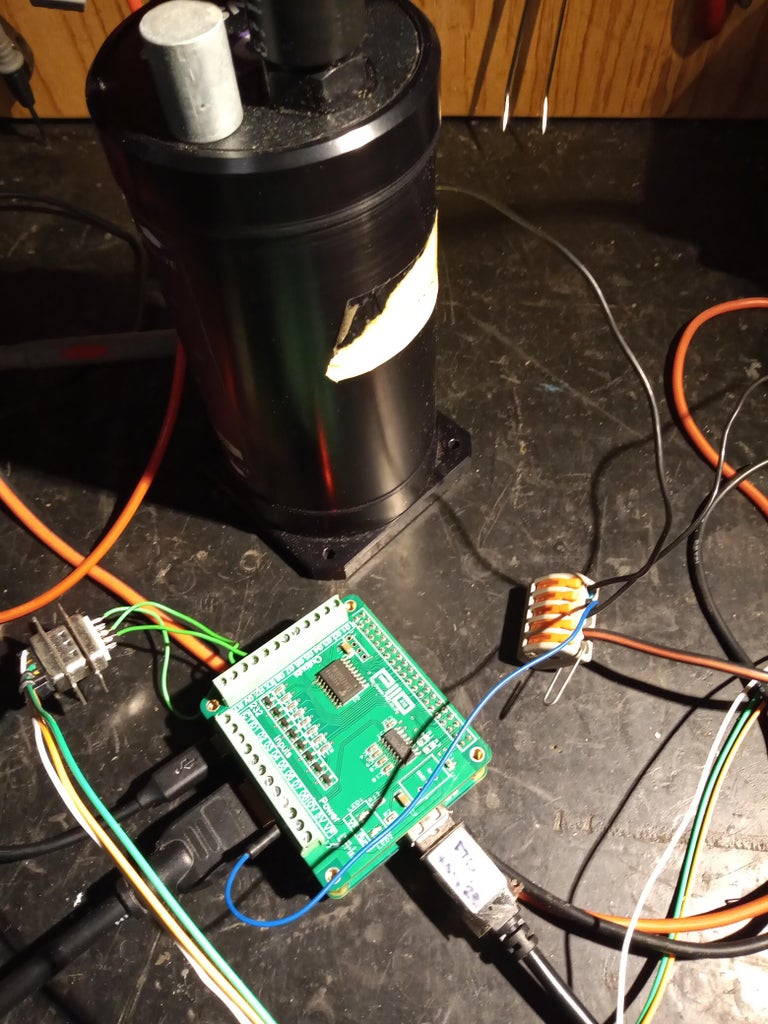
Here we're using a marine compass 'CDL INSENSE' which communicates using a protocol called 'TOGS' over RS232 - this reports heading, pitch and roll of the device.
Step 2:

Firstly we need to connect out compass to our raspberry pi. Here we've used a commercial board to do the interfacing since we need to mount it in panel and this unit has several mounting options as well as some 24V interfacing we may use to set the network address or just indicate status. (https://www.piio.co.uk) but you could just as easy use a USB device etc. Interfacing to RS232 requires a minimum of 3 wires Tx,Rx and GND.
Step 3:

Next log onto your router and get your Pi's IP address, you can use this to remote log on vis SSH using a terminal program like putty which is a tool that will enable you to log onto your raspberry pi remotely.
Step 4:

Putty login screen.
Step 5:

Next we can log on with ssh and use a program called minicom to talk to the compass locally from the raspberry pi.
[minicom -D /dev/ttyAMA0 -b19200]
Opens up a local terminal on the pi to communicate with the serial port and thus the compass. This just lets us view data from the port and send characters to the connected device using the keyboard.
Step 6:

Here we see the data back from the device via the ssh session, we can use minicom to enter a setup mode to setup the device now if required (type menu). As it is we're happy so we're going to try and write our python program now.
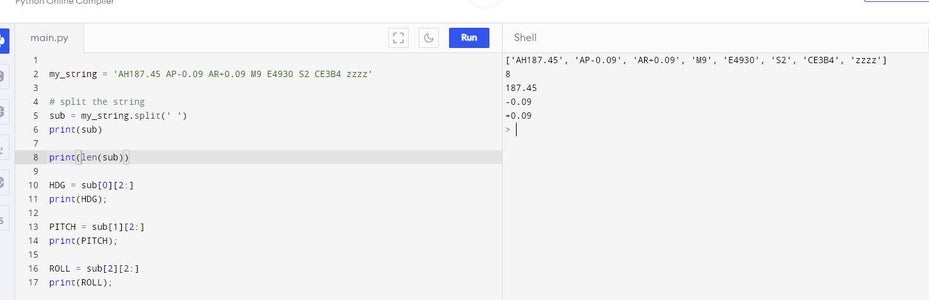
A good strategy here is to copy the string to the clipboard then develop the initial code using an online python compiler. Here we're using https://www.programiz.com/python-programming/online-compiler/ . We use this to quickly prototype some code to parse the incoming RS232 string we received earlier. It's convenient here to just check this works and doesn't crash if the string changes (see github example for more robust implementation).
Step 7:

Once this is done we can paste this into our putty ssh session and test it with the real device with some code running locally. Here we just run the python program on the local pi using the real 232 port again. Now the code is parsing the incoming string on the Pi.
Step 8:


We can now write some code to send this data out over UDP using the network to another computer which may be located several metres away. Here I'm using a program called 'pcomm terminal emulator' which can receive UDP messages on a windows PC. We'll use this to temporarily test that we can indeed send the data on the remote computer and print it to the screen. You could also use wireshark.
Step 9:
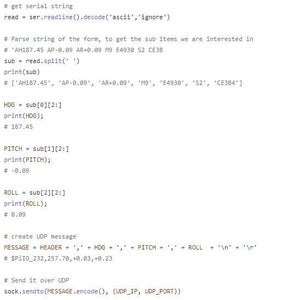

The code to send out data over UDP is quite straightforward in python. We just need the target IP and port, here we've added a header string s well so we can easily identify the string.
Creating our output MESSAGE is very easy in python, we add our header as discussed earlier.
Step 10:

We can now use our UDP string monitoring program to receive the RS232 data from the Pi Remotely. This is just 10m away here but could be read back anywhere on a much larger network, RS232 is generally limited to 10-20m, here se can send the data any distance we like.
Step 11:
So it really is that easy to make a protocol converter using the raspberry pi.
Featured IO board & code listing


