

Introduction: Reclaimed Wood Sign


In this video I make a sign using some reclaimed barn wood siding. I use an industrial style angle iron frame to hold it all together. Check out these 10 simple steps to make one of your own, and watch the video for more detailed instructions.
Step 1: Cut Metal to Size

In this step I pre cut all the metal to size and all my lap joints for welding. Very simple easy technique for making metal frames when you arent exposing any mitre joints.
Step 2: Tack Weld Frame Together

In this step you want to just tack your frame together and make sure it is square before final welding.
Step 3: Weld and Grind the Frame

Here you're going to want to finish welding the frame after checking for square. Then take a flap disc and grind the welds down so the back sits flush against the wall.
Step 4: Pre-drill and Counter Sink Screws

In this step you want to pre drill and counter sink screws to hold the back boarding into the framing. I use some lube to help the bits.
Step 5: Cut and Layout Wood

For this step you want to measure the inside diameter of your frame and cut your backer boards to length, I also rip mine on the table saw from some straight edges that go together nicely.
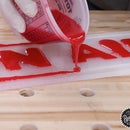
Step 6: Screw Down Backer Boards

This step you want to add some adhesive and screws to keep your wood backer boards in the frame. I use DAP Rapidfuse and you can find a link here for that. You can clamp the boards and adhere them however you like, I use screws and that glue sets and dries in 30 min.
Step 7: Layout Your Lettering

Next you want to lay out your lettering and adhere it to your wood of choice. I have some 1" thick reclaimed panels and am using pre-made vinyl cut stickers for my letters. You can print them and use some spray adhesive just as easily,
Step 8: Cut Out Lettering

Next you want to use the appropriate tools to cut out your lettering, either a bandsaw, scroll saw, or jig saw work best. Cut outside the lines of your template and then use an orbital or hand sander to bring the letters closer to the lines.
Step 9: Fasten Down Lettering

This step is simple, Layout your lettering the way you want it onto the backer board. You can just pre drill and screw our letters into the backer with some adhesive of choice, or just straight up screw them in with some wood screws (I chose method 2)
Step 10: Finish

Spray some finish on and that is a wrap.
If you want more detailed instructions of how I did this project please check out the full video.
Follow me on Instagram and Twitter @John_Malecki
and on Facebook at https://www.facebook.com/JMCustomBuilds/

Participated in the
Reclaimed Wood Contest 2016


