

Introduction: Repurposing: Sweatshirt to Poncho!


So I had this x-tra large, grey, boys sweatshirt. Just laying around, hanging out and taking up space. And I thought, what can I do to make this poor, boring sweatshirt, fabulous? Why, turn it into a poncho, of course!
Step 1:

You will need:
A sweatshirt. I used a boys x-tra large to make a girls x-small poncho (my daughter is a girls 4.)
Scissors
Sewing Machine
Thread
I cut off the binding on the waist, the sleeves and the neckline (although later I discovered that cutting off the neckline binding was unnecessary.)
Step 2:

Then I cut right down the seams on the sides of the shirt and at the arms. I suppose you could pick out the seam and open it up, saving a little bit of fabric, but I just pulled out my rotary cutter and chopped the seam right off!
Step 3:

The next step is to attach the sides to the sleeve edges. Start at the "underarm" and sew all the way down. The sleeves will be longer than the front and back, just trim it a little to even it all out. :)
Step 4:

Then look at it and think to yourself. "Hmmmm. This isn't supposed to be a box!" Draw a line across the front and back of the shirt from shoulder seam to shoulder seam as pictured below, and cut on the line and the shoulder seams. Discard the top of the shirt (with the neckline.) Now turn the whole thing upside down. The bottom of the shirt is now the neckline and the top from before is now the bottom! ooooooooh, fancy stuff! ;)
Step 5:

I put a zig-zag stitch around the bottom of the poncho, I did pull a little bit on each end of the fabric as it was being sewn to give it a slight/faux lettuc edge. Then fold over the edge at the top, about 1" to make a casing for the elastic. I didn't bother finishing the edge because the fleece fabric won't fray. Sew a seam all around the edge, leaving a 2" opening to insert the elastic. Don't forget to lock your seam and the beginning and end. Then sew another seam all the way around (no opening required) about half an inch from the original seam (I used 1/4" elastic for the neckline.) The second seam will give a ruffle edge to the neckline once the elastic is inserted. Insert the elastic and sew the opening closed.
Step 6:

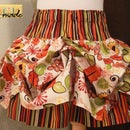
At this point I planned to applique some little flowers on it, maybe two teeny ruffles around the bottom edge. But my daughter came in, saw it. fell in love and declared if complete! :) You can leave yours plain, or add trim or applique.
With or without ornamentation :) its a quick and easy project! I'm off to make one for me now! :)

Participated in the
Sew Warm Challenge


