

Introduction: Tee Shirt Upcycle: Ruffled Flower Skirt


This is a very fun, easy project. :) The body of the tee becomes the skirt (no hem or side sewing needed, since it is already done for you.) The yoga foldover waist is made from one sleeve and is easy-breezy and super comfy. The ruffles are made with the remaining tee. Its a fun way to makeover a tee that never gets worn, or has a stain.
For this project I used:
A women's XL tee, not a fitted tee, it was a roomier cut (depending on the size of your tee and your wear-ee you may need more than one.)
thread to match your fabric
elastic thread
sewing machine
ruffler foot (optional)
Step 1: Preparing Your Tee for Transformation: the Skirt and Waist

Measure the length of your desired skirt (by measuring from the hipline to where you want the skirt to end) and cut off the bottom of the shirt to that measurement. It is really important that when you are measuring the tee, you start from the bottom. You want to preserve the hem already there. Note: if you don't want a yoga waistband, add 2" to the measurement and follow the instructions on Step 3 for a traditional elastic waist. :) My daughter has a 20" waist and the length was 14" so we had more than enough fabric with the one XL tee. You may need a larger tee depending on the size of your model.
Cut 4" from the bottom of each sleeve as pictured as well for the waistband. I know it sounds crazy to use a sleeve for a waist, but keep in mind that this is an XL non-fitted tee and I was making a skirt for a 5 year old. So the sleeve width worked well. In fact, I could have taken it in a couple inches for a better fit. For a yoga wasitband you want it to be a few inches smaller than your waist. If your knit is really, really stretchy you may want to cut it as much as 5", but for a standard tee, 2-3 should work. I know it sounds uncomfortable to make the waistband that much smaller than your waist, but the knit fabric stretches, if there is too much fabric it will be too loose and fall right off! :)
Step 2: Preparing Your Tee for Transformation: the Ruffles


Set aside the sleeves and bottom of the shirt and begin cutting the remainder of the shirt into one, long strip. Start at the bottom of the cut edge, and continued to cut in a spiral pattern, all around the shirt, a 1" wide strip. I stopped cutting when I reached the bottom of the arms. I cut off the trim around the neck and began cutting another long, strip in a spiral shape, all around the top of the shirt working around the neck.
Roll the strips just like you would a long piece of ribbon, lightly stretching the fabric as you go. Now you have the skirt piece (already hemmed with finished side seams, thank you!) The two ends of the sleeves and two rolls of tee-shirt ribbon!
You are ready to sew!
Step 3: Sew Your Waistband!

Unpick the hem on the end of the sleeves and sew them together along one of the cut edges, right sides together. Ta-daaa!! Waistband is done! :)
Note: If you don't have enough fabric or you don't like a waistband you can always do a traditional elastic waist. Just cut your skirt piece 2" longer than your desired length. Fold the cut edge over 1" and sew a channel for the elastic. Insert the elastic and sew shut and you're done. If you choose to do this, skip the next step, attaching the skirt to the waist band and go straight to attaching the ruffles.
Step 4: Attaching the Skirt to the Waistband


Put a gathering stitch around the cut edge (the top) of the skirt and adjust the skirt to the width of the skirt to the waistband.
Sew the skirt to the band using the elastic thread. If you've never used elastic thread it is easy-peasy. Just hand wind your bobbin with the elastic thread. If you have a top load bobbin, wind it as you normally would a bobbin. :) Then use your regular thread on the needle and the elastic thread in the bobbin and sew using a straight stitch. Now the waist will stretch when it is pulled over hips. :)
Hey, check out your skirt!!! But its kinda plain, don't you think? Let's add some interest!! :)
Step 5:


Take your long strips of fabric and sew right down the center with your rufflier foot. If you don't have a ruffler foot, I'd recommend keeping that elastic thread in your bobbin and shirring the fabric. Hand gathering is also a (heavy labor) option.
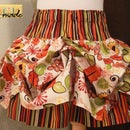
Then pin the ruffles to the skirt in a spiral to form a big flower. I started off center, just above the middle of the skirt. I chose to take the ruffle all the way around the bottom of the skirt. You can see in the pic that I had a hiccup with my ruffler foot. No worries, just snip off the non-ruffled pieces and overlap where you stop and start. You won't even notice the break in ruffles. :) Then c a r e f u l l y (with normal thread in the bobbin) attach the ruffle to the skirt.
Now you are done!!
Step 6: Enjoy Your Skirt!


Look how cute! And all from a boring, old tee! :)


