

Introduction: Reverse Truss Shelter


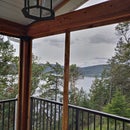

This is a shelter for a travel trailer (caravan) to protect it from snow and tree debris - pine needles, small branches etc.
It was built from salvaged material (20 foot lengths of 2x4 lumber), with new galvanized steel roofing panels. The trailer has an air conditioner in the middle of the roof, so a conventional truss would have to be higher to clear it. I chose to use an inverse truss to support the roof panels from above, allowing the roof to be significantly lower.
Supplies

Step 1: Frame Construction
I used precast concrete blocks to support the posts, to keep the untreated wood away from damp ground. There are horizontal members along each side, partly to support permanent diagonal braces and partly for bracing during construction, so the blocks have to be aligned and set at the same depth in the soil. So I dug away some material to level them. Next, I set the horizontal members in place.
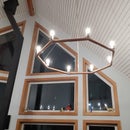
I cut the posts and diagonal beams to length, to accommodate the size of my trailer. The trusses were then bolted together with coachbolts. I set the assembled truss+posts flat on the ground against the blocks, then lifted the top of the truss and pushed it to a vertical position with a spare length of 2x4, then screwed a temporary brace in place to support it. I then lifted each leg of the truss into the slot in the concrete block. I repeated the operations for all four trusses.
I then added the four horizontal beams that hold the actual roof panels. Those are secured to the underneath of the trusses by steel hangers (nailing plates) and screws. If the shelter was built the normal way with the roof on top, things would be easier - just put the beams in place and then secure them. Since it's upside-down, I had to temporarily secure the beams in place with rope, one end at a time, then screw in the hanger at one end, then the other, then the ones in the middle, then remove the ropes.
I then replaced the original cross braces with permanent ones - essentially the same but with more screws. The 2x4 posts have their wider section across the width of the shelter, meaning they are not so stiff front-to-back. So they need some stiffening to limit bending, as well as to stop the whole structure folding up. I added a second pair of cross-braces higher up the inner pair of trusses, which made the structure stiffer when climbing on it.
Step 2: Roof Construction
I bought seven steel roofing panels 3 foot by twelve, then cut them in half. I used a circular saw with carbide teeth, with the blade reversed so that it does not catch the edge of the steel. Noisy but effective.
The panels are mounted under the horizontal beams using wood screws and washers. To position the panels, I placed a long length of 2x4 resting on the middle of the trusses, and suspended another length underneath the trusses using rope. I then balanced each panel on this lower length before temporarily securing the panel with a couple of screws. It would have gone quicker with a second person.
The panels are designed with stiffening channels, which overlap at each side. So all the panels are essentially locked together, meaning that they have to be oriented exactly to within a degree or so. After getting that wrong on one side and having to reposition everything, I used clamps on the second side to be able to rotate the first panel around one screw, and sight along the edge of the panel to get it exactly lined up. Initially, I secured each panel to the beam with four screws, then when the roof was complete went back and added another eight screws, with washers.
Step 3: Cable Stays
I had initially designed the shelter to use cable stays to support the mid-span of each beam, but in the event using the salvaged 2x4s the beams were over-specified, and quite adequate by themselves to support my weight and the expected snow load. I finished one in any case.
I also added a second 2x4 post at right angles to each of the corner posts, forming an L cross section. That stiffened the posts against fore-aft movement. That basically used up all the salvaged material.
Step 4: Loading
I basically started with the material I had, rather than designing the structure properly in advance. Doing some retroactive calculations, I estimate a six inch thick layer of snow would amount to some 263 kg of load on each side of the roof. Each roof panel is secured with eight two inch screws, with a withdrawal force of some 50kg each, giving a total capacity around 2900kg. The beam hangers are secured with 3 or 4 screws, with a shear strength about 115kg each. Eight hangers per side gives about 2700kg.


