

Introduction: Solid Wood Suspended Lightbar


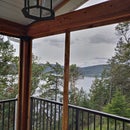
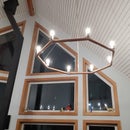
This is a light fitting suspended above a kitchen island, comprising a stovetop and worksurface. The lightbar is milled from a solid piece of arbutus wood (known as madrona in the US), and fitted with eight LED puck lights.
I couldn't find a commercial lightbar that I liked - one I saw was fairly expensive, and fake, made of hollow plastic rather than actual wood. I also wanted to use some wood from an arbutus tree I'd felled; I like the look and colour of the trees. This bar is made from a single solid tree branch, about six feet long and weighing some sixty pounds, suspended on chains from ceiling joists.
I started by purchasing some different styles of LED light and making mock-ups above a stovetop. I wanted something that would be energy-efficient but also give very good illumination along the length of the island, with no shadows. The lights I decided to use are 120V circular puck lights designed to screw underneath something like a cupboard,with daisy-chained connectors. I looked at some low-voltage LED pucks, with a separate power supply, but they weren't as bright.
Supplies
Big chunk of wood, LED puck lights, steel chain, 4 shackles, 4 eyebolts, octagonal electrical box with cover plate.
Step 1: Preparing the Wood
Arbutus wood is very prone to cracking as it dries, and should be dried slowly over a period of months. Cut a section of branch a bit longer than the final desired length, and paint the cut ends with latex paint to stop the ends drying too fast. Keep the wood in a dry unheated area for several months, then move it indoors to warm and dry further.
The log has some live edge, but the bottom and top surfaces are flat which makes it easier to fit the lights and wiring. I trimmed the edges with the electric sawmill described elsewhere, and then passed it through an electric plane to achieve the final finish. When the wood is dried and ready for use, the painted ends can be cut off.
Step 2: Assembly


Using a holesaw of appropriate diameter, drill out cylinders from the bottom of the log to take the LED pucks. I used a router and a chisel to remove the middle of the drilled cylinder and get a flat surface to screw the pucks to. The depth of the hole should match the height of the pucks so that the assembled lights are level.
Using an auger, drill holes from the puck recesses through to the top surface of the log to take the wiring. The pucks I used each had two wires which were connected in a daisy-chain, so I needed two holes per puck. The holes on the top surface should line up. Since my log was curved, I have the holes for the eight pucks in three straight-line segments. Using a router, cut a trench in the top surface through the holes, to take the horizontal wires. Then make wooden fillets to act as a cover for the trench. When finished, the holes leading to the pucks end at the bottom of the trench and the wiring is completely covered.
The pucks that I used have snap connectors, and for my purpose an excessive amount of wire - too much to coil up and conceal. For this project I cut the wires short and used crimped butt-splice connectors, keeping the snap connectors in case I later needed to replace a puck. Over-complex probably - it would have been easier to remove the snap connectors altogether and wire the pucks permanently with crimps or soldered connections, for which a narrower shallower trench would have been adequate.
I chose to use an electric junction box recessed into the top of the log, to transition between the daisy-chain cable provided with the pucks to the cable to the supply electrical box in the ceiling. Again, it would be easier to use crimp connectors and heat-shrink tubing.
The log is suspended from two chains, using a pair of eyebolts. For the log to hang level, the eyebolts need to be on a line through the centre of mass. I determined that by balancing the log on a long rod by hand and marking the position on the top side. The two eyebolts go on this line in a position where they won't intersect the wire channel. Since my log is curved, these positions are off-centre and naturally miss the channel. For a straight log, it may be necessary to position the eyebolts at either end beyond the extent of the trench, or to bridge it in some fashion.

Participated in the
Lamps and Lighting Contest


