

Introduction: SUP From Whitewater Canoe


Came across a couple very old, very well used, quite worn out whitewater canoes. Pictured is the better of the two. Wondered if it was possible to breathe some new life into one of these well loved water craft and convert it into a stand up paddleboard (SUP).
The theory is to cut the hull down to just above the waterline (I want to displace about 250 pounds). Fill the hull with sheets of Styrofoam insulation. Cover the insulation with some ripstop nylon to keep any errant Styrofoam with the boat and not in the local waterways.
Paddle local waterways while standing.
Sounds pretty easy - lets see what happens.
Step 1: What I Was Starting With.


I have no idea how you can damage a whitewater canoe this severely. Some of the more major defects from a quick inspection:
Hull obviously deformed
Crease in hull
Gunnel cracked - these 3 presumably happened at the same incident, glad I wasn't on the boat at that time.
One missing thwart. The 3 remaining thwarts were either bent, or loose.
Several patches on interior hull. Some were starting to separate from the hull, most were in alright condition. The fact that there were several patches is a tad concerning.
Exterior hull had 2 obvious holes, but these did not penetrate to the inner hole so there was some hope.
Substantial scrubbing from rocks on exterior hull.
Given the level of damage I wanted to see if it would hold water before putting any time and money into this project. So I loaded it the wreck on my car and took it to the local waterway. I was careful to launch without putting any water in the boat - I wanted to see if there was any leaks and didn't want water splashed into the boat to negate this check.
After paddling around for about 10 minutes there was a small amount of water in the boat - probably less than a cup. Pretty sure all of the water came in from the bottom, not from me paddling. Positive sign
What the heck - lets give this old wreck some new life by filling the hull with Styrofoam, what is the worst that can happen?.
Step 2: Demolition Time


I weigh a bit under 200 pounds. I figured displacing about 300 pounds would allow me to stay low to the water, and still give me enough buoyancy to move about.
A cubic foot of water weighs about 62 pounds - we'll call it 60 for napkin math.
The hull is 13 feet long, 2.5 feet wide (30 inches) To guesstimate displacement I just went with 8' by 2.5, or 20 square feet. 4 inches thickness gives me an estimated displacement of 6 cubic feet - or about 360 pounds. From my canoeing experience this made sense - I tend to draw 2-3 inches - having 4 inches would give me a bit of what may be called freeboard (if there is such a term in the SUP world).
To set my cut line I made a marking gauge. Took a couple scraps of wood and screwed them together. The vertical piece in this picture is 3 inches - I redrew with a 4 inch gauge after doing some math. Simply laid the canoe on some flat ground (my garage) and slid the gauge around. Pictured is both the original cut line that didn't look right - and the final cut line that was confirmed by some napkin math.
Took a reciprocating saw and cut along the cut-line. Last picture shows the bottom after it was relieved of the rest of the hull. Actually looked kind of pathetic at this point.
Step 3: Filling With Foam


Bought a couple sheets of foam from the local big-box home improvement store. Decided to use 1 inch as the first layer - then a layer of 2 inch. And if needed another 1 inch on top.
The first layer was by far the trickiest. Had to get the rough shape, then cut to fit the compound angles. Trying to keep things tidy so I have enough contact to secure the foam sheets to the hull. Was pretty sure once the first layer was in place the other layers would go in a bit easier.
To layout the rough shape I laid the hull on the sheet of foam and marked the outline. Then used my reciprocating saw to cut about 1/2 inch inside the mark. Original fit was pretty bad, so I took a pass around the foam with my saw at about a 45 degree angle and fit was much better.
Standing on the foam cracked the board - hey - it improved the fit so I just went with it.
Used polyurethane glue (gorilla glue) to secure the foam to the hull. This is both waterproof, and expanding. The label said it worked on both fiberglass and Styrofoam so it seemed to be a natural fit.
The leftover from the major section in the middle just happened to be about the perfect size to cut down and fill the fore and aft sections. Repeated the cutting and forming steps on both the nose and tail.
I used a 'gravity clamp' to hold the foam in contact with the hull while the glue cured.
Came back the next day - removed my heavy stuff. The foam felt pretty secure... But tapping the foam sounded hollow in several places. The plan was to fill in the inevitable gaps with EPS foam (aka 'great stuff' at the big box store). Drilled a few holes where it sounded hollow and shot in some foam. Filled in some of the gaps between the foam pieces as well. This took 2 cans of foam.
Turns out the foam seems to hold things together much better than the glue - so from here out I just used foam to connect everything together.
Step 4: Gear Tiedowns


Knew it would be important to eventually tie stuff to my SUP. Had some webbing from a previous project. Was pretty sure that cutting some slots into the hull and 'weaving' webbing through the slots would be plenty strong to hold stuff.
Used a palm router to cut some slots. I just eyeballed the slots and did my best to keep them lined up on both sides of the boat. Obviously wasn't going for perfection, just wanted decent looking functionality.
To secure the webbing I used an overhand knot and gorilla glue.
Step 5: Next Layer of Foam


The second layer of foam is installed pretty much the same as the first. Since the EPS held the first layer so well I decided to forego the polyurethane glue and just use EPS to hold things together.
Used 2 inch thick insulation for this layer.
I was tired of working on the ground so I put the boat on my bench and laid the foam on top of the boat. Again, used the hull to mark the foam and my reciprocating saw to cut. I didn't have a helper pair of hands - that would have been very beneficial cutting the foam. It was difficult to keep everything from shaking when cutting with the reciprocating saw.
Several passes with the saw to carve the edges for a reasonably tight fit.
Was able to form the pieces for the front and rear from the leftovers.
Sprayed the foam on top of layer 1 and quickly set layer 2 on top. Added the gravity clamps. Sprayed some more foam between the foam and the hull.
Went inside while the EPS secured the foam to the first layer and the hull.
Step 6: Final Layer of Foam


At this point I have about 3 inches, but still have some hull exposed. Instead of cutting down the hull (which would have cut into the tiedowns from the prior step) I added another 1 inch sheet of foam.
Just like the first 2 layers. Used the hull to draw the outline on the sheet of foam. Used my reciprocating saw to cut the sheet of foam. Carved the sheet down for a snug fit.
Used another can of EPS to secure the top sheet to the middle sheet.
Didn't show the gravity clamp - used the same stuff as before.
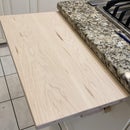
The 1 inch foam was proud of the hull in most places, so I decided to use my saw to cut a bevel all the way around the foam. Thought that would aid the fitting of the ripstop in the next step.
Step 7: Putting the Cover.


Pleased with the foam in the hull - time to add the covering.
Bought some ripstop nylon and laid it over the boat. Took my wifes good scissors and cut so I would have a couple inches hanging down below the hull.
I used hot glue to attach the ripstop to the outside of the hull. Was going to try to get some pictures of this process, but that proved too difficult. Very tricky to put some molten glue on the boat and then press the ripstop into the glue. Gave myself a painful burn on my finger when some of the glue went rogue and into my glove - ouch. This proved to be the most difficult part - maybe another set of (gloved) hands would have helped, not sure.
Once I glued the ripstop all the way around the boat went back and trimmed the ripstop to where the glueline.
All that's left now is the water trials.
Step 8: Water Trials


Took the project to the local waterway, had a day off so that gave me all day to goof off!
Have a few pictures close to shore.
How does it perform?
Less stable than a commercial SUP - which was expected.
More difficult to control a line than commercial SUP - adding a rudder or fin to the hull would solve this, but I paddle many shallow streams where the rudder would draw too much water (I'm frequently in less than 3 inches of water)
On the plus side...
When sitting as on a traditional sit-on-top kayak it is very quick and easy to control. This is just as easy to paddle and control as my cedar canoe.
In a kneeling position it is easy to paddle like sitting - but still are higher above the water than a sit on top - a decent cross between standing and sitting. The foam is easy to kneel on.
Makes a wonderful 'drifter'. After paddling up-river for a couple hours I took out a book, laid back, and read while I gently drifted downstream. The flat top makes a good platform for reading/napping.
Easy to hop on and off. While drifting, when I wanted to get wet just roll over. Getting back on is almost as easy.
I added a couple videos, tried to turn the volume down - the locusts/cicadias were exceptionally loud this morning.
This trip I paddled up-river for a couple hours - don't have river mileage on this route but I suspect it is about 5 miles. Most of the way upriver has almost no current - the last half mile or so started to have some moving water.
After I made my goal grabbed a snack and a paperback and floated back down for a couple hours. Ended up having to paddle for about an hour when the going got slow.
Will I use this watercraft - probably. When my wife and I go out for a day-long float I'll probably take both this and my cedar canoe - and leave the whitewater kayak back home - these performs better on flat water than the whitewater kayak.
Hope you enjoyed looking - now go out and get wet.
Attachments


Participated in the
Summer Fun Contest 2016


