

Introduction: Sewing Tools and Supplies


Sewing requires some special tools, but luckily none of the essentials have to be too expensive. Here's everything what you'll need to get started.
You'll use these tools all the time in your sewing practice:
- Sewing machine
- Iron and ironing board
- Extra bobbins
- Zipper foot
- Standard sewing machine needles
- Machine needles for stretch and heavy duty fabrics
- Fabric shears
- Paper scissors
- Thread snippers
- Seam ripper
- Hand sewing needles
- Pins
- Magnetic pin holder
- Transfer paper
- Tracing wheel
- Tailor’s chalk or disappearing marker
- Flexible measuring tape
- Clear 18"x2" ruler
You don't absolutely need these tools, but they'll definitely be useful in certain circumstances:
- Pattern paper or Large Sheets of tracing paper
- Metal ruler or thick plastic quilting ruler
- Cutting wheel
- Cutting mat
- Hip curve
- French curve
- Box to hold your tools
- Plastic divider cases for Small Notions
- Sleeve board or tailor’s ham
- Invisible zipper foot
- Buttonhole foot
- Pinking shears
I'll be using the following materials to demonstrate techniques in this class:
- Jersey, spandex or light knit
- Quilting cotton or cotton blend
- Canvas, denim, or upholstery fabric
- All purpose thread
- Double fold bias tape
- Fusible knit interfacing
- Standard non-separating zipper
- Invisible zipper
- Elastic
- Cord, ribbon, or twill tape
Step 1: Choosing a Sewing Machine

If you don't already own a sewing machine, you will obviously need to get one for this class. Choosing the right machine can be a bit overwhelming, so here are a few pointers to help on your shopping journey.
Industrial versus home machines: There are two basic kinds of sewing machines: industrial machines and home machines.
Industrial machines are expensive, heavy duty machines that are built into special benches, and are mostly used by professional seamstresses and apparel factories. Juki, Singer and Brother are the most ubiquitous industrial brands. These machines are simple, powerful, and usually only have straight and back stitch capabilities. They are great as part of a collection of sewing machines, but not that useful as your only machine. They also sew at a breakneck speed that can be downright terrifying for a beginner!

If you happen to have an industrial machine, you are welcome to use it, but you won't be able to do everything we're learning in this class on an industrial machine alone, so for this reason I highly recommend having a home machine.
Home machines are compact portable machines that are designed to be used on top of any table or desk. They come in a wide variety of price points and features, but even the simplest models can usually create a few types of stitches, as well as sewing buttonholes. Because of their smaller size and less powerful motors, they can't handle very heavy duty materials, but the portable aspect of home machines can be a huge plus because you can put them away when you're done... or, if you're like me, drag them with you to sew in all kinds of unlikely places ;)
Things to Consider:
- Choose something simple: as a beginner, it is especially helpful to have a machine that is easy to use. There are a lot of computerized machines on the market these days, and I'm sure some of them are great, but in my experience, manual machines are simpler, break less often, and are cheaper to fix. If you continue to pursue sewing, you will occasionally need some of the more complex features offered by a fancy machine, but even as an advanced sewer, the majority of the time you will probably only be using basic stitches.
- Think about what you want to make: depending on what you are most likely to sew, different machines can be better choices. For example, if you are likely to be sewing a lot of heavy fabrics, a simple but sturdy machine like the Singer 4411 Heavy Duty might be a good choice, but if you are more interested in decorative stitching you might want a more complex machine that includes a lot of embroidery stitches like the Brother CS 6000i.
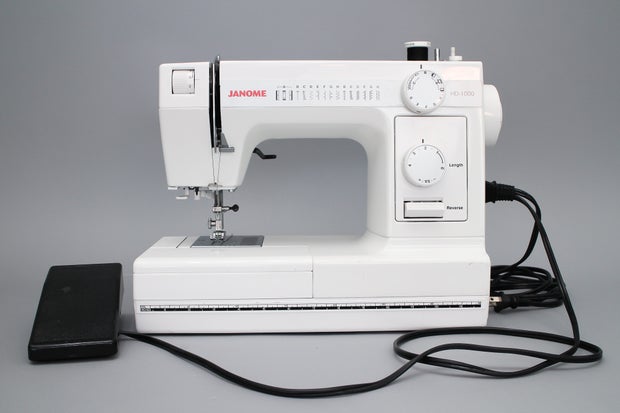
- Cost does not always equal quality: while some of the more expensive machines are great, you can also get a very good quality and durable machine for less than $300. The Singer I mentioned earlier is a great low cost, good quality option, as are the Janome Magnolia 7318 and the Janome HD1000 Heavy-Duty (the machine I'll be using in this class). I tend to prefer the feel of machines with heavy metal bodies (like the HD1000 and the Singer 4411), but they are not necessarily better quality than a good plastic body machine.
- Sewing machines are also usually long lasting, so you can find some great used machines on Craigslist, or even collecting dust in a friend's closet!
- Don't stress about it: whatever machine you use, it will probably be great! As long as you like using your machine, then it is the right machine for you. In my time I've had home machines from Viking, Singer and Janome, worked with quite a few industrial machines, and even gotten a calf workout using an ancient singer treadle! Each one has its pros and cons, but they've all enabled me to sew and that's what matters. (Though I'd steer clear of the treadle machine :)
If you really want to dig into some great information about the pros and cons of the best entry level machines, this great article from thesweethome.com is a really good resource. If you have a local sewing machine dealer in your area, buying from them can also take some of the mystery out of choosing a machine. They can let you try out different machines before you buy, walk you through the basic operations of your machine, and help you with repairs when it's acting up. Taking your machine to a shop in for a tune-up about once a year is a great idea no matter what.
Step 2: Know Your Tools

In the following lessons, I'll talk in more detail about where and when to use the tools we're buying, but for now, here's a little more info to help you understand the purpose of each tool.
Sewing Machine - This is, of course, the main tool we'll be using in this class. We've already talked a bit about the different types and how to choose one, and in the next lesson we'll take in in-depth look at how a home sewing machine works.

Iron and Ironing Board - From getting wrinkles out of your fabric before you cut it, to pressing open seams during sewing, ironing is an essential part of sewing. You'll need a good iron and a board to iron on. In a pinch a towel laid out on a table can work as an ironing board too.
 Sleeve Board or Tailor’s Ham (optional) - A sleeve board is a mini ironing board that lets you iron small tubes like sleeves and other hard to access areas, and a tailor's ham is similar but used especially for pressing concave and convex seams. They aren't essential tools but if you have them, you'll use them a lot especially the sleeve board.
Smaller Tools
 Bobbins - bobbins are a small spool that holds the bottom thread on your machine. You'll want to have a lot of extra empty bobbins on hand for different colors of thread.
Zipper Foot - a special kind of foot attachment for you machine that lets you sew on zippers, or sew next to any raised area. Sewing machines usually come with one, but you can also buy them separately. Make sure you are getting a foot that fits your specific machine.
Invisible Zipper Foot - an even more specialized type of zipper foot that is designed for sewing on invisible zippers. Your machine may also come with one. They can be useful, but to be honest, I have never used one, and I am going to teach you how to attach invisible zippers with a regular zipper foot.
Buttonhole Foot- some machines have a specialized foot for sewing buttonholes, which is usually included. My machine has a simple buttonhole foot, but I actually found that my regular foot worked better. Check your machine manual to see if you need to buy a special buttonhole foot.
Extra Standard Sewing Machine Needles - Breaking needles on your machine happens from time to time, so make sure you always have an extra set handy of you need to replace one.
Needles for Stretch and Heavy Duty Fabrics - different fabrics require different types of sewing needles, and we will be sewing with both heavy duty and stretch fabric in this class, so make sure you have a range of needle options. Getting a needle combo pack that also contains a double needle is a good idea.
Fabric Shears - having a good pair of scissors for cutting fabric is essential for sewing, there are many brands of scissors that will work just fine as long as you keep them sharp! Label your fabric shears, and try to never cut anything besides fabric with them! Protect them from uninitiated interlopers who try to grab them and use them for chopping up any old thing! Be mean and possessive! There's nothing more frustrating than trying to cut fabric with dull scissors.
Paper Scissors - you will also be cutting paper and other things while sewing, so have a pair of scissors dedicated to that as well, and when people try to borrow scissors from you, hand theme these :)
Thread Snippers- these tiny little guys are handy to have for trimming the ends of threads off seams and other small jobs where regular scissors are unwieldy.
Pinking Shears- pinking shears are scissors with a zigzag blade that cuts a shaped edge in fabric. Cutting the edge this way makes the yarns of the fabric less likely to fray, and is used as a seam finishing technique on some projects. Personally I don't use pinking shears that often, but they are a good tool to have in your sewing box.
Seam Ripper- this little tool that looks like a tiny lobster claw, or some kind of scary implement from the dentist's office is used to remove stitches if you make a mistake. It's a very important tool because no matter how long you've been sewing, you're going to make mistakes.
Hand Sewing Needles - even when you're sewing by machine, you're always going to have to do a little hand sewing every now and then, so have a set of hand sewing needles handy.
Pins- an absolutely essential tool, pins are how you hold your fabric in place so you can sew it together. I like glass head pins best, and I usually try to have a variety of sizes, some finer, some thicker for different types of fabric.
Magnetic Pin Holder - There are a few different kinds of pin holders, from the old fashioned kind that looks like a stuffed tomato to these magnetic dishes. I prefer the magnetic kind because they are easiest to grab from.
Transfer Paper - used to transfer markings from patterns onto fabric, it's usually good to have some in both light and dark colors so it will show up on any color fabric.
Tracing Wheel - this is what you use with the transfer paper to trace markings through from a pattern.
Pattern Paper or Large Sheets of Tracing Paper - you will need this if you want to trace your commercial pajama pants sewing pattern onto thicker paper before you cut it out.
Tailor’s Chalk or Disappearing Marker - these are used to make marks on fabric that will disappear later. Both are good options, but chalk usually shows up better on dark colors than the pen does.
Flexible Measuring Tape - used to take measurements on yourself, on a dress form, or any other place where you can't use a stiff ruler.
Clear 18"x2" Ruler - these are one of my most essential sewing and drafting tools, the clear grid makes them great for drafting and measuring seams etc.
Metal Ruler or Thick Plastic Quilting Ruler - you really only need one of these if you are planning to use a cutting wheel, which is a great tool that I highly recommend.
Cutting Wheel- cutting wheels are basically like pizza cutters for fabric. They have a sharp retractable wheel blade and come in different sizes. Mostly used for cutting straight lines, but sometimes used for for curves as well. You don't absolutely need one for this class but they are very useful tools.
Cutting Mat - when you're using a cutting wheel, you need to cut on top of a cutting mat or other appropriate cutting surface. Cutting surfaces need to be flat, smooth and somewhat soft so your blade doesn't get dulled or broken too easily. Depending on what you are sewing, they also need to be fairly large.
Hip Curve- a curved ruler used in pattern drafting. Very helpful for creating smooth curves.
French Curve - another type of curved drafting guide used for creating smaller curves.
Box to Hold Your Tools- staying organized is helpful in any crafting situation. So I like to have a box that holds all my thread, tools, chalk, etc. A tool box will work, or you can find cases designed specifically for sewing tools. Bonus points if yours looks like it came out of 1970s version of Lord of The Rings... :)

Plastic Divider Cases for Small Notions - you use some small notions in sewing, like buttons, snaps, hooks and eyes, etc. So having an easily visible place to store them can be nice.

Step 3: Setting Up a Sewing Workspace

It's important to have a good area to work in when you're sewing. Of course we can't all have a dedicated sewing room, but there are a few things that will make your sewing experience easier.
You will need a table or desk to hold your sewing machine. Make sure this space is the right height for you and that you have a comfortable chair to sit in when you're sewing. You will also need some space around the machine on the table to hold your fabric as you sew, as well as a thread snipper, pin cushion and other items. Try to keep your sewing table uncluttered though, it can be easy to knock things over with your fabric as you sew.
You will also need a surface for cutting. I think the best type of cutting surface is a high table that you can stand next to and move all the way around while you work. Laying out fabric and cutting large patterns sometimes requires a lot of moving around and it's much more convenient to be on your feet for this. You can always get a high stool to sit on when you want to get off your feet. A long table, at least as wide as the widest fabric (60") is ideal.
It's also really helpful to have a table with a surface you can cut on and stick pins into. There are many options for this. In fashion school, all our tables had smooth cork tops which let us anchor our fabric in place with pins, or cut easily with a cutting wheel. At my old studio I covered an Ikea tabletop with a layer of cork and then wrapped brown paper over the whole thing, that worked well. At Instructables we have a square table with a large cutting mat over it, and that works great too, though I prefer the cork.
Of course, most of the time it's hard to have a large table dedicated to sewing, and smaller ones will work too, especially if you are mostly sewing small projects. You can also find folding cutting tables online that can be put away when you're not using them, or in a pinch, the floor is not a terrible option (I've cut plenty of fabric on floors, believe me).
You will also need to have an ironing board and iron set up whenever you are sewing. You use a iron constantly when you sew. A small table top ironing board will work if don't have room for a full sized one.
No matter what, make sure your space is clean and well lit, and that you feel comfortable and happy working there, that is really the most important thing :)
Step 4: How to Shop for Fabric

Fabric choice has a tremendous impact on the things you sew, both aesthetically and functionally. Some fabrics just won't work for certain designs and others are really difficult to sew for beginners. Fabric stores can be dizzying and glee inducing... so many choices! Don't panic. There are thousands of types of fabric, but a little knowledge goes a long way. Here's what you need to know to get started:
Woven versus knit: this is possibly the most basic distinction when it comes to types of fabric. It is a fundamental structural difference in the way the fabric is created, and how it behaves.
Woven fabric is fabric that is made on a loom with warp and weft yarns that are woven over and under each other at right angles.

Different weaving patterns and different types of fibers create fabrics with different qualities, but standard woven fabrics are usually less stretchy and more structural than knits. Wovens are traditionally used to make the majority of clothing, especially anything tailored or structured (though more and more modern sportswear is created with knits because knits are more comfortable).
Some of the most common types of woven fabric are: quilting cotton, canvas, suiting, flannel, linen, denim, chiffon, organza and brocade among many many others.
Knits are fabrics that are created with a knitting machine. The structure of a knit fabric is fundamentally the same as something knitted by hand, but at a much much smaller scale. Instead of having many individual warp and weft strands like a woven, knits are made with just one long yarn that is looped over and over onto itself in thousands of knit stitches.

Because of its structure, knit fabric is fundamentally stretchier than woven fabric even when it is not made with a stretch yarn, and it therefore needs to be sewn with a zigzag stitch, a serger, or another technique that allows the seams to stretch with the fabric. Knit fabrics are also usually softer and more "drapey" than wovens, making them popular for clothing.
Some of the most common types of knit fabric are jersey, spandex, tricot, and sweater knits.
We will mostly be using woven fabrics in this class because they are easier to sew with a standard sewing machine, but we will also spend one lesson learning how to sew knits on a home machine.
Natural versus synthetic fibers: the yarns that make up a fabric are made from tiny fibers and those fibers can come from a variety of different sources, some man-made, and some naturally occurring. When you are shopping for fabric you will usually find a tag on each bolt of fabric that identifies the fiber content of the fabric. If you can't find this, ask for help.
Natural fibers are any fiber that comes from a plant or animal. Wool, silk, cotton, and linen are the most common naturally occurring fabric fibers. Cloth made from natural fibers tends to be more expensive and is often higher quality than synthetic fabric. I also think natural fiber fabric usually has a nicer feel, or "hand" than synthetic fabric, but the technology that creates synthetic fabric can give it more variation and versatility.

Cotton Plants. Photo by Kimberly Vardeman (Flickr: Cotton Harvest) [CC BY 2.0 (http://creativecommons.org/licenses/by/2.0)], via Wikimedia Commons

Flowers of the Flax plant which produces linen fibers. Photo by D. Gordon E. Robertson - Own work, CC BY-SA 3.0, https://commons.wikimedia.org/w/index.php?curid=1...

Silk Worm and Cocoon. Photo by https://www.flickr.com/photos/guojerry/7267496528... Creative Commons

Sheep whose wool is used to make cloth
Synthetic fibers are fibers that have been man-made by an extrusion process (which works kind of like a giant pasta maker with very tiny holes). Nylon, polyester, acrylic and spandex are some of the most common synthetic fibers. Fibers like rayon and bamboo can be considered semi-synthetic because they are actually made from a solution of wood pulp that is extruded in the same way as other synthetic fibers. Fabrics made from synthetic fibers have both advantages and disadvantages over natural fibers. They usually wrinkle and stain less easily, but they will melt under a hot iron, and they tend to retain smells more than natural fibers. They also tend to look and feel cheaper.

Spandex fiber. Photo by Luigi Chiesa - Own work, CC BY 3.0, https://commons.wikimedia.org/w/index.php?curid=3...

Spandex fiber under a microscope. Photo by Photon 400 750 - Own work, CC BY-SA 4.0, https://commons.wikimedia.org/w/index.php?curid=4...
These days many fabrics are blends of natural and synthetic fibers. For example: combining synthetic spandex with natural cotton allows factories to create woven stretch denim. Such amazing advances have been made in the process of manufacturing synthetic microfibers that, at this point, some synthetic fabrics can be hard to distinguish from natural fabrics.
Easier and harder fabrics to sew: some fabrics are harder to sew than others, and for a beginning sewer, it's important to choose fabric that won't be frustrating to work with. I recommend fabrics that I think are good for our projects at the beginning of each lesson, but here are a few things to keep in mind.
By Fiber Content:
- Cotton - generally the easiest kind of fabric to sew. It isn't slippery or sticky, it moves smoothly through a sewing machine, and it's easy to pin and press.
- Wool - also fairly easy, though thicker wools can sometimes jam a sewing machine.
- Silk - tends to be trickier because silk fabrics are often slippery and springy.
- Synthetics - some synthetic fabrics, like nylon, can be fairly easy to sew, while others like poly-organza are much harder. I mostly recommend using fabrics made from natural fibers as a beginner, with the exception of knits.
By Weight: mid-weight fabrics will usually be the easiest to sew. Fabric that is too thick, like heavy denim or canvas, may be difficult for a home machine to sew through and sometimes requires special needles. Very thin fabrics like chiffon or charmeuse are slippery and really difficult to sew neatly. As a beginning sewer, I would definitely steer clear of these thin drapey fabrics if you don't want spend a lot of time cursing at your sewing machine.

How fabric is sold: when you walk into a fabric store you will usually see fabric stored on rolls, these rolls are called bolts. If you were a designer making a lot of one design, you might buy fabric by the bolt, but usually you'll be buying fabric in yards. When you find the fabric you want, someone who works at the fabric store will cut you the number of yards you want. Some fabric stores will sell fabric in quantities of less than a yard (such as 1/2 yard or 1/4 yard) and some won't. When you're starting out, it's usually good to get more fabric than you need in case you make a mistake.

Fabric also comes in different widths. The two most standard fabric widths are 45" and 60", but some fabric may be wider or narrower than that. The width of the fabric will effect how many yards you need for a project, so make sure you find out how wide fabric is before you get it cut.
Where to shop: there are all kinds of fabric stores in every part of the world, and many options online as well (I've listed some of my favorite stores in the Sewing Encyclopedia). When you are first starting out, I really recommend making a few visits to a fabric store in person. There's just no substitute for seeing, and more importantly, feeling, a fabric in person. Honestly, I still rarely buy fabric online, because I think it's hard to make an informed decision about the hand and quality of the fabric, plus, fabric stores are fun! :)
People who work in fabric stores are also a great resource. They are likely to know a lot more than you do about the right fabric choice for a project, and they usually love talking to you about what you're making.
For this class I tried to buy as much fabric as I could at Joann Fabrics so that if you wanted to use the exact same fabric it would be easy to get. I couldn't find everything I wanted there, though, so I sourced a few other things at my favorite local store here in San Francisco, Fabric Outlet. I'm always a fan of supporting your local stores, and there are also plenty of other ways to source fabric if you're in the mood for a treasure hunt. Yard sales, thrift stores, re-use centers, and your grandma's closet are good places to start :)
Prepping fabric for sewing: once you've found the fabric you want to use, there's usually one more thing you need to do before you start sewing with: WASH IT!

Many fabrics are treated with a "sizing" that needs to be washed out, and they can also shrink and bleed when you wash them, so before you start measuring and cutting, you need to get those transformations out of the way. If you're lucky, your fabric will have care instructions on the label on the bolt, so snap a photo of this in the store if you can. Otherwise, a good rule of thumb is that you should wash and dry all cottons and cotton blends, and wash and hang dry (or tumble dry low) all polyesters. Silks and wools should usually not be washed as it can ruin the fabric. Ask an employee in the store for advice about washing specific fabrics.
In the next lesson we'll talk about exactly what materials you'll need to buy for each project.
Step 5: Projects You Can Make

This class is is designed to teach you basic sewing skills so you can apply them to whatever you want. But if you need some suggestions of good projects that will help you practice specific skills, I'll be linking to some options in each lesson. I encourage you to take on some projects as you learn, because seeing how the techniques I'm teaching are applied to real designs will help cement your understanding of the sewing process! Here is a preview of a few Instructables I've created that you might want to try.
Easy Cloth Tote Bag: practice marking, cutting, pinning, sewing straight seams, sewing corners, topstitching, pressing, hemming and seam finishing by making a simple canvas tote bag.

Custom Stuffed Animal: practice sewing smooth curved seams and panelling by following a simple pattern to create an adorable stuffed creature I've designed, or designing your own!

Infinity Scarf: practice using your home machine to sew stretch stitches by making a simple infinity scarf with two contrasting stretch fabrics.

Zippered Dopp Kit: practice installing zippers and adding a lining by making a simple lined dopp kit with a zipper closure.


Pajama Pants: learn how to follow a commercial sewing pattern and practice gathering and using elastic by sewing simple pajama pants. Choose a different pattern if you're feeling ambitious :)


Step 6: About Your Professor

I am a costume and experimental fashion designer and artist by training... and also a huge dork who likes to make and wear a lot of silly costumes and unusual clothes :)
I studied Visual Art at Brown University and Fashion Design at the Fashion Institute of Technology, and since then I've done my best to turn playing dress-up into a career. I have worked as a costume and fashion designer, and right now I'm lucky enough to have a job in the Instructables Design Studio where I make a lot of fun things with creative people in an amazing makerspace. I love experimenting with materials and finding new ways to use traditional techniques in my never-ending quest to create clothing and accessories worthy of time traveling cyborg superheroes!
I sewed my very first stitches on an old Singer treadle machine! (I'm not 95 years old, I just grew up in the woods with hippie parents and limited electricity :). In high school I bemoaned the fact that no one taught home-ec any more, so I started taking sewing classes in my spare time and learning how to make my own clothes. Later, in fashion school, I learned to sew on industrial machines, and design and construct garments with professional techniques. Sewing is still a huge part of my design practice and I think it's a tremendously fun and empowering skill that everyone should learn. You're going to love it :)
You can see many examples of my work on my website, and find all the tutorials I've created so far on my Instructables page.
Step 7: Quiz
{
    "id": "quiz-1",
    "question": "Which is a synthetic fiber?",
    "answers": [
        {
            "title": "Linen",
            "correct": false
        },
        {
            "title": "Nylon",
            "correct": true
        },
{
            "title": "Silk",
            "correct": false
        }
    ],
    "correctNotice": "Well Done!",
    "incorrectNotice": "Try Again"
}
{
    "id": "quiz-2",
    "question": "Fabric is sold in:",
    "answers": [
        {
            "title": "Bundles",
            "correct": false
        },
        {
            "title": "Bales",
            "correct": false
        },
{
            "title": "Bolts",
            "correct": true
        }
    ],
    "correctNotice": "Well Done!",
    "incorrectNotice": "Try Again"
}
{
    "id": "quiz-3",
    "question": "True or False: Knits are naturally more stretchy than wovens.",
    "answers": [
        {
            "title": "True",
            "correct": true
        },
        {
            "title": "False",
            "correct": false
        }
    ],
    "correctNotice": "Well Done!",
    "incorrectNotice": "Try Again"
}
Step 8: Moving On!

In our next lesson we'll continue our tool education by learning all about our sewing machine itself, threading, changing feet, winding a bobbin, and sewing our first few stitches!


