

Introduction: Sewing on a Button + What to Sew Next


In this lesson, we're going to learn about buttons and how to sew them on in the right way! Once that's done, I'll share some projects for you to try next to keep building your sewing skills.
Buttons come in two forms - flat and shank. In this lesson, I'll teach you how to sew on both types.

Flat buttons have holes in the middle of the button - usually two or four. They're the most common.


Shank buttons have no holes in the button, but instead rely on a shank on the back with a hole in the end.

This allows the button to be sewn on with no thread showing. Shank buttons are often found on coats and dresses.
Step 1: Sewing on a Flat Button

To sew on a flat button, you will need:
- 8 inches of doubled thread
- A needle
- A toothpick
- Scissors
- A pen for marking where you want the button to lay

Mark where you want the button to sit. Double thread your needle and knot the ends!

Insert your needle from back to front through your fabric and pull the thread tight. Push the needle up through one of the holes in the button and down through another.
Make sure you're ONLY sewing through one side of the project (in this case: the gadget case again!) which is one layer of outer fabric and lining fabric. If you sew through both sides, you'll sew the case closed. :)
(If you're using a button with two holes, that's it! If you're using a button with four holes, you need to decide how to sew it down. You can go horizontally, vertically, diagonally - whatever looks nicest to you. Just make sure you sew it as two pairs of holes.)
Now push the needle back through the fabric close to where you started.

Pull the thread tight and the button will flatten down against the fabric. Insert your toothpick between the two buttonholes you just sewed through.


Make a few more stitches through the button holes with the toothpick in place.

Now bring your needle up through the fabric but under the button as shown.
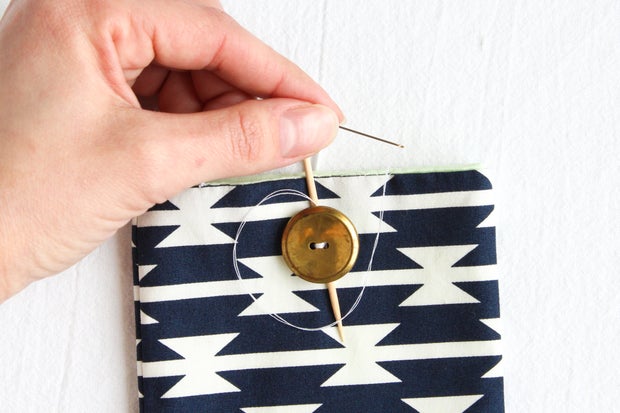

Pull the thread tight and wrap the thread end counter clockwise around the stitches you just made. Keep the thread over the toothpick and under the button. Do this about 8 times.
We do this to make a shank of sorts. Without this thread shank, the button would lay very flat and tight against the fabric, making it hard to use. The shank makes the button sit off the fabric a bit, allowing it to be put through a buttonhole more easily. The shank also allows the button to handle more stress and force, so it's especially smart to use this technique on heavy coats and clothing. :)


Pull the toothpick out and wrap the thread around a few more times.


Pass your needle to the back of the fabric and pull tight. Tie a couple knots and you're done!

And there you go - a flat button sewn on the right way. :)
Step 2: Sewing on a Shank Button

To sew on a shank button, you will need:
- 8 inches of doubled thread
- A needle
- Scissors
- A pen for marking where you want the button to lay

Make a mark where you would like the button to sit. Double thread a needle and knot the ends.

Push your needle through the fabric back to front and pull it tight. Insert the needle through the bottom of the shank and then put the needle back through the fabric near where you started.

Pull the thread tight. If you have a flat bottomed shank, the button will sit flat against the fabric. If your shank is rounded on the bottom, it'll flop around a bit.
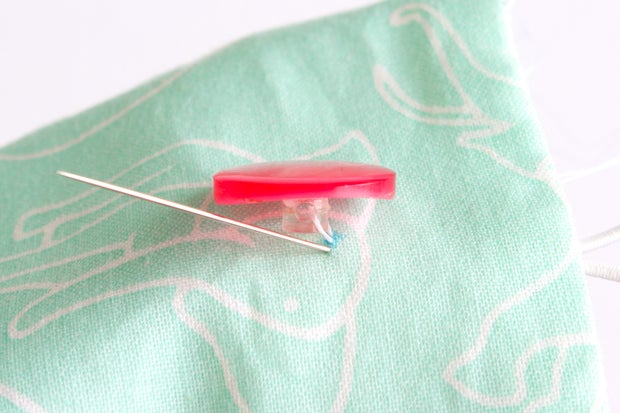

Push the needle back through to the front of the fabric and then push it through the shank. Then push the needle back through the fabric close to the shank. Repeat this process about ten times.


When the button is fastened down well, push the needle through to the back of the fabric. Pull the thread tight and then tie a few knots to hold the stitches in place. Trim off the excess thread.


And there you go - now you know how to sew on a shank style button. :D
Step 3: What to Sew Next

If you've finished the class and you're itching to try something else, use this lesson for inspiration!
Instructables has an amazing variety of hand sewing projects, so there's really no shortage of stuff to tackle next! However, that also leads to another issue: information overload. It can be hard to figure out which projects to choose!
To help you sew more awesome things faster, I've scoured the site and collected some of the best documented hand sewing projects we've got.
Scroll down to find loads of hand sewing projects, sewing resources and sewing techniques for you to move on to once you've completed the class.
I should also be sewing up some new projects to add to the list, too. :)
The photo above shows some of my favorite hand sewing projects here on Instructables:
- how to sew a leather thimble // make your own custom fit reinforced leather thimble using leather scraps
- bottle cap pincushion // a tiny, portable pincushion! perfect for a mobile sewing kit.
- make your own Instructables Robot plushie // learn about sewing 3D objects, and who doesn't want their own Robot? :D
- cute plushie bird // an adorable bird plush + pattern, plus more 3D sewing!
- sew a simple foldover clutch // how to sew a tiny bag - perfect for carrying your keys and wallet
- embroidery 101 // if you liked hand sewing, you may want to try embroidery!
Happy sewing!!


