

Introduction: Sharpie Drafting Compass


When working with metal and plastic, it is sometimes necessary to draw circles before cutting, sawing, etc. The normal way to do this is to use a drafting compass, but normal compasses won't necessarily leave a mark in some materials.
Sharpies are great for marking those hard-to-mark materials, but I wasn't able to find a drafting compass accessory for them, so here's an instructable for how to make a sharpie drafting compass. With this you can now draw circles on your most hard-to-mark material.
Step 1: Metal Working


This project uses a 1/4" wide by 12" long brass bar which needs to be machined. The following methods are used:
Cutting:
Use a hack saw and a custom miter box for sawing the brass bar accurately.
Drilling:
When drilling, work your way up to the final hole size for best accuracy:
- Use a center-punch or carbide-scribe to create a dent for drilling.
- Using a small drill bit to create a pilot hole.
- Expand the hole up to the final drill bit size.
- Drill with final drill bit size.
- For tight tolerances in screw holes, use a round file to finish the hole rather than a slightly-wider drill bit.
Tapping:
A tap & die set is used to create screw-holes and screw-heads. A die turns round-rods into screws (threads a rod). A tap turns holes into nuts (threads a hole). Although a tap and die is typically a hand tool, a drill press can be used (without the motor powered on) for tapping holes.
- Drill a hole for tapping which is slightly narrower than the threads.
- Make sure there is a hole under the metal being tapped so that the tap can come out the bottom.
- Place drops of cutting fluid (or oil) between the tap and the hole to make cutting easier and increase tap life.
- Use the drill chuck's key to rotate the chuck clockwise in quarter-turns.
- Every quarter-turn rotate the chuck an eighth-turn counter-clockwise to break chips.
- If it takes too much effort to quarter-turn clockwise, the hole may be too narrow or you may need to pull the tap out to remove chips.
Step 2: Slotting


The compass's needle point is held in place by a slot. To create the slot:
- Use a rotary cutting tool's cutoff wheel attachment in a drill press.
- Use a square piece of wood to hold the metal for slotting orthogonal to the cutoff wheel.
- Form the slot by moving the metal piece into and away from the rotation of the cutoff wheel.
- Deepen the slot by moving the wood closer to the cutoff wheel.
- Use a round file to widen the slot.
Step 3: Knobs


The compass has two wood knobs. One knob sets the radius of the circle. The other knob holds the sharpie in place. It is created by using a drill press as a lathe. To create the knobs:
- Use 1" x 1" x 1/4" hardwood squares.
- Using a ruler, draw a X from corner-to-corner on each piece.
- Mark and remove the corners.
- Center-punch the middle of the X.
- Drill the rounded square with a drill bit slightly narrower than the threads of a #6-32 screw.
- Use a #6-32 screw, two nuts, and two spacers as chucks to hold the wood.
- Turn the wood on a drill press. Use another block and sandpaper to round it into knobs.
Step 4: Needle Point


The needle point keeps the compass centered while drawing the circle. To form it, use brass or another hard material. I used tungsten because I had some spare welding rods. To form the point:
- Use a rotary cutoff wheel to cut the rod to length.
- Spin the rod in a drill press.
- Use a rotary cutoff wheel to sharpen the rod.
Welding Rods:
If you choose to use tungsten from welding rods, be careful:
- GREEN: Pure tungsten.
- RED: Contains thorium which is radioactive, do not use.
- BLACK or GOLD: Contains lanthanum.
- GRAY: Contains cerium.
- WHITE or BROWN: Contains zirconium.
The following table shows the Mohs hardness of various metals, from which it can be inferred that a tungsten point would be much more durable than brass or steel:
- Tungsten: 7.5
- Steel: 5
- Brass: 4
Step 5: Eye Joint: I


The interface between the metal of the compass and the wood of the sharpie holding block needs to have a larger surface area so that to torque of rotating the sharpie does not damage the wood. In this step, the surface area of the 1/4" wide brass metal is increased by soldering additional strips on either side. The hole may be drilled before or after this step:
- Work over a wood or paper work-space to prevent heat transfer from the brass to background.
- Use lead-free solder and a high-power (40+ watts) soldering iron.
- Solder small strips of brass on either side of the main bar.
- Use a flat surface and sandpaper to flatten the soldered area.
- Flip over and repeat previous two steps for the other side.
Step 6: Eye Joint: II


The joint from the previous step is rounded so that the edges do not damage the wood:
- Align the squared-joint with a long square piece of wood.
- Trace the squared-joint's center with a sharpie to mark the drill area.
- Use a center punch in the wood to mark the drill hole.
- Drill a hole slightly narrower than a #6-32 screw's threads.
- Screw the square-joint into the drill hole with a #6-32 screw.
- Use a belt sander and/or metal file to remove excess material as you rotate the joint.
- When finished, the square-joint will become round.
Step 7: Block: I


The sharpie holder is a small wood block. A screw holds to the sharpie to the compass eye-joint by tension. To form the block:
- Measure and mark the block for drilling.
- The sharpie hole should be narrower than a sharpie's diameter.
- The screw hole should be wider than a #6-32 screw.
- Drill the block.
- Taper the hole by rotating a sharpie with a strip of sandpaper into the hole.
- The sharpie should fit into the hole without wobbling from side to side.
Step 8: Block: II


For tension, the block needs to be cut in half:
- Mark the block down the center of the sharpie hole.
- Place the saw on top of the center mark.
- Look for symmetry on either side of the saw to confirm alignment.
- Saw the block in half.
- Sand the eye-joint contact area so that the eye-joint fits.
- Check the fit.
Step 9: Wood Finish


Finish the wood with rosin and paste wax. Paste wax is available at most hardware stores. Rosin can be made or purchased. It is sold at music stores for violins and is sometimes available at athletics stores for grip enhancement. If you make or purchase rosin and it is sold as a solid block, it can be turned into a powder by filing, crushing, or grinding.
First Coat:
All wood parts and the eye-joint need rosin. Rosin increases the friction between the sharpie holding block and eye-joint so that the sharpie's position can be fixed. Mix rosin powder with acetone (nail polish remover), which will create a mixture that is:
- Syrupy, like shellac.
- Dries as fast as shellac.
- Is more sticky than shellac.
Don't underestimate the stickiness of rosin. It's derived from pine sap, which is EXTREMELY sticky, so it is incredibly tacky before the acetone evaporates. I recommend using a small cap and a cotton swab to apply it since it would be too difficult to clean up a brush.
Second Coat:
For the second coat, apply paste-wax to all pieces of wood, but mask the sharpie and eye-joint areas of the wood block. Do this only after the first coat of rosin is dry otherwise it will be extremely sticky. Once this coat is dry, buff the wood and remove the masking tape from the wood block.
Step 10: Slider: I


A sliding mechanism is used to adjust the radius of the compass. This mechanism is made out of a 2 inch 1/4"-20 screw. In this step #6-32 tapers are added to the ends.
- Place masking tape on the body of the screw to minimize damage from placing it into a vise and drill press.
- Place the screw into a vise and use a hacksaw to cut off the head.
- Place the screw into a drill chuck and file down 1/2" on either side of the screw so that it is slightly wider than a #6-32 screw.
- Place the filed screw into a vise and use a #6-32 cutting die to cut threads into the ends. Reverse the die to get threads to the very bottom.
Step 11: Slider: II


In this step, turn the doubly-threaded screw into both parts of the sliding mechanism:
- Drill a hole slightly narrower than a 1/4"-20 screw into a softwood block.
- Screw the doubly-threaded screw into the softwood block. Use #6-32 nuts to assist if needed.
- Sand the wood block to expose the metal.
- Keep sanding until all screw-threads on the sanded face are gone.
- Mark a center-line on the screw for sawing.
- Drill a center-hole in the middle of the first half slightly narrower than a #6-32 screw.
- Drill a center-hole in the middle of the second half slightly wider than a #6-32 screw.
- Rotate the screw and sand the opposite side.
- Cut the doubly-threaded screw in half.
- Tap the first-half with a #6-32 tap.
Step 12: Assemble: I


Tthe needle point arm only needs four holes:
- Top: one tapped hole for a screw.
- Center: one loose hole for a slider.
- Bottom: two tapped holes for needle clamp.
When drilling the needle clamp, you can align the screw holes by attaching the two brass bars together with contact cement. After drilling, they are easy enough to separate. The clamp mechanism only needs one finger nut and may need 2-3 spacers so that tightening the nut applies pressure on the needle point body.
The extra holes on either side of the center-hole are there by accident.
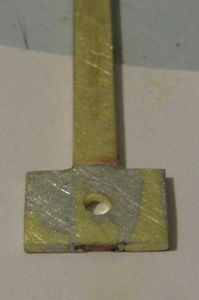
Step 13: Assemble: II


The slider mechanism has two sets of jam nuts with washers to hold the loose-hole slider in position near the end of a #6-32 threaded rod. Jam nuts are just regular #6-32 nuts which have been tightened against one another to prevent them from moving around.
The knob is held in place by an end nut, washer, another washer and an another nut. It should already be a tight fit because its center has a slightly narrower diameter than a #6-32 screw, but the nuts make sure that it does not move out of position.
Step 14: Assemble: III


The sharpie arm requires only 3 holes:
- Top: threaded screw hole.
- Center: loose hole for slider mechanism.
- Eye: loose hole for wood block.
The extra holes on either side of the center hole are a mistake. The knob is held in place by a screw with a nut on the opposite side to keep it fixed to the screw. Because the sharpie hole in the wood block is tapered, make sure that it faces the correct way during assembly.
Step 15: Assemble: IV


The top assembly is a simple brass bar with two loose holes. Finger nuts are used to allow adjustment of the top assembly as the radius changes.


