

Introduction: Simple Pallet Chair


The problem was that we always hang outside at my one friend’s house, and the lawn chairs that we use always break. My solution was to design and build a chair cheaply, that hopefully won’t break soon, that can withstand the elements.
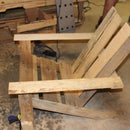
Step 1: Design

I wanted a simple chair that was comfortable, and easy to make.so I designed the chair in the picture. The chair consists of the two main cross braces (to support) and slats ( which are tied together to make the seat portion).
Step 2: Tools and Materials


I wanted to make it with minimal tools and materials, so I tried to keep it simple.
Tools
· Screwdriver
· Drill, or drill press
· Saw
· Hammer
Materials
· One or two pallets (disassembled)
· Nails (which I salvaged from the pallets), and screw
· Paracord
Step 3: Start Building


For the braces I wanted to use the 2x4 to make it sturdy. I drew out a few different designs from a few measurements that I made and started cutting the angles that I like. Please note always be careful and make sure there are no nails in the wood you are cutting unless the blade is made for it.
Once I cut the boards I nailed and screwed them together and realized I should add another support to it so I nailed in slat from the pallet to make it sturdier. Next I nailed both of the braces together with cross braces, see the third photo if you’re confused. Two of the cross braces will be used in the sitting part of the chair.
Step 4: Start Drilling


Sorry I skipped a step but in the mean time I cut a bunch of slats that would fit in-between the x braces on the end (see first image). This is what I was drilling. I marked out six places where I wanted to connect them and started drilling. The drill bit I used was slightly larger than the paracord was so I could get it through the hole. Once I drilled one board I used it as a template to drill the rest on both sides.
Once all those holes were drilled I used one of the boards to drill into the back cross brace and the cross brace at the knees
Step 5: Lace It Together


Sorry I don’t have any pictures of how I actually did, but it was pretty simple. I think if you made it this far you can figure out how to tie them together. An optional step in this process is to use a lighter and burn the ends of the paracord to keep it from fraying.
Step 6: Final Thoughts
After making the chair and sitting in it I think it is pretty
comfortable, but there are a few things I would change. One change would be to make the base wider so it is more stable. Another would be to make the chair deeper is you can recline further in it. Those are the only two problems that I would change. I hope you enjoy.

Participated in the
Reclaimed Wood Contest 2016

Participated in the
Outdoor Structures Contest


