

Introduction: Single Edge Safety Razor Blade Grips


Note:
You'll find the STL files at the end of this instructable.
Background:
There are a lot of different tools to cut things with - utility knives, exacto knives and, amongst others, single edge safety razor blades. The big advantage of the latter one is that they are thin and very, very sharp indeed, making them well-suited to cut through a variety of materials. Paper, cardboard, soft / thin wood, plastic, leather and so on can all be cut (mostly) easily and accurately with aforementioned razor blades.
The problem comes when cutting a lot of things and worsens if they are hard-to-cut materials such as leather. The thin metal backing of the razor blade really starts digging into your finger and hurts quite a bit, lessening the viability of this tool for cutting despite the often times superior sharpness.
If you have encountered this problem yourself, look no further for I bring you the solution right here:
A variety of different grips for safety razor blades which cost maybe 10-20 cents and 1-3 hours each to print.
Not only have I been testing these, I handed some of them over to a talented cosplaying friend of mine, Lie Chee (Instagram, Twitter, Facebook) for getting some additional feedback - she said she liked them quite a lot and apparently they're coming in handy with her new costume build.
Goal(s):
- Design a comfortable grip for single edge safety razor blades
- If possible, make it a single piece
- Make it easily 3D-printable
- Try to keep compatibility for FDM, SLA / DLP, SLS, etc. as well as possible so anyone can print it
Safety Advice:
This instructable makes use of 3D printers and razor blades. Especially the razor blades are very, very sharp and can cut you pretty badly, so remember to handle them with care. Also, 3D printer hotends are quite hot, so please don't burn your fingers either.
Step 1: Tools and Materials
Tools:
- 3D printer / 3D printing service
- If you don't have a printer, you can use a 3D printing service, e.g.:
- 3dhubs
- Shapeways
- iMaterialise
- ...
- Slicing software
- Exacto knife (optional, for cleanup)
- 3D design software (optional, if you want to recreate it)
Materials:
- 3D printing supplies (if doing it yourself)
- Single edge safety razor blades
That's about it. It's a nice, small and simple project which hopefully turns out to be useful to many crafters.
If you do not own a 3D printer yourself, the grip is fairly small and uses little material, which means it prints fast and should therefore be fairly cheap even if you need to outsurce the printing itself. If you have a printer yourself, a single grip should set you back maybe 5-20 cents (depending on which exact grip you are printing and how expensive of a filament you are using, provided you are using an FDM printer) and need 1-2 hours for a print, given 0.1mm layer height, 5 shells and 20% infill.
For fun I checked with 3Dhubs and the price estimate I got for these grips is 1-3 bucks per grip with 0.1mm resolution PLA on FDM printers. I believe this should be affordable enough for everyone, even if they do not own a printer themselves.
Step 2: Design Considerations / Technology Limitations / Rough Idea
Before you go on merrily designing away at your problem, you should first consider what material you want / need to make your item out of and which manufacturing technology you're going to use. Once you have decided on those, you can add the constraints resulting from your choices to all considerations you need for your item itself.
Blade grips are quite often made from plastic if there is not much pressure or shearing forces involved. With safety razors, those should not be a problem, so I can use plastic to make a grip.
Manufacturing Technology:
I own a 3D printer, namely a Prusa i3 MK3 which is an FDM printer - a Fused Deposition Modeling machine. These 3D printers take a roll of plastic filament string, heat it and deposit it on a build surface, adding layer after layer on top of the previously laid ones. 3D printers are great to make fairly complicated, functional parts with pretty darn decent accuracy which is perfect for this project.
Now if one wishes for good printability and wants to avoid using supports and / or brims, a flat contact surface for good adhesion to the print bed ist the first constraint to add. The next problem is overhangs. Many printing technologies including FDM and SLS / DLP have a problem with printing shallow angles and need to generate support structures for those. As a rule of thumb, angles over 45 degrees from the printing plane are safe. In truth, if the portrusion is rather small, shallower angles are viable, but testing might be needed. Finally, as the material is deposited layer by layer but the fusion between layers is not that strong we need to make sure that any mechanical stress the part is exposed to does not run along those layer lines, otherwise the part may easily break.
Lastly you need to think of what margins to use between your parts, how much slack you can accoundt for so that everything fits nicely together. For instance of you design a hole of 1mm and want to insert a 1mm rod into it you might find that the printer was not perfectly accurate, that the part shrunk or that the fit is simply too tight for other reasons. As such, margins / offsets are needed. For fairly tight fits I typically use offsets of 0.1-0.2mm.
Material Choice:
The material I want to use for printing is PLA, mainly as it is really easy to print with and no extensive post-processing of the print is to be expected. PLA is not as strong as ABS or PETG, but it should sufficient for this application.
Constraint Summary:
- Flat side towards the print bed for good adhesion
- Overhang angles of 45 degrees or more
- Expected mechanical stress not along layer lines
- Parts strong enough so the weaker PLA will still hold up
- Offsets / margins for accuracy
- The razor blade has to fit snugly
Rough Design Concept:
When cutting with a safety razor, most of the force and pressure is transmitted to the thin metal spine, that is to say away from the blade. Some force is directed at the back edge of the razor, away from the cut direction (basically drag). As such, that back and side of the safety razor must be held firmly and the grip must be solid there in order to withstand those forces.
With the spine being a bit thicker than the blade itself it can be used for positioning / holding / locking the blade in the grip. The same goes for the two cutouts at the sides of the blade.
One side must of course be open for the blade to portrude out of the grip and another may be open to insert the blade, or rather it needs some sort of locking mechanism if the grip is meant to be made from a single part only.
As such I decided to model the part upright with the razor blade edge perpendicular to the base surface. The bottom and back sides (blade spine) will be solid, the front have an open slit for the blade and the top will be a springy bit which can be pused aside to insert the blade, and locks it in if closed.
Step 3: Design the Grip


With the material and manufacturing technology set one can start thinking about the proper design itself. Naturally, many ways lead to the end product, so I'll just show you mine. What I did, how and why I did it the way I did.
- I measured and sketched out the single edge safety razor blade dimensions (image #1).
Optimally you'd accurately recreate the whole part, but for this simple of a project it is sufficient to know some key dimensions:- Blade thickness, width and depth of blade to the spine
- Spine thickness, width and depth
- Position and sizes of the side cutouts which are used to secure the blade
- Design a basic outline of the blade grip (image #1)
- Make sure to leave an offset of 0.1-02.mm around the blade for a good fit
- Make sure the walls are thick enough to withstand the pressure from cutting. All walls I designed are typically 1.5mm thick or thicker, which ought to be solid enough.
- Taper the edges towards the cutting edge of the blade. This will make it feel less blocky and hopefully improve the ergonomics.
- Form the basic body shape (images #2 + #3)
- Closed bottom and back, open front and top
- Make sure to add a peg fitting the blade cutout for locking the blade at the bottom side
- Make it large enough to fit the whole blade height and add a bit on top
- Add a top side locking peg (image #4)
- First slit the side with the locking peg so it can function as a spring
- Next add the locking peg to the top side. As this is an overhang, make sure to tilt it. However, to preserve the locking functionality an overhang angle of 45 degrees as usually suggested for easy support-free printing will be too steep. The good news is due to the relatively small width of the overhang and due to rounding it, I can get away with an overhang angle of 30 degrees which should work just fine.
- Add opening aid (image #5)
- Functionally, the previous step should be sufficient, but opening the blade grip and inserting the blade might be challenging. Therefore the springy locking side needs to be elongated a bit and an opening tab is added to make it easier to insert a blade.
- Add a cutout on the non-springy side to accomodate for the opening tab
- As the opening tab is an overhang, angle to bottom surface 45 degrees. Why not 30 degrees? Because the opening tab overhang is substantially larger than the locking peg and there is no functional reason for a shallower overhang
- Round outside edges (image #6)
- To prevent annoying, sharp edges, round them over. It does not matter if the printer can not resolve them perfectly, it mainly serves to break up the sharp 90-degree-edges and reduces the need to hit the part with sandpaper after it has been printed
- OPTIONAL (image #7): Go wild with variants
- For prototyping purposes I have settled on three different base widths: small, medium and large
- I have experimented with adding a finger rest for better anti-slip behavior and pressure application while cutting
- To improve the grip even further I have experimented with knurling patterns
Step 4: Prototyping, Printing & Finishing

Living the Rapid Prototyping Dream:
As already shown in the previous step a single base model of the razor grip is not sufficient in my eyes. The combination of having the 3D design software, a 3D printer and the parts being fairly small and cheap really let me live out the concept of "rapid prototyping".
For starters after printing the initial, simple grip version I found that yes, it does mitigate the hurting-finger-problem, but it might do so even better. Therefore I designed two more versions with increasing thickness, named "medium" and "large" to see if these thicknesses would improve the handling in a noteworthy fashion.
At the same time I figured that a regular square design might not be the end-all-be-all of things. For instance, many craft knives feature a small portrusion towards the tip of the blade as a finger rest which allows to put more pressure on the tip while cutting. Seeing the value in that I whipped up a version which included that as well.
Lastly (for now), I have noticed that the blank sides are rather comfortable to hold, but may be a bit slippery. As I very much like good knurling on tools to improve the grip I decided to give it a try and followed some videos on youtube illustrating on how to do that with Fusion 360. I don't want to keep those from you, so here's the creme of the crop that I referenced:
- Lars Christensen: "Create Cool Patterns & Knurling for 3D Printing — Fusion 360 Tutorial — #LarsLive 116"
- Paul McWhorter: "Learn Fusion 360 or Die Trying LESSON 8: Design Knurled Nut and Bolt for 3D Printer"
- Spark Plug: "Creating a knurl surface / knurling - fusion 360 tutorial"
- Radek Paszkiewicz: "Fusion360 knurling"
I don't want to cheat you out of my prototypes, so you'll get all STL files at the end of this instructable. My personal favourite so far is the Medium one with Knurling and a Finger Rest. My cosplaying friend on the other hand preferred the Medium one with Knurling but without a Finger Rest.
Printing:
Given the design constraints that went into these models they sould all print fairly easily, which means no rafts, no supports, just straight up printing. With the razor grips being rather slim and tall a brim of 3-5mm is recommended, but that's easily removeable and does not use a lot of plastic. Therefore place the grips with the blade insertion opening facing upwards.
I recommend printing the grips at a 0.1mm (100 micron) resolution due to some finer details and for a better fit of the razor blades. 5 shells and 20% infill should provide sufficient strength for its intended use. I have yet to break one despite putting considerable pressure on these when cutting hard materials.
For the knurled versions you may need to check your slicer settings and make sure that between the knurls there is at least one, better two traces / lines connecting the pyramidal shapes at their lowest (most inward) points.
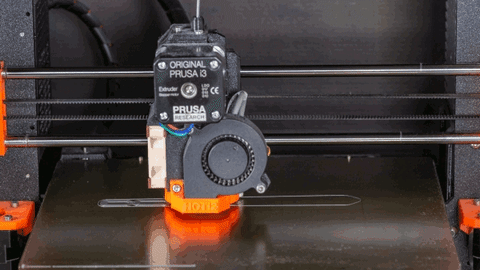
By the way, this printing timelapse gif there is made from ~230 seperate images I took with my DSLR over about 8 hours (one every two minutes), edited and then stitched together into a simple ~15-second-gif (15fps). Praise be unto the software developers of the world for automatic timelapses and good image editing and stitching software.
Also, for the eagle-eyed viewers among you, don't mind the grimy-looking surface of my build plate - that's residue of 3DLAC which gets pushed around and accumulates when cleaning the build plate with IPA. So far I only hit my build plate twice with it and I'm 4 spools of filament in. Virtually no adhesion problems at all! That stuff's magic in a can, I really can't recommend it enough if you have adhesion problems with PLA.
Finishing:
There should be barely any finishing necessary. Remove the brim (if you used one) and maybe hit those edges with a bit of sandpaper. In my case there was some slight stringing, but that was removed easily enough as well. Other than that the razor grips should be ready-to-use fresh off the printer.
Step 5: Usage

As it is easier to demonstrate than describe the blade insertion and extraction I have added a video to clearly show you how it works. If you prefer it in writing, essentially you use the flat side of the razor to push the small portrusion at the top to the side at which point you can insert the razor blade into the grip. Be careful when inserting it as the razor is of course very sharp, so mind your fingers.
Once the razor is fully inserted the locking tab should spring back into place and lock the razor in. For removal, push the locking tab to the side while gently pressing on the bottom side part of the razor to push part of it out of the grip, at which point you can grab the razor and fully extract it.
For demonstration purposes I have cut a couple of different materials which I have lying around. Of course the sharp blade itself is the most important factor, but I wanted to show that with the grip you can really push down on it without hurting your fingers and without the grip taking any damage. Here's my test materials:
- 0.4mm construction paper
- No challenge at all, it's thin and not that hard after all
- 5mm foamboard
- Again, no problems as the foam is soft
- 1mm gasket rubber
- A bit thicker, but still fairly soft. The blade glides through easily
- 1.5mm vegetable tanned leather
- This is where it gets harder, but nonetheless I got nice, clean and easy cuts
- 3.5-4mm vegetable tanned leather
- The first proper challenge, with a considerable amount of pressure involved
- Several passes might be necessary, but the blade can be controlled well with the grip
- 1.8mm cardboard
- LOTS of pressure, but the grip holds
- Multiple passes with the blade were necessary, but that is not surprising for this material and thickness
You can see the results in the video as well.
Step 6: Remarks, Potential Improvements & STL Files
Remarks / Potential Improvements:
Overall I'm quite happy with how these turned out. They hold the razor blades well, allow one to apply quite a bit of pressure while cutting and don't dig into your fingers such as standalone blades do. The knurling helps improve the grip without feeling particularly pointy, and the finger rest gives a comfortable place to apply extra pressure (although Lie didn't like that - personal preference I guess). They should serve me well when leatherworking and during a host of different cutting-related activities.
I do think I could play around a bit more with different thicknesses and I might improve the ergonomics even more, maybe by making the whole grip more triangular in shape.Perhaps instead of knurling divets for fingers might be even better and feel more natural.
A negative point is that as the grip is still fairly small overall ones hand may cramp up because it might be a bit difficult / awkward to hold. However, I think this is in the nature of such a compact grip and standalone blades are no larger to begin with, so it's an inherent property. If more ergonomics are necessary it might be better to go with a route similar to a straight razor-like grip, or go more into the direction of a utility knife.
The grip also covers quite a bit of the blade itself, thus reducing the effective maximum cut depth which can be achieved with the razor blades. With a somewhat stronger material such as ABS or perhaps Nylon it might be possible to reduce this, but some loss in cutting depth will be essentially unavoidable with this design. After all the blade needs to be held securely and not flop around in the grip or have the grip break when applying a bit too much pressure.
Also do note that there are a couple of different versions of those single edge safety razor blades. Mostly they differ in the blade thickness. There's some extra thin ones, the regular ones and some heavier-duty ones. I think all should fit, but if you encounter any problems at all, please do tell me.
STL Files:
Now as promised, here are the STL files of all the different single edge safety razor grips I have designed so far. You can download them here, or head over to my recently registered thingiverse account, where you'll find them under the following link:
https://www.thingiverse.com/thing:3173412
That's just if you prefer to download things on thingiverse rather than instructables, for whatever reason.
Personally I'd recommend the medium knurled grip with a finger rest. I think it offers the best grip, ergonomics and allows to apply a decent amount of cutting pressure without putting too much strain on your finger.
In any case, have fun using them and as always I welcome any kind of criticism, remarks or ideas for improvements and such. If you think you have a nifty design change proposal, do tell me and I'll see if I can put it into practice. After all this is meant to make the lives of all crafters using these blades just a little bit better, so anything helps.


Participated in the
Plastics Contest


