

Introduction: DSLR Macro Photography: a Comprehensive Overview


Note: View In Steps
I suggest you do view this instructable in steps, not using the ALL STEPS functionality.
This instructable is long and has a lot of pictures (over 100, if memory serves right). It might slow down your browser if you open all steps at once. If you don't have much RAM it might even outright crash it.
You have been warned.
About:
There's plenty of macro instructions around all over the web. Instructables itself has some pretty good ones on macro photography. However, those that are image-rich, explain the background, gear, how to use it and show plenty of results while explaining how they were achieved are few and far in between. This is something I wish to remedy with this instructable.
I have been writing, working on and tweaking this one on-and-off since before the last photography contest to make it as good and complete as possible. Almost didn't make it in time for this one, either!
And while even now this is far from a complete overview, I'll update it every once in a while when I'll have learned about new methods and obtained the right gear to achieve macro photography with those methods.
So though it's somewhat incomplete I hope this will help some people find their way into the wonderful field of macro photography.
As Thomas Shahan said: "Life on Earth is really, really beautiful and it really deserves a closer look."
So keep fascinating people with the fantastic small worlds all around us.
Background:
It sounds a bit cheesy, but ever since I was a kid I preferred to be the one behind the camera. One reason for that was that I was pathologically unphotogenic and looked terrible on most pictures. I still do. The other reason is that I liked cameras, the technology and the possibilities they open up.
Beginning around 2009, around the same time my love for DIY started budding, I began taking more pictures of stuff which piqued my interest. Mostly these were pictures of the things I made myself, wanting to document my finished projects.
I started out with a Nokia N97 mobile phone as my only available camera, which was ... moderate (at best). After a few years and a summer job I moved on to a Samsung WB2000 compact camera which opened the world of manual mode photography to me. This was incredibly helpful and educational to me. And while that compact camera is still pretty decent and I still use it as a fallback when my current DSLR is unavailable, I found that I kept hitting limits with it. Most notably how close I could get, how much light I could get in, how long I could expose an image, limited focal lengths, and so on.
So after saving up for quite a while, working while studying, I stepped my game up and got myself a DSLR which I am very happy with. This was several years ago during which I kept absorbing information about photography, kept getting good deals on used or new gear and built up my experience.
My two main photographic interests are product photography (so I could take better pictures of the things I make) and the relatively related macro photography (as I do like insects, amphibians, reptiles and am generally fascinated by the small worlds all around us).
So today I want to walk you through some terminology, some very superficial physics, some recommended gear, some software and several different methods along with some tipps and tricks about macro photography.
And if I have overlooked anything or got something wrong, please do point it out so that I can keep this instructable as up-to-date and complete as possible to help other aspiring macro photographers. I would also be grateful for any additional resources or good gear you could point out. If you have any ideas for images or things you'd like to see enlarged you can leave a comment as well. Maybe I'll add them with the next update of this instructable.
Goals:
- Explain what macro photography is
- Explain some of the physics behind it / how the methods work (superficially)
- Explain the challenges
- Show, demonstrate and explain different methods to achieve macro photography with a DSLR
- Show some useful gear to make macro photography easier
- Show some software to make macro photography easier
- In general, give you a good, solid overview and understanding of macro photography
Disclaimer:
Though I have a couple of years of research and shooting under my belt I am by no means a professional, merely an enthusiastic amateur.
I only have experience with the Nikon DSLR system (mobile phone and compact camera aside), so some of my advice or recommended gear may be specific to this system. However, most stuff should work the same with other systems, or similar alternatives should be available. Futhermore, all methods I mention are nondestructive and reversible. Meaning you won't have to take apart any lenses, glue stuff together or anything. There's other instructables for that.
Everything I say here is, unless otherwise stated, my very own personal opinion and should be seen as such. Your opinion may differ. If you have any remarks or recommendations, feel free to share them. I am still learning and am thankful for any feedback and insights.
All pictures, graphics, videos and such used in this insctructable are of my own making, or are creative commons and have the source listed or are links to external resources which again have their source listed as best as possible.
I do not get paid, get commissions or have any personal or professional advantages for linking to or recommending any products I mention here. It's just stuff I find useful, cool or remarkable for macro photography. If you know of other nice stuff, by all means, do point it out to me.
Step 1: Terminology

Let's start out with a couple of terms that you should be familiar with.
I will give you short descriptions of them, for this is not the place to give you a detailed rundown of what each of these terms really means or entails.
- Aperture: This is a value describing the opening of your lens' diaphragm. A larger value (e.g. f/16) means the opening is smaller, decreasing the amount of light entering the camera and increasing the depth of field. Conversely, a smaller number such as f/1.8 means the opening is larger, more light enters the camera and the depth of field is smaller. Small apertures can cause diffraction. This negative effect tends to get noticeable at around f/11 at gets worse with smaller apertures (larger f/number).
- Close-Up Photography: There is no real definition for this, but usually this is somewhere between a reproduction ratio of 1:4 to 1:1 and falls into the macro photography range.
- Color Temperature: A value in Kelvin which denotes the basic color / temperature of the light. A lower value stands for warmer light (orange-ish / yellow-ish), a higher value stands for cooler light (blue-ish). Average daylight color temperature is defined as 5600K.
- Crop Factor: A factor multiplying the focal length resulting from using a crop frame camera. The factor is derived from dividing the full frame sensor size (35mm) by the given crop frame sensor size (e.g. 24mm for Nikon DX, giving a crop factor of 1.5 = 35mm / 24mm).
- Crop Frame: Refers to cameras with sensors smaller than 35mm width, such as Nikon DX and Canon cameras with APS-C sensors.
- Depth Of Field: The depth of field or DoF describes the distance between the nearest and farthest object in a frame that are of acceptable sharpness. Imagine this as the distance between two parallel planes between which everything is in focus.This is not a fixed value and is dependent on many different factors.
- Diffraction: The phenomenon of light hitting the edges of the aperture blade and scattering, thus decreasing the sharpness of the picture. This effect tends to get noticeable at around f/11 in most cases. Due to this effect you will actually lose sharpness when stopping down too much.
- Effective F-Stop: The amount of magnification influences the f-stop, so your effective f-stop can be very different from the one you have set. As a rule of thumb, it is equal to the set f-stop * (1 + Magnification). So let's say you are shooting at 2x magnification with an f-stop of f/5.6. The effective f-stop will be 5.6 * (1+2) = f/16.8
- F-Stop: The aperture setting of the lens you are using, usually denoted by the letter 'f' and a slash followed by a number. E.g.: f/1.8
- Filter (Thread) Size: This is a number denoting the diameter of the filter thread for screw-in filters, typically located at the front of the lens. There are rear filters and drop-in filters as well, but they are pretty rare by comparison.
- Focal Length: The distance between the (outermost) lens (element) and the focal point at which the projected image is in focus while the lens is focused at infinity. As a rule of thumb, the larger the focal length, the further away you have to be to get the same frame of a given subject. Wide-angle lenses have a short focal length, tele lenses have a long focal length. Typically the minimum focus distance increases with the focal lenth as well.
- Full Frame: Refers to the sensor size. Full frame sensors have a width of 35mm. The focal length of a lens is based on a full frame sensor, even with lenses designed for crop factor cameras.
- ISO: Also called film speed this value is a measure for the light sensitivity of your camera's sensor. Typical ISO ranges start at 50-100 and can go up to 409600 (or even exceed that). Note that higher ISO will lead to sensor noise which will degrade your image quality up to the point of uselessness. Typically the lower the ISO, the better the (potential) image quality.
- Lens Flare: Generally unwanted scattering of light inside the lens, typically caused by a bright light in the image frame or shining on the lens, but not inside the image frame. May take different forms such as a haze, washing out the colors in the image or artifacts, typically on the form of circles or oval shapes with a strong color tint.
- Lens Hood: A hood typically made from plastic or metal that shades the front elements of your lens from light, minimizing the chances of getting lens flare.
- Life Size: A 'true' macro lens is expected to be able to take pictures at life size, that is a 1:1 reproduction ratio.
- Magification: The amount of magnification is equal to the result of the division of the reproduction ratio values. So at 2:1 you have a magnification of 2/1=2.
- Macro Photography: There is no solid definition for this, but usually this describes taking pictures close to life size, or even exceeding it.
- Minimum Focus Distance: The closest distance that your system (camera, lens, any modifiers) still can focus at, typically measured from the front lens element. At the same time this gives you the maximum reproduction ratio with the given setup as you are as close to the subject as you can be while still getting sharp pictures.
- Photomacrography: Synonymous with macro photography.
- Photomicrography: A type of photography which involves taking pictures through microscopes or similar contraptions. The reproduction ratio is often much greater than 1:1, although there is no clear number. It can easily reach the double or triple digits.
- Prime Lens: Unlike zoom lenses, prime lenses have a fixed focal length. While this limits the flexibility of the lens, it often comes with the advantages of a larger maximum aperture (smaller f-stop) so that they are able to let more light in and a simpler lens construction with less elements, meaning sharper pictures and less distortions. In general, that is.
- Reproduction Ratio: The reproduction ratio describes how large your subject is in relation to the sensor size of your given camera using two values seperated by a colon. A reproduction ratio of 5:1 means that 5mm on the sensor equal to 1mm of the subject giving you a 5x magification. Conversely, a 1:4 ratio means that 1mm on the sensor is equal to 4mm of the subject, that is a 1/4 life size representation. The reproduction ratio is calculated by dividing the sensor size by the width of the picture (done e.g. by photographing a ruler, calipers, reference target, or something similar).
- Sensor Size: Quite simply the size of the sensor in your camera, usually in millimeters. For a full-frame camera that will be 35mm width, for a Nikon DX camera it will be around 24mm (23.5mm for the D7100) and so on. You can look up your sensor size in the camera manual or online, e.g. on wikipedia.
- Step-Down Adapter / Ring: Step-down adapters allow you to use filters with a smaller filter thread size than that of your lens with that lens. With a 77-67 step-down-ring you can use a 67mm filter on a 77mm filter thread lens. Keep in mind that this will block a part of your image and may cause a variety of problems.
- Step-Up Adapter / Ring: Step-up adapters will allow you to use a larger diameter filter with a smaller diameter lens. Using a 67-77 step-up adapter will allow you to use a 77mm filter on a 67mm filter thread lens. In general this has little to no disadvantages quality-wise, however it may make it impossible to use a lens hood and it may make your setup more susceptible to lens flare.
- Shutter Speed: In light of all different kinds of digital cameras this can be summed up as the amount of time your sensor is exposed to / registering light. Effectively the timespan you are giving your sensor to take the given image.
- Telephoto lens: Commonly known as a tele lens, this type of lens has a large / long focal length. These lenses are well-suited to taking images of smaller subjects from a (relatively) large distance.
- Wide-angle lens: A lens with a small / short focal length. These lenses have a wide viewing angle and are well-suited to take pictures of a large subject from a (relatively) short distance.
- Zoom lenses: Unlike prime lenses, zoom lenses have a range of focal lengths they can operate at. This makes them more versatile as you do not need to move to reframe the subject and can avoid cropping the picture unnecessarily. However due to a more complicated construction and more elements zoom lenses tend to be less sharp and have more distortions than prime lenses. Also their maximum aperture tends to be smaller, that is they have a higher f-stop they start out with. There are different types of zoom lenses, most importantly fixed aperture and variable aperture lenses. The former maintain their maximum aperture throughout their zoom range, while in the latter case the maximum aperture changes throughout their zoom range, getting smaller at the long end.
Step 2: Manual Photography

Any digital camera worth their salt will offer you at least four main modes for taking pictures: Aperture priority, Shutter priority, Program Mode and Manual Mode. Those are known as the PASM (sometimes PSAM) modes and most other modes are a bonus.
- Aperture Priority (A)
In this mode you can manually set the aperture to whatever you like and the camera will decide on an exposure time (shutter speed) that will result in a properly exposed picture, by whatever metric the camera uses to calculate that. This mode is rather flexible as there's a lot of shutter speeds to choose from. - Shutter Priority (S)
In this mode you can set the exposure time, or shutter speed, and the camera will adjust the aperture as it sees fit. Compared to the shutter speed the aperture is a little less flexible as the range to choose from is smaller, but it works out OK usually. - Program Mode (P)
This is the I-don't-want-to-think-about-it mode, where the camera will choose both the aperture as well as the shutter speed to get a properly exposed picture. Commonly known as "automatic mode", this will let you concentrate on framing, composition and when to press the shutter release button to take a picture. Also where to focus at. Results may be a bit different than you expect.
If your camera has a dedicated "Auto" mode, that will likely control the ISO and a few more settings, too. - Manual Mode (M)
You're telling the camera to hold your beverage of choice as you've got this. You're controlling both the aperture and the shutter speed, along with pretty much anything else the camera has to offer. This mode gives you the most control over your camera and thus the resulting picture.
Do refer to your camera's manual, as it might or might not be setting ISO automatically, too. Or be messing with other settings.
Now most people don't seem to know this, but if a camera shows you it's shooting at f/5.6, 1/320s, ISO400 then it's most likely not really doing that, especially in non-manual modes. Instead it might be shooting at f/5.3, 1/295s, ISO380. However as the closest set values are the ones mentioned previously, this is what it will display. It usually doesn't have any big impact, but you might want to know that nonetheless. You can check the picture's EXIF metadata to see the actual values. Some cameras only write the closest set values into the EXIF data though.
Personally, I only use aperture priority mode when the camera is on a tripod and I don't particularly have to freeze a subject in motion or anything. Most of the time though I am shooting in manual mode, and so should you!
I don't really want to extensively list the advantages of the manual mode or which setting has what kind of impact on your image as that's not the point of this instructable, so I'll just give you a few really good cheat sheets that you can print, slap on your wall and refer to to see what those settings really do to your picture:
Step 3: Inherent Problems With Macro Photography

Every type of photography comes with its own set of technical and perhaps artistic challenges. In landscape photography you might have too much light and need to use ND filters to get slow shutter times for beautiful bodies of water, in sports photography you might have trouble to get the shutter speed fast enough to freeze the action, or have trouble getting a good focus lock on your subjects, in concert photography you need to deal with an overall lack of light and a lot of interfering stage lights causing color casts and harsh shadows.
Leaving the artistic side of image composition, subjects, background and such aside, macro photography has quite a few challenges on its own. With an increase of magnification these problems also tend to get more and more severe and dealing with them gets ever more difficult.
The most distinctive problems which I want to present are:
- Depth of field (DoF)
- Lack of light
- Working distance
Depth of field:

As described in the terminology, depth of field refers to the distance between two imaginary planes (mostly) parallel to your front lens element which enclose a region in which everything is reasonably in focus. In many forms of photography this is used as an advantage by visually separating the subject in focus from the back- and foreground, which in turn becomes blurry and depending on the lens may display a very pleasing bokeh (technical term for blur caused by the aperture).
In macro photography however, with an increasing magnification the DoF decreases drastically. With higher magnifications it is not rare to see a DoF of 20-100 micrometers (or less!), that is 0.02-0.1 mm. For reference, a human hair has a diameter of 18-80 micrometers. So unless what you are photographing at those magnifications is very planar and perfectly in focus, you will not be seeing much sharp parts in the image. A smaller aperture may help mitigate this problem, but quickly introduces diffraction as a new problem to deal with.
Lack of light:

This is closely tied to the magnification and effective aperture as well. Smaller apertures mean that less light is reaching your sensor, and specialist high-magnification optics such as microscopes have relatively small apertures to begin with. But with the decreasing DoF you want to use even smaller apertures to get enough of the image to be sharp, further decreasing the light reaching your sensor. If you are not shooting hand held you may use a slower shutter speed at the risk of introducing some motion blur (even on a tripod, subject and camera are rarely perfectly still). Otherwise you have to indroduce external light sources, either in the form of a flash or from a continuous light source. With more magnification, you're going to need more light.
Working distance:

Now using a smaller aperture to combat a small DoF and external lights to combat the loss of light unfortunately is not enough as this is not the end of the problems inherent with macro photography. With higher magnifications you will increasingly encounter the problem of working distance, that is the distance between the front element of your lens and your subject. The distance may become so short you simply can not accomodate any additional illumination from the front or side any more as the lens is in the way. As an extreme example, microscope lenses may have working distances of a few millimeters, some requiring to outright dip into a drop of fluid either on top of or containing the subject in question. Another example would be using a wide-angle lenses with extension tubes which may result in the focus point being on the front lens element or even inside the lens itself! Now this might all be still somehow manageable with still subjects, or in studio / laboratory settings, but most live animals such do not tend to hold still for long in the first place, and a big camera right in their faces certainly won't help convince them to either.
Side note: The "space invader" refers to an Australian alcoholic beverage commercial starring two blokes. The whole series of commercials is great, but I'll refrain from linking. You'll have to find it yourself. Though searching for it will certainly be a good call, mate.
In short:
Overall macrophotography gets increasingly difficult with higher magnifications with everything working against you. It's not all that bad though. With a little bit of tinkering, tweaking and ingenuity you'll be able to get good results in almost any case. Next I'll run you through the possibilities of achieving macro photography and a few tricks to get better results. Prepare for walls of text and bursts of photos.
Step 4: Reversing Rings

What is it?
Reversing rings are metal rings which on one side have a male filter thread to fit the front of your lens and on the other side a (typically) 'cold' lens bayonet. Just like a cold (flash) shoe, it is 'cold' because there are are no electronical contacts so the reversing ring does not communicate with your camera at all.
While you can simply handhold the reversed lens, reversing rings are much more comfortable and really affordable so there's no excuses to not own one or two just in case.
How does it work?
Essentially, lenses are made to project a big plane (usually far away) in front of the lens onto a small plane, that is the camera's sensor, behind the lens (usually very close). A reversing ring enables you to switch these proportions around to project a small object close to the lens onto a bigger plane on the back of the lens.
The bonus point here is that you don't introduce any additional glass into the equation, thus the optical quality of this method is quite good. The small caveat is that you are only using the center part of the lenses elements, thus any blemishes or faults here will have a stronger effect on your image than with regular photography. From my experience you can achieve higher magnification ratios with wide-angle lenses, although this does come at the cost of a reduced working distance.
Pros:
- Affordable
- Light, setups can be handheld
- Enables you to use off-brand lenses of all kinds, as long as filter thread size fits your reversing ring
- Fairly high quality results
- Anywhere from small to large reproduction ratios
Cons:
- Generally short working distance
- Small depth of field
- By default, no communication of lens and camera. Additional gear is needed to achieve this.
- Lenses without aperture collar have no aperture control now. Additional gear is needed to achieve this.
- Need an adapter for every filter thread size
Pricing:
About 5-30$. Pricing does increase with the filter size and quality.
Things to look out for:
You probably don't want to get the cheapest ones as their threads might be made from inferior metal or even plastic and might damage your lenses' filter thread, or it might get stuck. I have had good experiences with rings I got for 10-15$.
Recommended gear:
- Tripod. Depth of field is really small with this method and to avoid blurry pictures from camera shake you'd probably need a shutter speed of at least 1 / (4 * focal length), unless you have incredibly steady hands.You can substitute for this by bracing your camera against something, using a beanbag (video by David Clark) or similar items.
- Macro focusing rail. This allows you to put the focus point right where you want it to be. In a few pages I'll tell you how to get more use from your cheap macro focusing rails.
- Flash or continuous light source, preferably with softbox / diffusor. Unless you're photographing in bright sunlight you're probably going to need a bit of artificial light to get a proper exposure with acceptable settings.
- Some sort of aperture control for your lens. If your lens has an aperture ring, great, otherwise you're going to need an electronic adapter, manual controller or something similar. This can be very expensive.
For Nikon I can highly recommend the Fotodiox Aperture Enabler (no link as fotodiox apparently removed it from its lineup, but it can still be found online) as it is very cheap, quite well-made and allows you to comfortably control the the aperture of your reversed Nikon G-type lenses (and others). It is manual and you do not really know what aperture you have set, but at 15-20$ it is a fraction of the cost of any other good solution. If you do have the money and / or need to spend on an electronic coupler, Novoflex makes a really good one (only for Canon).


Pictured above is the Fotodiox Aperture Enabler I have mentioned just now, mounted on the 50mm f/1.8G (I have two, so one is mounted, the other is in front / supporting the tilted lens). Nikon lenses up to the G series have a small spring-loaded metal levers which can be used to open and close the aperture. I have marked those with the circles, both for the 85mm f/1.8G as well as the 50mm f/1.8G. The Aperture Enabler has an F-body mount so it can be attached to the rear of Nikon lenses, a moveable small plastic lever (see the right circles) and a 52mm filter thread so you could add e.g. a UV filter to protect the rear of your lens, which is exposed when reversing lenses. The "lock <-> open" ring can be used to move the lever and thus open or close the aperture of compatible lenses in a mechanical way. Notice the different positions of the lever in the first and second picture and the corresponding changes in aperture. This makes using reversed lenses much more comfortable, as you can set the aperture or change it as you see fit without having to fiddle with that small metal lever. The caveat is that you can not tell what the actual aperture you have set really is.
Recommended read(s) / video(s):
Macro Reversing Ring - Mike Browne talking about and demonstrating reverse-lens macro photography. He also demonstrates some easy, albeit not quite as comfortable methods to deal with the aperture control problem with Nikon lenses.
Step 5: Reversing Rings: Setup & Sample Images

The Setup:
The setup for a reversed lens is fairly simple. In its basest form all you need is a reversing ring of the right size and camera mount type, then mount the lens in reverse. That's it. In order for me to be able to control the lens aperture I have added a Fotodiox Aperture Enabler (or Aperture Control, it goes by several names) and that was already enough to take some pictures. At 18mm the working distance was so short that using the pop-up flash or a dedicated flash is useless as the subject will be inside the shadow cast by the lens, so it's just a waste of electricity.
I have gotten around this problem by either bumping the ISO to dangerously high levels, or in a studio setup using external continuous light sources in the form of Ikea Jansjö desk / working / reading lights, my desk lamp, or flashlights.
Image 1: Spiderbro

So a couple months after getting some reversing rings I had my camera sitting on my desk as I had played around with it a bit previously. It's late, at least 9pm, if not 11pm or so, and as I look at my desk I see this curious little guy here crawl out from under my desktop PC and race around my desk. He might look huge and intimidating in the picture, but this little guy was 5mm in size, tops. Might've been closer to 3mm actually. And as I see him running to and fro I recall some videos by Thomas Shahan who mentions how jumping spiders are really curious and interesting subjects. I also kind of remembered that Misunderstood Spider meme, which I find super cute. Mr. Shahan also recently made a video about common spider misconceptions, which again is worth a watch.
At this point I think it's a worthy endeavor, so I go grab a reversing ring, quickly reverse the lens, crank up the ISO, take a couple of shots, notice it's too dark, reposition my desk lamp to get more light, adjust the settings, some more test shots and now I'm ready. With the lens set to 18mm I got approximately 4x magnification. For presentation here I cropped the image as well as my D7100 gives me a 4000x6000px image, but I only upload about 1000px wide images, usually, which afforded me some leeway with aforementioned cropping.
Thankfully my little Spiderbro here has not decided to make like a bee and buzz off, no, the proud explorer still ran around my desk. I carefully encouraged him to move towards my mousepad thinking the border might limit his movement somewhat and get him to stand still for a bit, which turned out to be correct. He stood still long enough so I could get two nice pictured off, one focused on his four frontal eyes, the second focused more at his rear eyes at the back of his head. By then he must've disliked the bright lights and began to run off.
Thankful for having gotten some pictures, I let him go and wished him the best of luck, as well as lots of prey so he would never go hungry.
I checked all the images I got and due to the shallow DoF sadly most were unuseable, until I found two decently aligned ones which I could stack in CombineZP and get the picture above as a result.
If you happen to have a soft spot or at least some curiosity towards these beautiful little buggers, I highly, HIGHLY recommend the youtube channel Peacockspiderman. He films spiders, especially their mating behavior, and the videos are simply gorgeous. Sometimes funny, too, like his video about the mating behavior of Jotus remus. Or this stunning display of a specimen of Maratus speciosous.
And for more down-to-earth encounters with our eight-legged buddies, I do recommend checking out the Spiderbro Subreddit. For a picture slideshow of the content its members produce, do check this link here out.
Image 2: Salt & Pepper

Originally I wanted to take a picture consisting only of sea salt and make a joke about how the level of magnification achieved is good enough to see the particles of 90% of online multiplayer gamers, but decided that that would be a tad boring and added some pepper corns as well. If someone's surprised at the size of the salt, it's sea salt which is usually sold with slightly larger corn sizes than regular table salt.
Given the rather shallow DoF I have stacked this image, but specifically left the chromatic aberrations from this method in. I'll elaborate later on what stacking is and how to do it.
As far as the setup goes, the salt and pepper was placed on an opaque sheet of black, high-gloss acrylic for a deep black background and nice reflections which you can barely see at all, so so much for that. I used two Ikea Jansjö lamps from the sides to get enough light for a nice picture.
Images 3-6: Illuminated Marbles


This was a somewhat interesting experiment. I still have a box full of glass marbles from my childhood days and figured, hey, wouldn't it be cool to light them up and see how they look then? For the first three pictures I clamped my Lumintop Tool AAA flashlight in place so that it points straight up, set it to its middle intensity (32 lumen), added a small white polyamide washer on top to keep a marble in place and then placed the marbles on top of the flashlight. The last picture is of a glass stone with a flat bottom side, so there was no need for the washer here.
The camera was mounted on a tripod and pointed at the marbles, then I snapped away.
Curiously, that dinged-up white marble looks almost like an icy or frozen planet, the green one looks almost biological like some sort of egg and the blue one like some sort of blob from the deep sea. Note that all the little white dots on the marbles come from tiny air bubbles inside the marbles and from dust on the marbles (I didn't clean them because I liked the look it produced).
Image 7: LCD Screen

This picture gives me eye cancer in that looking at it hurts my eyes. Curiously, you're basically looking at a magnified version of your screen - what you see here are the tiny, tiny diodes which make up your screen and are used to sidplay images.
Specifically, this is a Nokia Lumia 1020 Smartphone screen, focused on a part which displayed a white part of the screen. If you'd step far enough away from your screen this image should appear white to you. If you're wondering why there's twice as much green as blue it's due to the human eyes increased sensitivity toward green colors and engineers using that fact. Supposedly the evolutionary background for this is a better ability to discern various plants for consumption. Two green diodes together with one red and blue one form one pixel on your screen. Curiously, the pixel geometry of this screen is somewhat reminiscent of a CCD's Bayer Filter, using the PenTile RGBG layout.
For this image I set the smartphone on a white screen, pointed the camera straight down, focused and snapped away. As the screen's not that bright a slower shutter speed was necessary to compensate.
Image 8: Tiny Sea Snail Shells

You know how everytime you go to the sea there's souvenir stands with these small corked glass bottles with tiny sea snail shells? These are from just such a bottle, bought at least a decade ago. Size-wise they're between 5 and maybe 10mm, so fairly small indeed. I placed the shells on the glossy black acrylic sheet to get some reflections for a more interesting picture.
Illumination-wise I used two Ikea Jansjö lamps from approximately 4 and 8 o'clock with the camera on a tripod. Due to the shallow DoF I stacked several images. Once more, I'll get more into detail about that at a later point.
Image 9: 1933 Deutscher Reichspfennig

Though not particularly rare this coin does come from a rather interesting time period being coined in 1933. These were the late days of the Weimarer Republik, essentially Post-WWI-Germany, and just prior to the rise of the Deutsches Reich (also known as "Third Reich") which existed up until the end of WWII.
The setup for this image was very simple. The coin laid flat on the table, the camera pointed fairly straight down and two Ikea Jansjö lamps were used for illumination. The rather harsh cross-lighting causes small shadows wherever there's a rise, thus making the raised parts such as the lettering pop much more.
Step 6: Coupling Rings / Lens Stacking (provisional)

Note:
This part is provisional, as I have not done any lens stacking yet. I do not have any decent prime wide-angle and tele lenses, so I have not tried this technique. For completeness' sake I have written down here what I do know about this technique so far without having tried it myself.
What is it?
Coupling rings are metal rings which have a male filter thread on both sides in order to connect two lenses by their filter threads. The front lens will be reversed, the back lens stays in normal orientation.
As lenses have different filter thread sizes, you will need one for every combination of filter thread sizes that you are planning on using.
Coupling rings may also be used in conjunction with step-up or step-down rings or a variety of other adapters to make some weird combinations possible. For instance, I use an M42-M42 coupling ring (pictured above between two sorbothane pads) together with an M42-M40.5 step-up ring to mount a Nikon EL-Nikkor 50mm f/2.8 in reverse on a M42 bellows. We'll get to using that in a bit.
How does it work?
One way to use coupling rings is the aforementioned way of e.g. reversing lenses on some bellows. In my case it's a M42 one, but other bellows may require reversing rings instead.
The primary way of using coupling rings for macro work is by lens stacking. You reverse one lens (typically a wide-angle prime lens ,<30mm, close the aperture down) and screw it to the front of another lens (typically a tele prime, 100-200mm, leave it wide open) which in turn connects to your camera.
Now as far as I understand it the reversed lens acts much like a regular reversed lens used with reversing rings, that is it projects a small plane from the rear of the lens (now the front end of your stacked lens combination) to a bigger plane on the front of the lens, which connects to your second (tele) lens in the assembly. The secondary lens acts as a gatherer which takes in all of that light and that image, then projects it back onto your image sensor.
Compared to a single reversed lens, this has the advantage of less light loss, while technically getting a better image due to correcting the image plane curvature of the reversed lens. Or so I've read anyway. In my mind using this combination results in more glass between you and the subject, thus the image should not be as sharp as that of a single reversed lens. However, it may be that other advantages increase the overall quality of the image so that this method is better.
From what I have read the magnification you will get is somewhere around focal length of second lens (tele) / focal length of primary lens (wide-angle, reversed) * crop factor. So you should be able to get something between 1x and 16x magnification with a crop frame camera, and 1-10x with a full-frame camera, depending on your lens combinations.
Pros:
- Affordable
- Enables you to use off-brand lenses of all kinds for the primary (reversed) lens, as long as filter thread size fits your coupling ring
- More coming once I've tried this myself
Cons:
- Somewhat cumbersome as tele lenses tend to be bigger and heavier, and strapping a wide-angle lens in front of them doesn't improve the situation
- By default, no communication of primary lens (wide-angle) and camera.
- Primary lenses (wide-angle) without aperture collar have no aperture control now. Additional gear is needed to achieve this.
- Need an adapter for every filter thread size combination
More coming once I've tried this myself
Pricing:
About 5-20$. Pricing does increase with the filter size and quality.
Things to look out for:
You probably don't want to get the cheapest ones as their threads might be made from inferior metal or even plastic and might damage your lenses' filter thread, or it might get stuck.
Recommended gear:
- Tripod / beanbag (video by David Clark) / some other stabilizer or similar items.
- Macro focusing rail. This allows you to put the focus point right where you want it to be.
- Flash or continuous light source, preferably with softbox / diffusor. Unless you're photographing in bright sunlight you're probably going to need a bit of artificial light to get a proper exposure with acceptable settings.
- Some sort of aperture control for your lens. If your lens has an aperture ring, great, otherwise you're going to need an electronic adapter, manual controller or something similar. This can be very expensive. For Nikon I can highly recommend the Fotodiox Aperture Enabler (no link as fotodiox apparently removed it from its lineup, but it can still be found online) as it is very cheap, quite well-made and allows you to comfortably control the the aperture of your reversed Nikon G-type lenses (and others). It is manual and you do not really know what aperture you have set, but at 15-20$ it is a fraction of the cost of any other good solution. If you do have the money and / or need to spend on an electronic coupler, Novoflex makes a really good one (only for Canon).
- Potentially a lens collar, or brace to stabillize or otherwise reinforce your stacked lenses so as to not damage their filter treads
Recommended read(s) / video(s):
Coupling Lenses For Macro by Johan J Ingles-Le Nobel. A great article walking you through the essence of using stacked lenses for macro photography,
Step 7: Close-Up Filter / Lens

What is it?
Close-up filters, or rather close-up lenses, are special lenses which you can screw onto your normal lenses using their filter thread. They come in different strengths, usually denoted by diopters. Typical diopter strengths are +1, +2, +4, +5 and +10, though you may come across other diopter strengths as well. Increasing diopter strengths increase the magnification you can achieve. Close-up lenses can be stacked and their diopter strengths are additive, that is two +4 and one +2 close-up lenses give the same magnification as a single +10 close-up lens, albeit at a worse image quality than a single +10 close-up lens.
There is also a second type which offers the same functionality at a highly increased quality, which is a close-up lens with a (usually achromatic) doublet lens. Here's a video of photographer Bryan Peterson talking about the achromatic Canon 500D close-up lens, one of if not the best close-up lens. Unfortunately only at 480p. There's a bunch of different videos on youtube demonstrating the capabilities of this close-up lens, so if you're interested, go check them out.
A quick side-note about achromatic close-up lenses:
A single piece of glass acting as a lens will focus different wavelengths of light (e.g. the blue, green and red fractions of the light) onto a slightly different spot. If the lens is projecting onto a sensor, these kind of shifts are a cause of chromatic aberrations. You can especially see these shifts at the edges of images or along high-contrast regions of images. Achromatic or doublet lenses consist of two lenses whose color shifts mostly cancel out so chromatic aberrations are minimized. Apochromatic and superapochromatic lenses perform even better in this regard but are even more expensive.
Pictured above are:
- Left: B+W 72mm +5 close-up lens. Single piece of glass, huge bulge.
- Front, center: Hama 72mm +1 close-up lens. Single piece of glass, noticeable bulge.
- Back, center: Canon 250D 58mm close-up lens (+4). Achromatic lens doublet, less pronounced bulge.
- Right: Canon 500D 77mm close-up lens (+2). Achromatic lens doublet, almost no bulge.
How does it work?
Close-up lenses work similar to reading or magnifying glasses and allow your lenses to focus at a closer distance, thus enabling you to get closer to the subject and get a higher magnification ratio. They tend to work best with higher focal length lenses (100-200mm focal length). Note that some close-up lenses are optimized to work best with specific focal lengths.

B+W 72mm +5 close-up lens held over a microfiber cloth that came with this close-up lens. This image serves to illustrate both the magnifying glass property which makes close-up lenses work as well as the chromatic aberrations that are common with single-lens constructions. You can see both a blue-ish as well as an orange-ish tint along the borders of the letters which should not be there.

Canon 500D 77mm close-up lens (+2) held over the same microfiber cloth at approximately the same height. Obviously a +2 close-up lens will not show as strong of a magnification effect as a +5 one, but the main point is that the achromatic doublet lens shows significantly less chromatic aberration compared to the single-lens construction of the B+W close-up lens demonstrated previously. In fact I'd be hard-pressed to find any chromatic aberrations at all in this picture.

Canon 250D 58mm close-up lens (+4) held over the same microfiber cloth at approximately the same height. As expected the +4 250D shows a similar level of magnification as the B+W +5 and quite a bit more than the Canon 500D (+2), yet still maintains the same low to virtually nonexistant levels of chromatic aberrations. Again I'd be hard-pressed to find any.
Pros:
- Affordable*
- Small
- Lightweight
- Versatile (can easily add, remove or combine close-up filters for different magnifications)
- No light loss
- All electronic functions of your lenses still work
Cons:
- High diopter strengths tend to cause significant loss in image quality, especially in the form of chromatic aberrations*
- More for close-up rather than high magnification macro photography. High magnifications can be achieved by using high-diopter close-up lenses or even stacking them, but the image quality will suffer significantly.
- Fixed filter thread size - you will need a set for every filter size your lenses hav, or go for step-up rings.
- Depth of field decreases with increasing magnification
*: This goes for the cheaper / more affordable models. Higher-quality achromatic doublets are more expensive but produce much better results.
Pricing:
Sets of simple close-up lenses can be bough for as little as 15$ though their quality tends to be on the lower end of the spectrum as well. Higher-quality close-up lenses can cost several dozen dollars and even go beyond 100$ for a single one. Higher-end ones tend to be achromatic doublets. They may also be optimized to work best with lenses of specific focal length ranges.
Note that prices generally increase with the filter thread size.
Notes / Things to look out for / Additional gear:
If you have lenses with several dfferent filter thread sizes you can go for close-up lenses fitting your largest filter size lenses and use a step-up ring to fit the larger filter to your smaller-diameter lenses. To future-proof your investment into high-quality close-up lenses such as the Canon 500D close-up lens or Marumi DHG Achromats (also excellent) I highly recommend going for at least a 77mm diameter version and getting a set of step-up rings for your lenses. That way you will be be able to use that close-up lens with virtually any lens you'll ever have. Some noteable exceptions would be extreme wide-angle lenses, fisheye lenses or some of the bigger tele lenses which have filter thread sizes of 82mm or more. I should also note that a good portion of Nikon's professional lenses lately have moved to a 82mm filter thread size. I do not know about other manufacturers filter thread size preferences.

Canon 500D 77mm close-up lens mounted to a Nikon AF-S FX NIKKOR 50mm f/1.8G with a 58mm filter thread using a 58-77mm step-up adapter.
Recommended read(s) / video(s):
How To Use Macro (Close Up) Filters by Mike Browne. Note that he is using achromatic doublet filters, in this case made by Hoya having cost him around 40£ each.
Step 8: Close-Up Filter: Setup & Sample Images

The Setup:
The basic setup is very simple, just screw on the close-up lens in front of a lens of your choosing. In this case I have added a step-up adapter to use a 77mm filter with a 67mm filter thread diameter lens. Additionally I have a flash with a cheap softbox flash diffuser to get some softer light.
Note that using the flash on the flash shoe might not give you the best illumination if you get too close to your subject. In that case using a flash cord for off-camera flash and maybe mounting the flash on a macro bracket is the better option.
Images 1-3: Orchids. 50mm lens without close-up-filters, with +2 and +4 filter


To give you a first-hand impression of how well close-up rings work in giving you the ability to get closer and thus increase your magnification I decided to take a couple pictures of some orchids. The camera was on a tripod with a remote release, the orchid in front of it as close as focus with the 50mm f/1.8G would allow. For the illumination I used two Amaran Aputure H528S LED panels with shoot-through umbrellas as diffusors for some really soft light, illuminating the subject from around 4 and 8 o'clock. Maybe 4:30 and 7:30. About one meter behind the subject I had a piece of black cardboard to get a darker background.
For the second image I simply added the Canon 500D close-up lens (+2) and moved the orchid closer until the camera was barely able to focus. Third picture worked much the same, except I used a Canon 250D close-up lens (+4).
Needless to say, all images were treated the same way in editing and no crop was applied.
Unfortunately at the time I forgot to stack the 500D and 250D to get a +6 diopter close-up lens effect and remaking the images is a bit of a hassle. Given that it'd focus just a bit closer it wouldn't have been that exciting anyway, and three pictures of the same subject are already repetitive enough. Unless there's a request for it, this'll have to do.
Image 4: Seashells

As a kid I used to be somewhat of an oppotunistic collector of things. Everything that was interesting to me got collected, such as these seashells and snail houses. Come to think of it that hasn't changed much, though I mostly focus on tools and photographic equipment nowadays.
This image was taken similarly to the orchids as far as the general setting of camera and lights go. The background is different this time though, I used an opaque, high-gloss black acrylic sheet to get a really nice background with sweet reflections.
Image 5: EDC Flashlight

The EDC flashlight I have been using for years, the Zweibrüder LED Lenser P3 BM. Splendid little light, still works like a charm. The focusing of the beam is smooth and gives a very nice and useful spot, and the overall build quality is superb. As mentioned it served me well for years, survived drops and got itself some 'badges of honor', as those dings and scratches could be called.
Recently I have switched to a Lumintop Tool AAA due to a much nicer tail-cap button and multiple brighness modes with an overall upgrade in brightness. Still, I miss that zoom functionality quite a bit.
Once more, the setup is quite similar to the orchids, LED panels with shoot-through umbrellas for diffusion at approximately 4 and 8 o'clock and the flashlight placed on white cardboard for a nice, uniform background.
Image 6: Adeptus Mechanicus Tech-Priest Dominus

Though I do not play Warhammer or any other tabletop games, some of my friends do and they happen to know that I like the lore of Warhammer 40.000 quite a bit. As a tinkerer I have somewhat of a soft spot for the Adeptus Mechanicus, the Tech-Priests from Mars and for my birthday two of my friends gave me this amazing figure on which they spent hours upon hours, meticulously painting it. Look at that paintjob, isn't it amazing? I still have to make a neat acrylic enclosure with a pedestal for this figure some day to keep it safe and clean. Currently it's in a display cabinet, but I'd like to protect it even better.
The setup is similar to the seashells. Black high-gloss acrylic for a sweet reflection, diffused LED panels for lighting and a remote-shutter camera on a tripod for the shot. Black cardboard was used to blend the end of the acrylic sheet over to a black background.
Image 7: My Neighbor Totoro Stacking Game

These little figures here are part of a very prized posession of mine: A Studio Ghibli-approved (read: official) My Neighbor Totoro stacking game. I can't read Japanese so I do not know the producer, but you can find it googling "Studio Ghibli Nibariki X Ensky Tsumu Tsumu Series TMU-19 My Neighbor Totoro Set" or something like that. "Totoro Stacking Game" works, too.
I got this as a thank-you gift for the Leather Spellbook that I made for a friend of mine. He got it for me when he was staying over in Japan for half a year, knowing full-well what huge Studio Ghibli fan I am. It's been residing on my desk ever since, with its original package and I still get a happy grin when I look at it. The quality of these figures is superb and stacking them is a lot of fun. They are designed incredibly well so that you can arrange them in a bunch of different ways, one of which is demonstrated here.
There's nothing new to say about the setup except that black high-gloss acrylic is an amazing background if you want reflection effects.
Image 8: Random Coins

These are another example of my serial collecting habit - random coins. I got a bunch of them from my grandparents, from family and friends. Since it's not really an active hobby I merely have a small bag full of random coins, but there's still some pretty neat ones in there. Two coins from 1930s Germany for instance, pre-WWII. Not that old or rare, but still pretty cool. A DDR coin from when Germany was split into West and East Germany post-WWII. Again, not rare, but still pretty cool. And then some other fairly recent coins from all over the globe.
I had the camera pointing almost straight down at the coins which I had placed on top of a piece of leather for a more stylish backdrop, kind of imitating the look of a leather wallet or maybe a leather-lined box for keepsakes or such. The LED panels with shoot-through umbrellas were positioned at the sides for a nice, soft light and to avoid too many reflections with the highly reflective metal coins.
Step 9: Extension Tubes

What is it?
Extension tubes are aptly-named tubes which extend the distance between your lens and the image sensor. They do not have any glass elements inside, thus they do not degrade the image quality as badly as other methods. Sometimes lenses come with a "close-up adapter", "macro adapter" or "life-size adapter" which typically is nothing else than an extension tube of specific length for the given lens.
There are 'cold' and essentially 'smart' extension tubes. The former do not have any electronic contacts to connect your lens to your body electronically, the latter do. Pictured above are Kenko DG Automatic Extension tubes which belong to the latter group. You can see the electronic contacts at the bottom inside of the left 20mm ring. Naturally the former are more affordable than the latter.
Extension tubes come in different lengths with 12mm, 20mm and 36mm being common, but other lengths exist as well. Longer extension tubes result in higher magnifications and you can mix, match and stack them as you see fit. The length of the extension adds to your lenses focal length, so using a 50mm lens with a 20mm extension gives you an effective focal length and corresponding field of view like a 70mm lens. Note though that not only does your close focus distance decrease with adding extensions (thus increasing magnification), so does your far focus distance as well. Instead of being able to focus from let's say 30cm all the way up to infinity, you might end up with a bracket of 10cm to 5m.
Wide-angle lenses can achieve higher magnification ratios than tele lenses using this method, albeit at the cost of drastically decreased working distances and loss of light. It is not impossible to get the close focus point directly on top of the lens, or even inside of it.
How does it work?
Your lens projects an image in front of the lens back onto the sensor. Typically lenses are made such that the image circle they project back is large enough to cover the complete sensor, but not that much larger. An extension tube moves the focal point further away from the sensor, increasing the size of the image circle at the sensor plane. Which in turn means you are blowing up the projected image and only using the center part of it.
To put things a bit into perspective, what you are doing is performing an optical crop of sorts, using only the center part of your lens (and image), thus getting a higher magnification. With this analogy it is easy to see that increasing the extension means throwing away ever more light as you are only using a small part of the image circle, as well as magnifying all the errors and blemishes the center of your lens has.
Pros:
- Highly portable
- Can cover anything from close-up to higher magnification ratios, depending on extension and lenses used
- Versitile. Quick to put on and off, quick to stack.
- Fairly affordable (*)
- Full electronic communication with the lens, can use autofocus, aperture, etc. (**)
Cons:
- Loss of light
- Loss of quality with increasing extension as you are magnifying errors in the center part of your lenses
- DoF decreases with more extension
- Decreases close and far focus distances
- No communication of lens and body, no autofocus, no electronic aperture control, etc. (*)
- Somewhat costly (**)
*: This goes for 'cold' extension tubes without electronic contacts
**: This goes for 'smart' extension tubes with electronics
Pricing:
'Cold' extension tubes can be obtained for as little as 15$. 'Smart' tubes start at 30-40$. In either case I'd highly recommend to not get the cheapest models as they might have plastic mounts, cheap and unreliable contacts and the overall build quality might be quite subpar. As always, look around and get models with good reviews and of decent quality.
At this point I should also mention that there are several instructables on here to make your own extension tubes.
Cpt.Insano has written an instructable about a tilt/shift extension tube he designed and 3D printed.
Snelpiller wrote one about making an extension tube.
There's a couple more, but it's not the point to list them all here.
Notes / Things to look out for / Additional gear:
Stacking more and more of the extension tubes makes the whole setup a bit rattly and loose, up to the point that your focus place shifts out of place, or that your 'smart' extension tubes may lose electric contact and your lenses electronic functions may fail.
Use apertures of f/9 - f/11 to get your subject somewhat well enough into focus while avoiding image degradation from diffraction.
Additional light sources, be it flashes or continuous lights, are highly recommended and probably outright necessary to avoid very high ISOs and slow shutter speeds. Diffusing them by using a flash diffusor, small softbox or even a piece of paper greatly improves the lighting and consequently the pictures you take.
Tripods, bean bags or other stabilizing gear is recommended whenever possible and plausible.
Recommended read(s) / video(s):
Thomas Shahan's "An Introduction to High-Magnification Macro Photography". Technically this video shows you nothing about extension tubes at all, but you should still watch it. This video will teach you a bit about a good mindset to have for macro photography while showing you gorgeous pictures which I know at least some have been taken using extension tubes, all while being narrated with Thomas Shahans soothing voice.
"Methods in Macro Photography with Thomas Shahan", another video by the very same Thomas Shahan. Again, macro philosophy, gorgeous video clips and pictures, soothing voice. Additionally, this video goes a bit deeper into the gear he uses (extension tubes, reversing ring), how he lights his subjects, framing, backgrounds and more. This video definitely had a huge impacet on me and prompted the purchase of my macro tubes as well as my excursion into the woods which you'll read about shortly.
Basically, just watch the videos on his channel. Even in his reviews, such as the Laowa Venus KX-800 Twin Flash, he talks a lot about lighting, composition and other useful things. Plus his voice is super-soothing.
Step 10: Extension Tubes: Setup & Sample Images

The Setup:
This is the setup that I have used to take the pictures below, sometime in summer 2013. The quality might be a bit subpar as I have been starting out with DSLR macro photography at the time, and my memory of the events might be a bit fuzzy. I told you I have been working on this one for quite a while.
Anyway, this setup uses a 20mm extension tube with the 50mm f/1.8G to put it somewhere in the range of maybe 1:2 (0.5x), so it's more close-up than 'true' macro photography. Pictures that seem closer may have been cropped digitally prior to uploading them here.
The big advantage of this setup was that the working distance was long enough for the flash to work properly and illuminate the subjects, also to somewhat avoid the flight distance that most insects have. Another boon was being able to use the autofocus and aperture control due to using automatic extension tubes which have electrical contacts and pass all signals from the camera to the lens and vice versa.
The flash diffusor is a cheap one which I have modified to work with velcro (which I have also sown together because I am a cheapskate who didn't want to pay 20$ for a piece of rubber-backed velcro with branding on it). It is quite recommended to diffuse the flash somehow in order to get a much nicer illumination of your subjects and to avoid any harsh shadows. A large enough diffusor (in relation to your subject size) will give you amazing illumination.
Note that using the flash on the flash shoe might not give you the best illumination if you get too close to your subject. In that case using a flash cord for off-camera flash and maybe mounting the flash on a macro bracket is the better option.
Passing entomologists or herpetologists helping to identify the insects and amphibians in the following shots would be appreciated.
Image 1: Dragonfly chilling

Once or twice a year I visit my parents holiday home which is in quite a rural area and almost the last house at the edge of a small village. The advantage is that it's full of amazing subjects to take pictures of. So I prepare my setup as seen above and head for a forest not five minutes away. It has several small bodies of water, sized between ponds and small lakes, so there's a bunch of aquatic, semi-aquatic, amphibian and such species around. I mostly kept to forest paths where the sun came through so I could take pictures with a small aperture and higher shutter speeds at manageable levels of ISO without resorting to the use of the flash which might spook my subjects. The sky was lightly overcast, or I was in the shadow of trees for many of the shots so the lighting was even and soft.
One of the amazing insects I happened to find was this red dragonfly. Given my complete lack of knowledge in the field of entomology I can not give more specific information about this species, except that it should be a dragonfly, not a damselfly.
Photographing dragonflys and damselflys is somewhat tricky as they have fairly good vision, long flight distances (as in get too close and they'll flee) and are rather quick. Photographing them in flight is hard, but luckily they perch down quite often, too. I found this one perched down so I crouched down to appear less intimidating, keeping the sun to my back or side such that my shadow wouldn't fall onto the dragonfly. I slowly crept closer until my lens was about 20 or 30cm away, waited for a moment where the wind didn't blow so that the plant the dragonfly perched on was adequately still and managed to take this picture.
Image 2: Beetle walk

Stepping off a bit to the side of the path I found this blue-ish / black-ish beetle crawling through the forest. Being in the shadow of trees I had to slow down my shutter speed to get a good illumination, but given that the beetle stood fairly still that was not a problem. I got down at me knees, got the camera down to ground level, supported it with my hand on the ground, got closer and snapped this shot.
You can appreciate just what a monumental task it is to fight your way through all this grass, moss, sticks and whatnot that's several times your size.
Image 3: Moth camouflage failure

I continued my walk, looking at the ground, at the grass, and at trees to find some interesting subjects and with this one I think I lucked out. If this moth had been sitting on a pile of dried leaves, or on tree bark, I doubt I would have noticed it. For whatever reason though it was sitting on a green leaf, and the contrast made it possible for me to notice it. Again, it's in the forest so the shutter speed is still reduced, but with a still subject this was manageable. The patterns of this moth along with the hump-like structures likely imitating leaves look amazing.
Images 4 + 5: Hornet Wannabe


At first I was pretty darn scared of this one here - colors like a wasp, plus the size of a damn hornet. At least half as long as my thumb, and almost as thick, too. Given that I have encountered hornets there several times I was ready to calmly, but decisively retreat until I noticed the odd shape. Kind of chubby for a wasp or hornet. Taking a closer look at the jaws, or rather mandibles, I noticed that this here fly here was an imposter! Look at the second picture of that snide sucker, rubbing his tiny hands together, laughing about how he had tricked me! Wind was blowing at the time and it was really hard to get a good focus on the head given the small DoF. In any case, interesting little bugger.
Image 6: Fly resting

Not far away I noticed this (more regular) fly on another leaf. Quite the big specimen, a bit bigger than a thumbnail maybe. Surprisingly hairy, but maybe that comes with the age, too.
Images 7 + 8: Frogs in the woods


With water bodies nearby, it is of no surprise to find a couple of frogs in the underbrush as well. I was simply walking through the forest when they jumped out of my way and stopped, maybe thinking they were adequately camouflaged. The first one might be a young Moor Frog, or Wood Frog, whereas the second one might be Common Water Frog, Pool Frog or maybe a Marsh Frog. Both were surprisingly cooperative and I could take several pictures before leaving them be. Actually I felt kind of bad for not having brought a cup full of maggots, mealworms or the like to feed them as a thank you of sorts.
Image 10: Bumblebee at work

Back at home from my stroll I checked the garden and lo and behold, bees, bumblebees and the like were pretty busy here, buzzing to and fro between all the flowers in the garden. I used this opportunity for the stereotypical bumblebee-in-sunflower-shot that's sort of like a rite of passage for macro photograhpers. Well, not really, but I doubt there's very many who haven't taken such a shot.
Really, when you take a closer look at bumblebees you'd kind of wish they were the size of a small dog and that they could be tamed. They look so freaking fluffy! By the way, if you think they are cute, you might be interested in those giant isopod plushies from Japan (google image search link). Super-cute in an odd way. If my sister or friends have kids I might just give them some of these as gifts, making me either a nightmare-bringer or the most awesome uncle.
Images 11 + 12: Goliath vs David and his Brothers


The next day I set out into the forest again for an hour or two and found some more interesting subjects, like this one.
Honestly, I have no idea what was going on here. I saw this big beetle crawling around, preparing to fly so I figured it'd be cool to try and get some shots of it in flight as big beetles like this typically aren't the fastest in flight. The given area was fairly dark, so I opted for an external light source. The flash also helped freeze the beetle in flight, and the autofocus worked surprisingly well with the extension tubes so I could track the bug using continuous autofocus mode. Given the flash I could have used a lower ISO, but keeping the settings basically the same allowed me to quickly and comfortably switch between flash and no-flash setup simply by turning it off. I overexposed those images quite a bit and both the framing and focus leave some things to be desired with but I was really inexperienced back then. Normally I would've scrapped the pictures, that is until I noticed that big bug here was carrying passengers!
At this point I'd really like to tell you what is going on in this picture, but as I have stated in the first sentence, I have no clue. I don't know if the small bugs are children, somewhat symbiotic bugs, accidential passengers, parasites, or are attacking the big bug for whatever reason.The only thing I can say is that the big guy had quite a bit of trouble flying and only got maybe 10-20cm airtime at once, landing, crawling a bit somewhat distressed-looking, then trying to fly again.
Image 13: Ant Herding Aphids

Moving on I saw a plant stalk full of tiny black dots and some ants running around, so I decided to take a closer look. If the ant wouldn't have been crawling around so fast and if I had been aware of focus stacking back then, I would've maybe gotten a cooler picture out. Be it as it may, it's still quite a fascinating example of symbiotic relationships in the animal kingdom. Those small bugs are aphids, which feed on plant sap / juices, but are eaten by a bunch of other animals. Ants have taken a liking to them as Aphids secrete a substance which ants like to eat. Much like humans do with livestock, ants take in the aphids, sometimes going as far as to herd them into their nest at night and getting them out to feed during the day, all the while protecting them from all sorts of predators. The stalks covered with aphids are patrolled by ants all the time and any and all intruders are attacked to protect the aphids.
Again, in the forest it was somewhat dark, an overcast day to boot, so I had to cut back and open up the aperture a little to deal with the swaying of the plant stalk in the wind while keeping ISO levels in a comfortable region.
Image 14: Human Eye

Last but not least, my sister had agreed to pose for a macro shot which has also become somewhat of a fad - a detail shot of the iris. I pointed my 60W desk lamp directly at her from the side as can bee seen in the reflection, took the longest tube I had and got as close as I could, snapping away and hoping I could get one picture in focus showing the utterly alien structure that the human iris shows. Sadly, it's not so evident in this shot, but I still like it nonetheless. If you don't know what I am talking about, check out the pictures Suren Manvelyan's project "Your Beautiful Eyes", or his projects "Animal Eyes" and "Animal Eyes 2". Lama eyes look really weird and Chinchilla eyes are freaking hardcore and so unlike their cute and fluffy nature. Even with the desk lamp I had to crank up the ISO beyond comfortable levels to get an acceptable shutter speed given the light loss introduced by the extension tube and the fairly closed aperture.
By the way, ladies, that's how your mascara looks close-up. And how many little hairs you likely have around the eye. And don't tell my sister I used this picture.
Author's Side-Note:
Basically, I love my automatic extension tubes. They're really convenient, versatile, fairly affordable and make it possible to get amazing results with the lenses you already have. Personally I would say that this is the best way to dip your toes into the waters of macro photography without draining the bank. Sometimes they're tricky to work with, but overall they are really nice. Again, I explicitly recommend mid- to high-quality automatic extension tubes. They are still far cheaper than a dedicated macro lens, and you can use virtually all your lenses with them.
Step 11: Bellows

What is it?
Bellows are an accordion-like tool which allows you to extend the distance between your lens and your sensor, much like extension tubes do. The difference is that, to a certain extent, the extension of a bellows is arbitrary and can be changed on the fly. Additionally, some bellows may allow you to tilt the front and/or back parts, moving the focus plane into potentially more advantageous orientations (see "Scheimpflug principle" in this Cambridge Colour article about tilt-shift lenses) and shifting may further influcence the focus plane as well as be used to create or correct image distortions.
Originally bellows were used with lenses which could not focus on their own, so the amount of extension between lens and film was set such that the subject would be in focus. This is still the main purpose for bellows with some medium and large format cameras as well as photographic enlargers.
How does it work?
Pretty much the same way extension tubes do. Increasing the distance between the lens and the sensor increases the image circle and focal length of the lens, thus resulting in sort of an 'optical crop', giving you a larger magnification than what your lens is typically capable of.
Pros:
- Extremely high magnification ratios possible with the right lenses
- Possible to quickly change the magnification ratio by adjusting the extension
- Very robust (especially the better bellows)
Cons:
- Kind of cumbersome. Especially the bigger bellows can not be called portable. More of a studio piece of equipment.
- Loss of light
- DoF decreases with more extension
- Decreases close and far focus distances
- No communication of lens and body, no autofocus, no electronic aperture control, etc. (*)
- Can be very pricey
(*): There might be some select few bellows which in fact do have electronic contacts, but they are likely prohibitively expensive. One that I know of is the Novoflex Automatic Bellows (available for Canon EOS or Sony Alpha / AFMinolta).
Pricing:
Used bellows may be obtained cheaply. I think I paid 30 bucks for mine. You may also get some potentially wonky new ones for about that much. Decent ones should run somwhere between 100 and 300$.
Good used bellows like the no-more-produced Nikon PB-4, Nikon PB-6 or others will still set you back a couple hundred dollars.
New high-quality ones such as the Novoflex bellows (multiple different ones) or the Cambo Actus may set you back anywhere between a few hundred and even a few thousand dollars.
Overall, bellows are at the higher end of the price spectrum when it comes to achieving macro photography. Especially if you keep in mind that this price does not include any adapters for your lenses, or the lenses themselvers.
Notes / Things to look out for / Additional gear:
For starters, you will be needing adapters. Likely a ton of different ones. Just to illustrate my point, here are some of the adapters that I have and use with my bellows:


In order:
- M42-M42 coupling ring. Used with a M40.5-M42 step-up-ring to reverse-mount e.g. some EL-Nikkors.
- M39-M42 thread adapter. Used to mount e.g. some EL-Nikkors in forward orientation.
- M39-Nikon F and M42-Nikon F adapters (2 adapters in one picture). Used to mount M39 lenses (e.g. some EL-Nikkors) or M42 lenses on a Nikon F camera, extension tubes, or bellows.
- Nikon F-M42 adapter (2 pictures). This was really, really hard to find. It's an adapter which allows me to mount Nikon F lenses on my M42 bellows in forward (regular) orientation. I actually do not know why I got this in the first place. Probably one of those "better be safe thatn sorry" moments.
- Conical RMS-M42 adapter, on the bellows. It allows me to mount RMS (Royal Microscopical Society) thread microscope lenses on my bellows while providing an additional 5cm extension beyond the capabilities of my bellows.
Lenses. You're going to need some lenses which work well with a bellows. There's a whole bunch of stuff out there, here's a few of mine:


In order:
- Nikon EL-Nikkor 75mm f/4 and 135mm f/5.6. Both are the newer "N" (for up to 105mm) and "A" (from 135mm) series, respectively. These are lenses designed for photographic enlargers. I'll come back to those at a later point.
- Nikon M4, U10 and U20 as well as Olympus M40 metallurgical microscope lenses. I'll come back to those a bit later as well.
- Leitz Wetzlar Germany Colorplan 90mm f/2.5 Projector lens. This was a lens used in medium- to high-quality diapositive slide projectors made by Leitz, especially the Pradovit line. There's tons of versions of this lens around, such as the Made-in-Portugal one (supposedly not that good) and the quite rare Super-Colorplan (of which more versions exist). I have yet to make a proper adapter which allows me to use this lens.
For photographic purposes, stay away from "CF" versions, which stands for "curved field". These lenses were optimized for curved slides to keep those perfectly in focus and will show a distinct falloff in sharpness towards the edges when used with a planar digital image sensor.
Recommended read(s) / video(s):
- "Amazing Micro Cinematography of Mold And How To Build Your Own Macro Bellows" by Kinetek. A video about high-magnification macro videography of mold. Sound gross, but the video is stunning. Additionally, he talks about building his own bellows, and the whole setup, and how he took the shots.
- "Photomacrography using Bellows and Extensions" by the BioCommunications Association. The Adjunct Associate Professor of Scientific Photography at RMIT University in Melbourne, Australia, Gale Spring, talksyou through the use of bellows, and general high-magnification macro problems and solutions.
Step 12: Bellows: Setup & Sample Images, Part 1


The Setup:
Please do ignore the color cast in these pictures, as my DSLR was obviously in use I had to turn back to my WB2000 which somehow has this annoying center-based color cast spot in some images. However, as it's only pictures of the setup I did not feel the need to spend much time editing it out.
Moving on, here you can see the the basic setup that I used for taking pictures with a microscope lens and a DSLR. Do note though that this is generally not how you want to take high-magnification pictures as the tripod with the camera and the table with the subject are both light and move seperately, which means this setup is highly susceptible to vibrations and at 5x or more magnification, movement becomes your primary adversary in terms of image sharpness.
To improve upon this setup you'd want to mount the camera and the subject as securely as possible onto something heavy such as a big slab of steel, or granite or so, then have that viobration-dampened for instance by adding sorbothane pads. If you have tons and tons of money to spend you can get ever-better setups going, using actively vibration-dampening optical benches or the like.
Side-tracking a bit, here's a list of setups for inspirational purposes that you might want to check out:
- Chris S. and his much beloved and ever-evolving rig, the "Bratcam" ("Another macro rig (the Bratcam)" on photomacrography.net).
- Richard A. Nelridge (naturephoto1) and his repro-stand-based rig ("My studio Macro Rig, A Project and Work in Progress", on photomicrography.net).
- Marc and his Novoflex-based rig ("My Setup", on photomacrography.net).
- Finally, a collection of different setups (post by rjlittlefield, site admin of photomacrography.net, in the thread "FAQ: What's the best way to step focus when stacking?").
This whole forum is a true treasure trove of information and highly, HIGHLY skilled macro photographers. Every year Nikon has a Nikon's Small World: Photomicrography Competition with truly outstanding participants and stunning pictures (the winners are worth a look every year, here's the winners from 2016). Top 20 participants win prizes, and I have read that every year about half of those are members of photomicrography.net. Not so coincidentially, the administrator is also a developer of Zerene Stacker, a leading stacking software. So again, do check this place out. You will not regret it.
Now then, back to my humble first setup:
The Nikon U10 microscope lens I use is a metallurgical 10x microscope lens with a numerical aperture of 0.22 and a barrel length of 180mm. That means that to achieve 10x magnification and the optimal sharpness there should be 180mm between the back of the lens (the right side of that knurled, black ring) and the image sensor.
I achieve this by attaching the lens to an RMS (Royal Microscopical Society) thread to M42 adapter, which in turn is connected to my M42 - Nikon F bellows by Novoflex, finally ending in my DSLR camera. The bellows is set up such that the correct barrel lenght of 180mm is upheld.
This whole assembly is then mounted on a focusing rail on a tripod. Additionally I have attached a flash rail holding two tiny ballheads to which I have affixed LED flashlights using tape to get a decent illumination of the subject from two sides. Talk about a ghetto setup, but hey, it worked...
Moving on to the subject, it is a dead fly held in place with a simple third hand you can get and virtually any electronics or hardware store.
In order to minimize vibrations from taking pictures just slightly, I have added a remote for the shutter.
Here's the short version of all the drawbacks of this kind of setup:
- A bunch of vibration as camera and subject are fixed to seperate objects
- What they're affixed to is far too light. 20-30kg or more should be the aim here. Vibration-dampened, if at all possible.
- The focus rail is a joke and absolutely not suited for the step sizes you'd need at 10x magnification. Get a linear stage with 10 micron resolution instead. If you can't get that, at least get a decent focus rail, such as the Manfrotto 454, a Really Right Stuff focusing rail, Novoflex Castel series focusing rail or something of similar quality.
Image 1: Fly Face

Above you can see a single slice, that is a single picture I have taken with the setup described previously, of the very same fly you can see in the setup pictures.
As you can see, the DoF of the image is pretty darn shallow, I'd estimate it somewhere between 200 and 500 microns, so somewhere between 0.2 and 0.5 mm. It's a guess though as I took these pictures a year or two ago and didn't take any measurements at all.
This was actually the very first time I tried out that Nikon U10 microscope lens, and pretty much the first time I took pictures at 10x magnification. It might explain why the picture and setup suck so much, Anyway, I set everything up as described, stood as far away from the camera as my corded remote allowed me to, had the camera set to mirror-up (to reduce vibrations caused by the mirror moving, a very real concern with high-magnification macro work), opened the mirror, started holding my breath, standing as still as possible and after 3-5 seconds of time for the vibrations to stop I finally pressed the shutter to take a picture, which is what you can see here.
As a small bonus, here's a gif of 10 of the slices that I took. Looking at them closer it turned out that 3 were completely out of focus and didn't contribute to the final image at all, so I did not include them in the gif.

Then I repeated the process another 12 times, moving the focus rail in as small increments as was possible for me to get a grand total of 13 images forming a stack. Essentially I have moved the focus plane from just in front of the subject to just behind it in step sizes with overlapping focus. Or at least I tried. I then got all the pictures, edited them the same way in lightroom, exported them to JPG, threw them into the free stacking software CombineZP, aligned them, then tried all stacking algorithms and chose the one I liked best.
Now to dismantle this picture, as a guideline for you to do it better:
- The framing sucks. A 6-8x magnification might have given nicer opportunities to get the whole head in.
- The dirt! I didn't know any better and did not clean the fly at all. I could've used an air blower like Giotto's Super Rocket, or used water or isopropyl alcohol or other things to clean the fly and get rid of all that dust.
- Step size. As mentioned, the focusing rail I used is far too crude for these magnifications. Right next to the eye you can see a blurry area which shows that I have missed several steps and did not get a picture where that part was in focus. Do yourself a favor and get a proper linear stage before dabblind in high-magnification macro photography.
Image 2: Pencil Tip

After I had gotten the bellows and microscope lenses I invited two macro enthusiast friends over to take a series of images for fun. At the time I did not have a control software for my DSLR, but my buddy using a Canon EOS 70D did. Plus, he had Magic Lantern on it, so he had even more control. The images were taken with Mirror-Up mode and Electronic Front Curtain Shutter (EFCS, article by Michael Hohner). As I have mentioned the tiniest vibrations become big problems at high-magnification macro photography. Mirror-Up is done to reduce vibrations from the movement of the mirror of the DSLR, and EFCS opens the shutter prior to the exposure so that the shutter does not cause any vibrations either. The latter is somewhat overkill for smaller magnifications, but it doesn't do any harm either. As far as I know Nikon does not offer this functionality.
In any case the setup as described above has been used to take a picture of the tip of a pencil. While the harsh lighting caused some reflections and loss of detail, you can still see that pencil tips which appear fairly smooth and uniform actually are very rough after sharpening, and that the graphite is not very homogenous at all. Actually you can see the ridges where the graphite broke off from sharpening.
Image 3: RAM

I had an old bar of RAM lying around and we figured it'd look cool to try and see it more closely. We changed the setup slightly and used a reversed Nikon EL-NIKKOR 50mm f/2.8N at an extension giving us approximately 2x magnification.
Again, harsh lighting caused a lot of reflections, especially of the solder and some of the exposed copper surfaces, but overall still a pretty neat shot for such a simple setup.
Step 13: Intermission: Vibration Reduction and Optics for the Bellows

Sorbothane
My previous setup had quite a few problems with vibrations. If I so much as looked at my setup wrong I got blurred images out.
To remedy this, I have reworked my complete setup with some inspirations from the rigs over at the photomicrography forum. I don't have the money for an optical bench, or microscope stages, or other expensive equipment. I don't have the room to store a 30kg granite block either. This means some improvisation is in order.
I have some storage space for wood, and the right tools to work it. I also happen to have some weights, so that issue is solved. A heavy setup is less likely to be influenced by small, weak vibrations. To reduce what little vibration will come through, I got myself some Sorbothane. Sorbothane is a silicone- / rubber-ish substance which has excellent vibration dampening properties. People into Hi-Fi-stuff love these and put them under their speakers, under their turntables, basically under all of their equipment. You can get sorbothane in different thicknessess, strengths, shapes and so on. You could even use some tools to calculate where exactly to place what kind of sorbothane dampeners to absorb vibrations of a specific frequency as well as possible.
Above you can see the pads that I got.
Microscope Objectives

Microscope objectives are THE way to go when high-magnification macro work is the goal. Typically the barrel of microscope lenses shows four numbers, something like:
160 / 0.17
10x / 0.22
The first number is the tube length. This is the distance beween the opening where the lens is mounted and the sensor. 160mm is pretty common, but 180mm, 210mm and others exist as well. An "infinity" sign indicates that this is a lens with an "infinite" tube length, that is the image does not focus behind it, but instead needs a tube lens of a specific focal length to focus the image instead.
The second number is the cover slip thickness which the lens is correcting for. Microscope slides often use a cover slip, a thin piece of class, on top of the subject and microscope objectives correct for that if this is their intended use. "-" means no cover slip is expected.
Next comes the magification of the lens.
Finally, the last number is the numerical aperture of the lens. This is a number indicating the light acceptance angle, which influences the objectives effective aperture, resolving power (how sharp the lens is) and the DoF.
There are a number of different microscope objectives around, some are meant to be used with cover slips, some are meant to be immersed in water, oil, or something else, some need special lighting, and so on. The arguably most useful ones are metallurgical microscope objectives, as these are designed to not be used with any liquids, cover glasses or anything and typically have fairly large working distances (for microscope objectives, that is).
Above are four metallurgical microscope objectives. The Nikon U10 and U20 come with a 180mm tube length, the Olympus M40 with 160mm and I think the Nikon M4 does as well. I only used that last one once so far and it's been a while back, so I don't quite remember. They might not be the best for incredibly sharp images, but I got them fairly cheap and they work well enough.
If you want to read more about microscope objectives, the types that exist and such, I recommend the following links:
- MicroscopyU: Microscope Objective Specifications. Overview of microscope lens classifications and what the different identifiers mean.
- MicroscopyU: Infinity Optical Systems. Same, but focused on infinity objectives.
- Edmund Optics: Understanding Microscopes and Objectives. VERY detailed overview of all the different technologies and well worth the read.
- Extreme Macro: Extreme Macro Microscope Objectives. Nice read about using microscope objectives for high-magnification macro photography.
- Extreme Macro: Extreme Macro Tube Lenses. Article about how to use infinity objectives for high-magnification macro photography.
- Extreme Macro: Nikon CFI Plan 10x Objective. Article about the use of aforementioned infinity lens for high-magnification macro photography. The information can be applied to other objectives as well.
Enlarger lenses
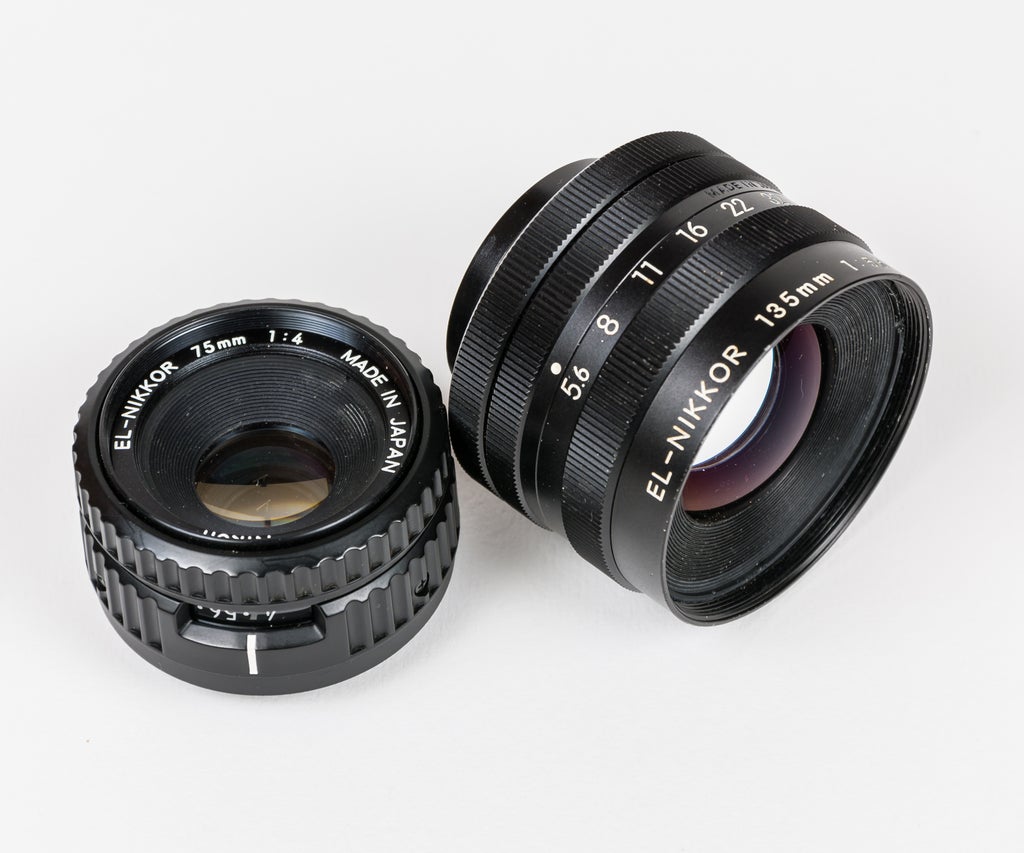
Photographic enlargers were used to project the image of film negatives onto photoreactive paper to get photographic prints. Different lenses were used to achieve different size prints. In general, the lenses had exceptionally flat focus fields as both the negatives as well as the paper were flat and a curved field would result in blurred prints. quite often they have an aperture, but no focus ring, making them well-suited for use with bellows.
There's apochromatic versions of these lenses which are rather expensive and rare, but with outstanding imaging quality.
Adopting these lenses can be a bit tricky. The regular orientation is usually not that hard as M39 Leica thread is fairly common with these, but reversing them may be harder. Most of the EL-Nikkors that I have have M40.5mm filter threads, and I could not find any M40.5-M42 coupling rings, so I had to use a M40.5-M42 step-up-ring in conjunction with a M42-M42 coupling ring. You'll see more on that later.
Here's some links on the subject:
- Extreme Macro: Reversed Enlarger Lenses. Short article about using enlarger lenses for macro photography.
- Savazzi: Enlarger Lenses In Photomacrography. Detailed article comparing different enlarger lenses for their viabiliy for macro photography.
- Savazzi: Manuals. A listing of various instructions, manuals and sales pamphlets of all sorts of lenses, including EL-NIKKORS.
- Lens Hacking: Using Enlarger Lenses For Macro Photography. Nice, short article about, you guessed it, enlarger lenses for macro photography.
Projector / Projection lenses:


Projector lenses are not your typical camera lenses as they were made for slide or film projectors. Most ofthen they have a fixed aperture, no focus controls and micht come in a variety of mounts that are rather complicated to adapt to for DSLR usage. Basically they are just a metal barrel full of glass. However, some older slide projector lenses are of quite good quality, readily available and not that expensive. Or you could go for more modern devices and cannibalize defunct beamers or (movie) projectors.
Pictured above is a Leitz Wetzlar Germany Colorplan 90mm f/2.5 Projector lens. This was a lens used in medium- to high-quality diapositive slide projectors made by Leitz, especially the Pradovit line. There's tons of versions of this lens around, such as the Made-in-Portugal one (supposedly not that good) and the quite rare Super-Colorplan (of which more versions exist). For photographic purposes, stay away from "CF" versions, which stands for "curved field". These lenses were optimized for curved slides to keep those perfectly in focus and will show a distinct falloff in sharpness towards the edges when used with a planar digital image sensor.
Many people have been adapting these lenses for DSLR use with a variety of devices. Some glued PVC pipe of a fitting diameter to some adapter with the lens bajonet, optionally added some tape or other things to make the lens fit inside that pipe well and had it held in place by friction, focusing by moving the lens back and forth. Others opted for helicoid adapters (essentially variable extension tubes) and some other things to mount the lenses.
Below is an adapter that I have designed so I could use this lens either with a helicoid adapter, on extension tubes or on bellows, regular and reversed, fairly easily while allowing the use of filters if I so pleased. The adapter is designed to have a 62mm reversing ring for the back (glued and screwed in, some drilling required) and a 58mm-77mm step-up adapter for the front (again, glued snd screwed in, some drilling required). A M3 or M4 setscrew would serve to hold my particular 90mm Colorplan in place. Unfortunately I have yet to successfully print this adapter at my local FabLab. For whatever reasons almost all my prints fail.
I expecto to be able to use this setup for fairly decent pictures with up to 2x magnification, maybe up to 4x, hopefully with fairly long working distances. The missing aperture will likely give me a very shallow DoF, which means stacking will be necessary. I will update this when I'll get it to work properly.
In any case, do be careful that such projector lenses do not intrude too far into your camera body or the mirror might catch the lens when flipping up and get damaged.
Specialty Bellows Lenses:
Given that bellows exist it is not surprising that there are lensis which were developed specifically for bellows or bellows-like systems. Noteable mentions in this category are the Macro-NIKKOR lenses (note: NOT the micro-NIKKOR that are macro lenses you can get now) which were a set of four lenses made for the Nikon Multiphot system that Nikon solte in the 1970s and 1980s. Microscopyu has an article about the Multiphot Large Format Photomacrography Microscope. Enrico Savazzi has an article about the Macro-NIKKOR lenses. These are high quality, but rare and expensive optics which cover anything from 1x to 40x magnification with the right bellows setup.
Another mention would be the Zeiss Luminar and Tessovar lenses. Again, Enrico Savazzi has an article about those Photomacrographic lenses. Once more, these have unfortunately been out of production for decades and are thus fairly rare and somewhat expensive.
Laurent Thion uses some of these in his presentation of the Cambo Actus bellows system on NikonRumors. Here's part 1 and part 2 of his report.
Also, Bjørn Rørslett has an overview of Special-Purpose Lenses For Nikon 'F' Mount, many of which are suited for bellows.
Naturally there is a whole bunch more, but this part, for now, is only for mentioning that this type of lenses exists.
At this point in time I do not posess any such lenses. Once I do I will update this part and add resulting shots.
Printing Lenses:
Printing lenses are special lenses meant for optical printing, that is for copying film or similar such activities (Wikipedia on optical printing). These lenses and setups were used quite often for making / introducing special effects onto the film, copying film, restoring film and so on. The optical quality of these systems tended to be very high to preserve as much of the original film quality as possible.
Examples for such lenses are the elusive Printing-NIKKOR lenses. Think of these as incredibly expensive, high-quality, rare enlarger lenses on steroids which put the Apo-EL-NIKKORS to shame. Apparently Stanly Kubrick used these to copy his films, and that guy was really picky about his lenses. He got his hands on some very rare and exotic lenses and knew his lenses very well.
If you find one of these in used, in good condition for less than 1000$ you're getting a good deal. However, at this price point you'd likely be better off with a variety of other lenses to achieve macro photography.
In any case, Coin Imaging has two tests of the Nikon Printing-Nikkor 105mm f/2.8, Article 1 and article 2 for your reading pleasure. Sharpness, resolution and such are, as expected, outstanding. The achieved magnification is rather small though.
Enrico Savazzi has some manuals / instructions on Printing-NIKKORS available for donwloading.
At this point in time I do not posess any such lenses. Once I do I will update this part and add resulting shots.
Cine Lenses (reversed):
Cine lenses were lenses specifically made for cinema and television (that is film) cameras, typically with a C-Mount. Depending on what film size they were intended for, the image circle might only cover a part of DX / APS-C sensors, let alone full-frame or medium format sensors. However, these lenses may be reversed and used for macro work that way. Depending on what lenses you get they can be of very high resolution and highly corrected for chromatic aberrations, field curvature, and other distortions.
Once more, these lenses have become fairly rare nowadays and might not be the best or cheapest way to achieve macro photography in this day and age.
Again, Enrico Savazzi has manuals / instructions on these lenses available for downloading.
Furthermore, Extreme Macro has a short paragraph about them in their article "Other Extreme Macro Lenses".
At this point in time I do not posess any such lenses. Once I do I will update this part and add resulting shots.
Industrial Lenses:
This subject is fairly broad. Industrial lenses cover any lenses that the average person does not come into contact with as they are used for industrial, or possibly research purposes. Examples could be lenses used in optical inspection equipment, automatic inspection equipment checking produced parts such as microchips, lenses made for medical purposes (optometry, medical imaging, ...), general science (geology survey equipment, underwater lenses, astronomy equipment, ..), security (high-quality security cameras, night-vision equipment, specialty scopes, ...) and so on.
Heck, I've heard about really rare lenses which were made to project plans onto huge pieces of steel at shipyards, indicating where those sheets are to be cut. Stumbling over such lenses is a very rare and lucky occurrence.
Old industrial lenses are near impossible to find and obtain (potentially highly expensive, too), and new ones are designed specifically for their intended purpose, and likely expensive as well. Information about these is scarce, too.
You will likely have to put in quite a bit of effort to adapt those specially-designed lenses for use with regular DSLR cameras, provided you even get one in the first place.
For obvious reasons at this point in time I do not posess any such lenses. Once I do I will update this part and add resulting shots.
Extreme Macro has a short paragraph about them in their article "Other Extreme Macro Lenses".
Microfilm Lenses:
Microfilms or Microforms are films, paper or other materials carrying positively tiny reproductions of text or pictures. Presumably everybody knows about the spy-related tropes of microfilms that were used to either take pictures with highly miniaturized cameras, or to smuggle documents, pictures or other such information in a tiny form factor. What fewer people seem to know nowadays is that microfilms were also used as a general storage and archiving medium, with corporations, universities and even public libraries having collections of such microfilms. Naturally both creating as well as viewing the microfilm required special lenses. The microfilm viewer lenses which allowed for magnifying the shrunken-down source material to a viewable size are especially interesting for macro work. Given that the original documents were shrunken down up to 1/160th of their original size (1/25th was common), microfilm viewer lenses ought to be a good alternative to other ways of achieving macro photography. Plus they tend to be fairly high-resolution, too. Though a dying technology, you can still find them around and as they were popular, prices are manageable as well.
Extreme Macro has a short paragraph about them in their article "Other Extreme Macro Lenses", as well as one about the Otamat 20mm Microfilm Lens, which is one such lens.
At this point in time I do not posess any such lenses. Once I do I will update this part and add resulting shots.
CCTV Lenses:
CCTV, or Closed-circuit television, is essentially video surveillance. These cameras are of course pretty much everywhere, and quite a few sport the S-Mount for exchangeable lenses. Adapting these for DSLR use is fairly simple as a result, and using them in reverse may lead to some interesting macro possibilities. As these kind of lenses is very common, they can be obtained fairly cheaply.
The big disadvantage is that most CCTV cameras sport low-resolution sensors and image quality isn't exactly the highes priority either, which means most CCTV lenses sport low resolution and are typically not highly corrected for a variety of distortions. Higher-resolution CCTV systems are being developed, but are still expensive (and so are their lenses).
Until technology in this field improves, these lenses likely are not a worthy avenue to pursue.
CCDP (Closed-circuit digital photography) is currently a more promising field. Think of it as CCTV with still pictures every set time interval instead of a continuous video stream, similar to timelapse cameras. These have a higher resolution and their lenses might be more interesting.
Extreme Macro has a short paragraph about CCTV lenses in their article "Other Extreme Macro Lenses". Wikipedias Closed-circuit television and ""
At this point in time I do not posess any such lenses. Once I do I will update this part and add resulting shots.
Projection Eyepiece:
This is a rather surprising combination. The first time I have heard of this was from an article by Steen G. Bruun who applied principles from Astrophotography to Macrophotography in order to increase the amount of magnification from a given setup withhout shortening the working distance. That's gold, right here, pleople!
The way he does it is by introducing projection eyepieces (specifically from astronomy equipment, that is eyepieces for telescopes, but microscopes have something similar, too) to the equation. These projection eyepieces (Wikipedia: Eyepiece) are lenses placed near the focal point of an optical setup (such as the telescope or microscope), collect that light and magnify the image further.
Adapting and including such lenses into given setups can be a bit tricky, and it does introduce at least additional chromatic aberrations and some loss of image quality, but these lenses are quite affordable, readily available and greatly increase the magnification capabilities of your setup. From the example setup by Steen G. Bruun you do not lose the ability fo focus to infinity either. With the right adapters it is even possible to have something of a "macro zoom" which alloss you to change the amount of magnification without changing the working distance.
Here is the article "Extreme Macro - in a slightly different way" bySteen G. Bruun. Note that it has three pages.
At this point in time I do not posess any such lenses. Once I do I will update this part and add resulting shots.
Step 14: Bellows: Setup & Sample Images, Part 2


The Setup: Microscope Lenses
Let me start with the weight of this setup:
- Tabletop: 22.8 kg
- Macro rig (unweighted, without camera but with tripod head): 9.8 kg
- Additional weights: 17kg
- Camera, specimen stand, lights and such: 3kg
So the weighted camera rig, with the camera, lights and specimen clocks in at about 30kg and is placed on the four 70 durometer sorbothane pads rated for a weight of up to 36kg. This whole setup sits on the countertop, which in turn is placed on the eight 50 durometer sorbothane pads with a combined rated weight of 54kg. Given that the setup with the counter weights about 53kg, this is perfect. So vibrations should be pretty well under control now. Maybe not perfectly so, but good enough.
Now for the camera part of the setup. I have attached the Manfrotto MA 141RC tripod head to the rig with a 1/4' screw, added a focus rail for the coarse adjustment, attached an Owis linear stage with 10 micrometer adjustment accuracy on top of it, added an Arca-Swiss-holder, and finally attached the bellows to this via an Arca-Swiss quick-change plate.
The microscope lenses with RMS mount are attached to the bellows with an RMS-M42 cone adapter and set to the correct distance to the sensor. The DSLR is attached to the bellows and a wireless trigger attached. The DSLR is set to manual mode, with settings adjusted for a good exposure, and set to Mirror-Up-Mode. Even though the vibration dampening of my rig is pretty good, the mirror movement of the DSLR will still cause problems. So the wireless trigger is used to first move the mirror up with the first click, then I wait for a couple of seconds for the setup to stop vibrating, and take the actual image.
The subject is held in place using a third hand, placed on top of a sturdy wooden box for height adjustment. Or on the lab jack you can see in the picture, whatever works. Because illumination is needed, I use two Ikea Jansjö LED lamps to light the subject. In this case the subject is a M2.3x9mm machine screw.
The Setup: Enlarger Lenses


The second setup here is very similar, but instead of microscope lenses I use Enlarger lenses. The first setting is one of an enlarger lens in regular orientation with a Horsefly as a subject, adding tracing film as a diffuser to get some softer light on the subject. I cut the film such that the bellows can pass through, but kept the gaps small to avoid light spill. The clips are there to weight down the tracing film. The enlarger lens has a M39 mount, so I used a M39-M42 thread adapter to get it to work with my M42 bellows.
The second image shows the third setup, which is again quite similar except that I have reversed the enlarger lens using a M40.5-M42 step-up ring and a M42-M42 coupling ring. Also the subject is not a pidgeon feather. At least I think it's from a pidgeon, I just found it in a park.
Oh, right: In both images you can see the holes I drilled for attaching the tripod head at different positions depending on where I want the weight to be, and to make room for additional gear.
Image 1: Machine Screw

The result of the first setup. Nikon U10, 180mm extension, approximately 10x magnification, approx. 15mm working distance. The subject is a 2.3x10mm machine screw and I used a 0.1mm step size for the stack.
As you can see in the setup, the IKEA Jansjö lamps shine directly onto the screw, which is of course the cause of all those reflections and highlights you can see in the image. Furthermore you can see just how rough and dirty screws are when you just leave them lying around for a while. Most of this should be dust.
RMS to M42 cone adapter
Image 2: Horsefly

Nikon El-NIKKOR 50mm f/2.8N with 120mm extension on the bellows, set to f/11, forward-facing, giving approximately 1.7x magnification. Technically lens should have been reversed as it exceeded 1x magnification and reversing it would have improved the image quality a bit more. For the given purposes it was fine though. Working distance is approximately 50mm which leaves enough room to get some light modifiers in. Due to the relatively low magnification and relatively small aperture (thus bigger DoF) I chose a step size of 0.5mm. This is manageable even without a fancy, expensive linear stage.
The subject in question is a dead horsefly that I found last summer, at my grandparents home if I remember correctly. Either there, or at my parents holiday home. Dead insects tend to accumulate at rarely-used windows during late summer / autumn, so it's rather easy to find some subjects that will hold still withouth weighting much on the conscience. The down side is, of course, that the subject does look dead. Usually horseflys have really vibrant colors, especially the eyes, which turn dark some time after their demise. Also, I tried to clean this one up a tiny bit, but did not have my Airblower at the time so my possibilities were limited and you can still see some dust here and there.
As insects are really interesting, here is a gif of the slices of this stack.
Image 3: Tip of a Feather

Reversed Nikon El-NIKKOR 50mm f/2.8N with 155mm extension on the bellows, set to f/11, giving approximately 3.2x magnification at a working distance of 45mm. Again, more than enough to get some light modifier going. The step size is once again 0.5mm, which is sufficient for this setup.
The subject in question is the tip of a pidgeon wing feather that I found in the park. Once more, a bit dirty, so please disregard that. The funny thing about the feather is that one always thinks there are strands of whatever going off from the stem and that's it, but as it turns our those are like miniature feathers in themselves. Presumably all these little hair-like structures interlock as can be seen with the mesh-like look on the left side to become fairly airtight so as to allow the bird to fly.
Image 4: Matchstick
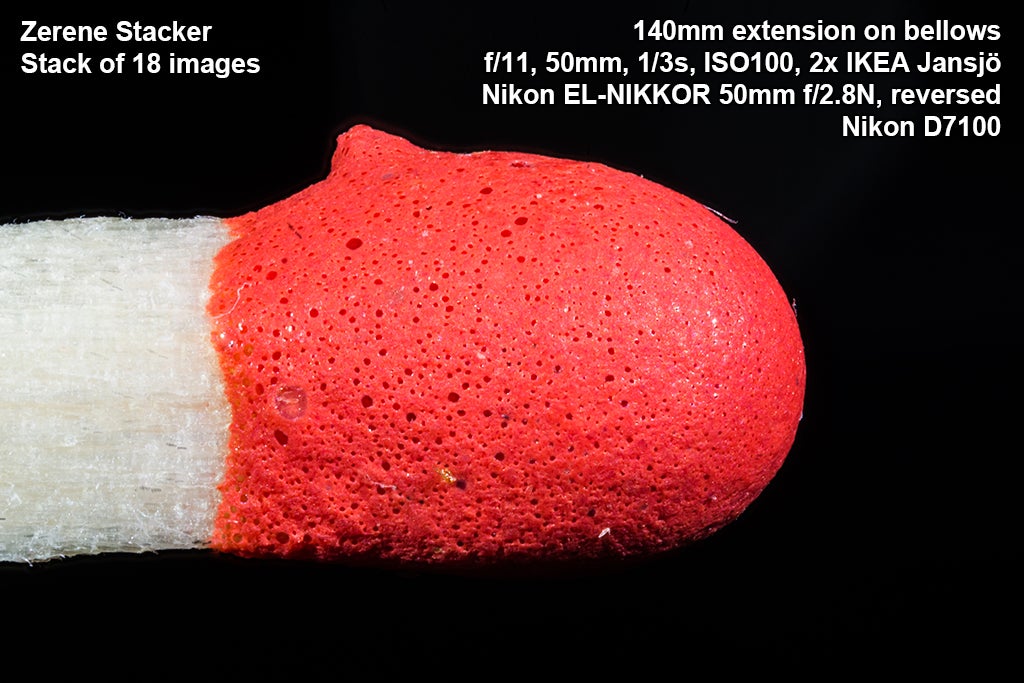
In the spirit of examining some everyday life objects I opted to take a closer look at a simple match, more specifically, at its head. While it is a bit less exciting that I thought it would be, the porous structure of the match head is mildly interesting.
The match was held in place by a third hand on top of a lab jack, while I used two Ikea Jansjö LED lamps to directly illuminate the match from both sides.
Image 5: Rusty Wire

When I was visiting my grandparents this easter I already had the idea of taking acloser picture of something rusty. While I would've preferred the flaky type of rust you get on some sheet metal types all I could find in the garden was some rusty wire which still looks pretty neat when you magnify it to somewhere around 3-4x.
The setup was essentially identical to the matchhead setup.
Image 6: Bumblebee

Before people get up in arms for me murdering and impaling a bumblebee, let me assure you that I found this specimen dead on the sidewalk on my way back from the university. Not slow, cold or dying, but stone-cold dead, not twitching at all. If it did I'd have given it some sugar water to recover. As for the pin, I used a drop of crazy glue to attach it to the bumblebee.
I did somewhat try to clean the bumblebee up a bit but my air blower is at a friend's place and I didn't want to try remove the dirt with a brush or something and end up breaking off a leg or antennae. If you are able to see past that, you might notice the huuuge reddish-brown tongue that's sticking out which bumblebees use to drink flower nectar.
The pin was held in palce by a third hand on a lab jack while I used a screen of tracing paper with a cutout for the lens to poke through to diffuse the light of the two Ikea Jansjö lamps which were used for more or less frontal illumination.
Image 7: Razor's Edge

I got the idea for this one when listening to AC/DC. What you see here is a retired exacto blade with a broken tip. Those vertical lines you can see are caused by the factory sharpening process. Really, really sharp blades will actually have a mirror-shine polish, and the edge will be perfectly straight with no burr at all. Given that this is a used, throwaway blade the imperfections in the blade are of course acceptable.
The setup used was the same one as used with the bumblebee, except adapted for the smaller microscope lens.
Image 8: Twig Fungi
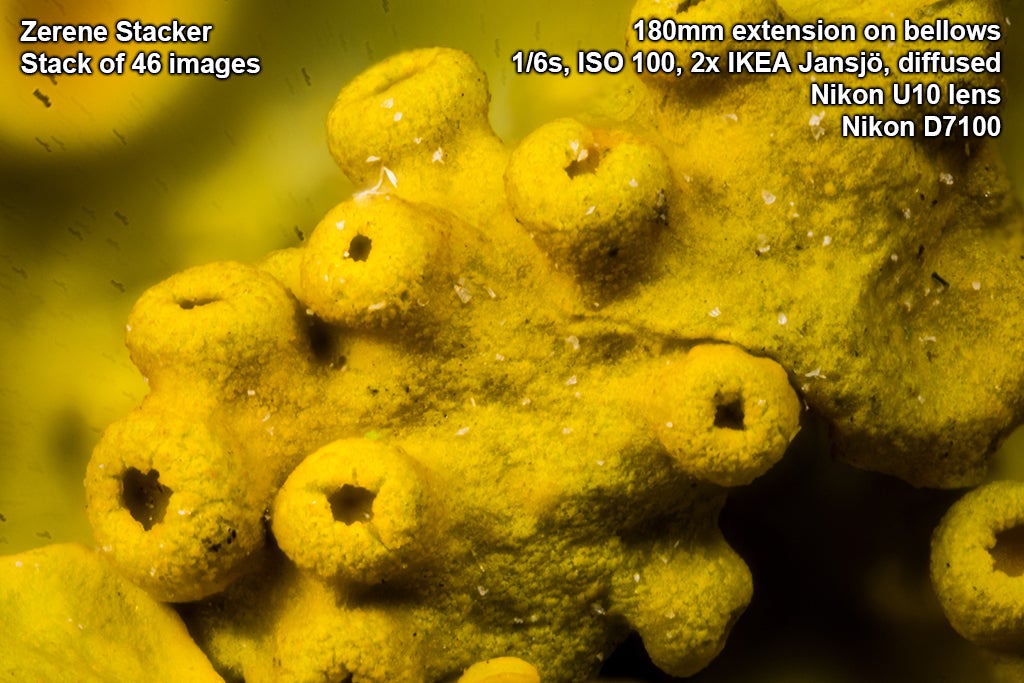
Do you remember my opener image of the dragonfly nymph on the fungi- and moss-covered stick? Well here is a much closer look at some of the fungi on that stick at approximately 10x magnification.
These are quite interesting, somewhat resembling bigger puffer mushrooms but as far as I can tell these simply fold open once they grow a bit. In this tate though, with a bit of imagination they remind me of some sort of polyp, or maybe octopus tentacles.
Setup-wise I used the same approach as with the bumblebee and exacto blade.
Step 15: Macro Lenses

What is it?
Macro lenses are lenses which are designed to have a shorter close focus distance than lenses of comparable focal length such that you are able to take pictures with a higher magnification ratio. "True" macro lenses are lenses which can achieve life-size reproduction (1:1 reproduction ratio / 1x magnification), or exceed that. Typically macro lenses have a smaller minimum aperture (higher f-number) than lenses of compareable focal length to give you the possibility of a wider DoF at the highest reproduction ratio they are capable of.
Macro lenses are a comfortable way of achieving macro photography as they are specifically designed for this very purpose, can be used directly with the camera without any modifications and function just like any other lens would.
Also, they tend to be very good all-purpose lenses as well as they can focus to infinity, too.
How does it work?
In general these lenses are designed to have a shorter close focus distance than comparable "regular" lenses, so they can achieve 1:1 reproduction ratios. Other than that they are usually not much different from any other lens and are available in a variety of focal lengths.
One should note that as with regular lenses, in general the minimum working distance increases with a longer focal lengths, that is while you achieve a 1:1 reproduction with a 50mm macro lens and a 200mm macro lens, the latter will be further away from your subject (which is useful for photographing animals with larger flight distances). At the same time, the DoF decreases with a longer focal length at the same f-number, just like it does with regular lenses. Furthermore your field of view decreases with an increasing focal length. While a 50mm macro lens will show you quite a bit of the background (wide angle of view), a 200mm macro lens will only show you a smaller portion (narrow field of view).
Pictured above is a Tokina ATX f/2.8 100mm Pro D Macro AF lens, one of the more affordable, good macro lenses. I got mine used in near-mint condition for 300 bucks (at the time it cost around 450 new).
Pros:
- Very comfortable and easy-to-use
- Light, setups can be handheld
- High-quality results (depending on the lens)
- Fairly large working distances (depends on the focal length)
- Typically full electronics support, autofocus, etc.
- Fairly large DoF
- Can be used like normal lenses as they can focus to infinity
Cons:
- Expensive
- Small reproduction ratios
Pricing:
This one really depends on your brand, if it's used or new lenses you are looking for, old or recent ones, and what special features you'd like them to have.
Generally I'd say prices for decent new macro lenses start at maybe 200-300$, and go all the way up to 1000+$ (or more) for brand-name high-quality or specialized optics.
Notes / Things to look out for / Additional gear:
Some lenses offer a "macro mode" which lets them focus a bit closer than for regular use. Typically this mode does not enable you to get life-size pictures though.
As with other macro methods, tripods, beanbaggs or so for stabilization purposes and external light sources are your friends. Try to use apertures of f/9 - f/11 at most to get your subject well enough into focus while avoiding image degradation from diffraction. If you can live with some loss of maximum sharpness while extending the DoF, go beyond.
Noteable mentions for lenses are the Canon MP-E 65mm f/2.8 1-5X Macro Lens with a variable reproduction ratio and a very respectable maximum magnification of 5x. This lens is very famous and enviously ogled by Non-Canon shooters, myself included.
From the Nikon camp, the renowned and near-indestructible Nikon AF FX Micro-NIKKOR 200mm f/4D IF-ED. With its 200mm focal length you get nearly unprecedented amounts of working distance in the macro field.
Fairly recently introduced, the Venus Optics Laowa 15mm f/4 Wide Angle Macro Lens. Although the working distance is short, the DoF is absurdly wide due to it being a wide-angle lens. The pictures you can take with this lens are near impossible to reproduce with other gear.
Also from Venus Optics, the Laowa 60mm F/2.8 Ultra Macro which gives you up to 2x magnification for a very reasonable price. Also, this lens has a built-in shift lever which enables you to add some very interesting effects to your images.
A side-note about the Venus Optics lenses though: While they are affordable for what they offer and the image quality is good or better, their macro lenses often suffer from a short focus throw. That is the focus ring is turned a rather short distance for moving from the closest to the farthest focus distance. For any sort of tripod-based or studio work this makes focusing exactly quite difficult. For hand-held shooting this is basically a non-issue as you mainly focus by moving the camera closer or father.
Recommended read(s) / video(s):
Thomas Shahan's Review of the Laowa 15mm macro lens. Thomas Shahan goes into some of the details of this lens, as well as talking about wide-angle macro photography in general, showing some pictures, video and thoughs on the subject. He also shows a relay lens setup, a fisheye adapter setup as well as fisheye lens used for wide-angle macro photography.
Thomas Shahan's Review of the Laowa 60mm 2x macro lens. Aside from the technical details, Thomas Shahan also shows quite a few pictures taken with this lens, and his personal thoughts on it.
Mike Browne giving some tips about macro photography, part one and part two, focusing on macro lenses. He gives some general backgrounds, some tricks about lighting your subjects, then moves on to taking pictures indoors to have more control. His enthusiasm in demonstrating techniques and finding subjects to shoot is quite contagious.
He also visited his friend, Peter Little, and in two videos (part one, part two) goes through an inexpenise, flexible and honestly ingenious home studio for macro photography which essentially runs on improvisation and excellent ideas. Noteable techniques including colored pieces of paper as reflectors to manipulate the colors of your subject, aluminum foil as a very affordable reflector, K'NEX for easily modifiable light boxes and much more. These two videos are really a must watch to get inspiration about using common household items or inexpensive items you can get anywhere for macro photography at home.
Step 16: Macro Lenses: Setup & Sample Images

The Setup:
A macro lens setup doesn't get much simpler, simply attach the chosen macro lens to your DSLR and you're good to go. Additionally I have added a flash with a softbox flash diffuser for some softer light. For macro photography I most often use the lens on manual focus and get the focus spot where I want it to be by moving back and forth.
Note that using the flash on the flash shoe might not give you the best illumination if you get too close to your subject. In that case using a flash cord for off-camera flash and maybe mounting the flash on a macro bracket is the better option. There are also dedicated macro flash options, such as the ever-popular ring flashes and twin flash systems such as the Nikon R1C1 Wireless Close-Up Speedlight System, or various other options.
Also note that the setup above is my outdoor setup which I have not used for the studio pictures below. The studio pictures were taken with the bellows-setup, but using the macro lens onstead of the bellows.
Image 1: Dragonfly Nymph Exoskeleton

You have probably clicked on this instructable due to this picture in the first place, so naturally I am obligated to tell you about how this image came into being.
My sister happens to own a home with a pond and I visit her every now and then. This spring I did see a dragonfly nymph crawl around in their pond and asked my sister to look out for the exoskeleton for when the dragonfly will transition from its nymph to its adult form. I informed her she should just keep an eye on the first 15-30cm of above-water vegetation growing from the pond. It took a couple more weeks but I finally got my hands on the shed exoskeleton, sadly without the piece of reed or whatever it was atached to. I improvised by placing the nymph on a twig which was covered in all sorts of interesting and colorful fungi and moss.
To get a more interesting look I opted for a pice of blue cardboard as a background, which contrasts nicely against the nymph and complements the greens and yellows on the twig. Two LED panels with shoot-through umbrellas were used for an even illumination. Now the interesting part is this: I positioned the branch orthogonally to the lens (so parallel to the focal plane) and oriented my focusing rail the same way so that I could move my DSLR left and right, parallel to the branch while keeping the same distance in order to keep the branch sharp. I proceeded to take several pictures and essentially created a micro-panorama which I stitched together in Photoshop.
If you want to see a high-resolution version of this photo, look no further (3075x1200px).
Image 2: Candle Wick

Did you know that candle wax is pretty cheap, but that candle wicks are technological marvels and the most expensive part of most candles? They have to burn with exactly the right speed for the given wax used for the candle, they need to burn consistently, transport the liquid wax towards to where it can ignite well, and so on.
The illumination used for this picture was just the light the candle gave off. A black piece of cardboard was used as a backdrop.
Image 3: One Million (German) Dollars!

Everything that Dr. Evil dreamt of when he pressured the United Nations with a stolen warhead. Well, if it were in unmarked, nonconsecutive banknotes and in dollars and actually worth something.
One of my grandfathers used to collect postage stamps semi-actively, but gave up on this hobby years and years ago. However, instead of throwing them out he gave them to me when I was a kid and being the habitual opportunistic collector that I am of course I still have them lying around gathering dust until I can find a good purpose for them. For this instructable I went through part of the collection to find an interesting one among them and stumbled over this whopping 1 Million Deutsche Reichsmark postage stamp from 1923, which of course is worth approximately as much as the paper it's printed on. In case you did not know, between the first and second world war Germany had a big problem with its currency and was plagued by hyperinflation which was in the end only solved by pretty much devaluing all money and introducing a new currency, the Rentenmark.
I have placed the postage stamp on top of blue cardboard for a little bit of additional color and used the ambient light in my room for an even illumination. Given the luxury of a stable setup and immobile subject I could easily get away with a shutter speed of 6 seconds.
Image 4: Amethyst

Not too far from my work is a nice little shop specializing in selling all sorts of stones, minerals, crystals and the like. Every now and then I drop in to check if they have a neat-looking geological specimen which could be interesting to take pictures of. One of those that made it into my tiny collection is this small part of an amethyst geode, placed on top of the high-gloss black piece of acrylic for a nice, dark background and neat reflection. An even illumination was achieved with two LED panels in cross-lighting orientation and using shoot-through umbrellas for diffusion.
Image 5: Circular Crayon Rainbow

Just like ballpoint pen and pencil tips, crayons are among the obligatory macro shots. To make this shot a bit more interesting I decided to emulate a color picker circle with a few of the crayons I have at my disposal. The crayons were placed on top of a piece of white cardboard and as they are so close to the background in order to avoid harsh shadows I opted to simply use the available ambient light to take this picture.given that my room was rather dark the exposure time was a whopping 10 seconds. Without a sturdy tripod or some similar sort of stabilization you can forget about getting sharp shots at those kind of exposure times.
Image 6: Engraved Lighters

Two or three years ago I have been experimenting with using my Proxxon FBS (a Dremel-like tool) and a diamond-tipped tool to engrave cheap Zippo knockoffs. Turnes out it's actually rather easy to get decent results. I started with drawing the lines onto the lighter using a fine-tipped permanent marker, put on some magnifying goggles, spun up the Proxxon to the highest speed (engraving is easier with higher speeds, which is why professional jeweler's motors have absurdly high RPMs) and started engraving. Lastly I dipped a piece of cloth in some black acrylic paint and rubbed it on the lighters, let it sit for a minute and then quickly rubbed off any excess to darken the engraved lines a bit.
As you can see I engraved Pokemon's Charmander whose tail actually continues under the lighter's cover so when you light it it looks as if the tail's on fire, and Studio Ghibli's Princess Mononoke from the same-named movie.
The setup is the same simple high-gloss black acrylic and two LED panels with shoot-through umbrellas for diffused light.
Image 7: Wasp's Nest

My family's vacation home is often used as a place for wasps to start new colonies, although quite a few nests are abandoned at some point of their build. I do not know if the queens simply find better locations, or if they happen to be eaten or if there is a different reason, but this nest here had been abandoned mid-construction so I figured it'd be nice to take with me for some detailed pictures. The openings above which look ripped actually are as that was where the nest had been attached to a horizontal wooden beam. Fortunately this opening allows us to see that this nest already consists of at least three layers of the thin, paper-like material which wasps use (or more accurately, create) to make their nests.
There is a funny anectode about wasps I remember. So my family was sitting on the patio of our vacation home, eating breakfast when a wasp lands on a slice of ham, proceeds to cut a circular piece out of the ham by turning in a circle and happily snipping away, then noticing that the piece of ham she cut was approximately her size and impossible to grab, so she spread her six legs, hooked onto the ham and freaking flew away with it as if she were a heavy transport helicopter. And my whole family, watching in quiet fascination, unanimously decided that none of us was mad and that what had just occured was simply amazing.
Back to the image at hand, the wasp nest was placed in front of a blue cardboard background and illuminated with two LED panels with shoot-through umbrellas for diffusion.
Image 8: Beat-Up Watch

Pictured here is a Russian watch which was given to be by my grandfather when I was a young boy. I do not know the exact model of this watch, nor when he bought it, but I do know that it was already a bit beat up when I got it and being a careless kid it got a few more scratches since. I have had it for at least 15 years now. Given that I respect my grandfather a lot and this watch will become a memento of him I'll likely some day have the glass cover replaced and the mechanism tweaked as it's a bit late.
Fun Fact: Poljot, the company which made this watch, was previously called the First Moscow Watch Factory and, amongst others, made the Strela (transliteration from the kyrillic word for "arrow") which was worn by the cosmonaut Alexei Leonov during the world's first space walk in 1965. Which of course says nothing about the watch pictured here, but is an interesting piece of trivia nonetheless.
The image itself was taken with the watch lying flat on top of its metal wristband, placed on the frequently-used piece of black acrylic. I used two LED panels with shoot-through umbrellas as diffusors from about 4 and 8 o'clock, both angled downwards about 30-40 degrees. The lights were placed such that there were few reflections on the watch face.
Image 9: Dried Flowers

I checked around the flat to see if there was something interesting to photograph and found this small vase with dried flowers which retained a nice, intense violet coloration. For a background I chose a red piece of cardboard to get a synergetic effect with the flowers themselves. It might be a bid distracting and a softer or more neutral color may have been a better choice, but I think it's interesting nonetheless. Once more I used the same orientation and setup of two LED panels with shoot-through umbrellas for diffusion.
Image 10: Pearl Ring

Last year a friend of mine contacted me for a potential collaboration on jewellery photography for a certain small jewellery shop. To cut the story a bit short, unfortunately it didn't work out in the end because our quote was a tad too high, but we had a lot of fun playing around with the sample jewellery we were provided with in order to take test pictures.
One of the sample pieces we wer given was this silver pearl ring with inserted gemstones. If I remember correctly, it was a replica and those were definitely not real diamonds, but that's beside the point.
As the jewellery was really reflective we tried out several different setups to control all reflections and in the end went for a white infinity screen (bent piece of white cardboard) and a triangular light tent we made from a longitudinal rod over which we thres a roll of approximately 1m wide tracing paper which cost us like 10 bucks. If you look closely at the reflection of the pearls you can see the triangular opening of the tent. Two studio lights were used for illumination, the weaker one was palced by the opening for a circular highlight, the other, stronger one was set off to the side to illuminate the ring through the tracing paper, diffusing the light and removing most shadows. To get rid of any shado on the background cardboard, the ring was elevated using a thin monofilament fishing line which we easily removed later in Photoshop.
Image 11: Gold Necklace Clasp

From the same set of jewellery we got this really thin gold necklace with positively tiny stamp for the gold content. That stamp was maybe 2 or 3mm in size, tops and barely readyble by the naked eye. We took this picture both as a detail shot of the clasp as well as to display the stamps as a proof of the material quality of the necklace (750 / 18K / 75% gold content).
The setup used was pretty much the same as the one used with the ring, but the lights were positioned more to the sides to avoid any direct illumination.
Images 12 - 16: Etched Glasses


I have some friends who are really into Super Mario and for a birthday I decided to make them some etched glasses. I do have a bit of a history with making etched glasses (see my flickr album) and the album is certainly a good display of how my photographic prowess increased over the years. In case you're interested on how to make such glasses yourself, there are a variety of good instructables on here about the subject. Only comments I'd like to add are to use self-adhesive vinyl instead of tape for crisper lines, and definitely use good protective gear.
Photographing glass is really hard as it's darn reflective, and making the etched surfaces stand out is not easy either. So let's go over the setup to tell you how I achieved these shots. Of course by now you have seen that you can get a really nice reflection using a piece of glossy black acrylic, however when photographing glasses you can use the cheap trick and just reverse one glass and put the other one that you're actually photographing on top.
I started out by setting up the glasses, the camera and the black background. Next I positioned the flash with the snoot above the glass such that the light from the flash would hit the etched surface from behind, but not illuminate anything else if I can help it. The snoot is just a roll of fabric with a reflective surface inside which serves to direct the flashes' light into more of a spot. You can improvise a snoot with a pringles can or some aluminum foil, too.
Once the etched surface was alright and with having no big reflections due to the black background and a good flash setup, I added white pieces of cardboard on each side of the glass with flashes set to wide-angle illumination in front of them, but behind the glass so it does not get illuminated. I had to go through several iterations of mosing both the white cardboard as well as the flashes themselves to only give the sides of the glasses nice highlights.
All flashes were triggered remotely. I realize not everyone has a bunch of flashes and remote triggers around, but you can substitute them for continuous lights such as desk lamps without a problem. In fact using live view and continuous lights makes setting everything up much easier as you can directly see the effects of moving the lights or backgrounds. You'll probably need a slower shutter speed, but for stationary objects in the studio that's irrelevant anyway.
Step 17: Specialty Lenses

This part of the instructable is a stub. You can help extending it by pointing the author to specialty lenses or interesting ways of achieving macro photography (preferably non-destructive and suited for DSLRs).
I hope to get to try out the methods and lenses mentioned here sometime in the future and add them to this instructable, but can't promise anything as quite a few of them are rare and / or expensive.
Specialty Macro Lenses
I own a pretty nice Tokina 100mm macro lens, but there's some rather interesting optics out there that I'd like to try out as well as they allow you to take pictures that are hard to get with other methods. Amongst those lenses is the Nikon AF Micro-Nikkor 200 mm 1:4D IF-ED, the indestructable, high-quality, long-working-distance macro lens. For a more interesting field of view the Venus Optics Laowa 15mm f/4 wide-angle macro lens. Canon has the 65mm f/2.8 MP-E 1-5x macro zoom lens, which is highly interesting. I'd need to borrow a Canon body, but that's the smaller problem.
Microscope / Telescope Eyepiece Setups:
I have not read all too much about this approach (yet), but apparently it is possible to use the magnifying eyepieces of microscopes and telescopes to get suprisingly affordable and functional high-magnification setups to work. These are usually fiddly and require quite a bit of adaptation work, but the end results do look quite interesting and tempting.
Steen G. Bruun has written a three-page article about this kind of setup on his homepage gyes.eu.
Bellows Lenses:
Given that the first cameras used bellows for the focusing and magnification and that even now bellows are being used by photographers worldwide it is no surprise that there are optics dedicated for the use with such systems. Most often these lenses are suitable for lower magnifications (<5x), but there are some which can exceed that quite a bit.
Examples for dedicated bellows lenses include the highly-prized Macro-Nikkor series of lenses and Olympus Bellows Lenses such as the 38,, f/2.8 or the 38mm f/3.5.
Infinity-Corrected Microscope Lenses
While I do posess several finite barrel length micrscope lenses, I do not own any infinity-corrected ones. These are more modern microscope optics and require the use of a barrel lens or other optical equipment to be functional for macro photography. The upside is that these optics tend to be of a higher quality than most finite barrel length optics, the downside is that they are expensive.
Examples include the Nikon CFI Plan 10x/0.25NA 10.5mmWD and the Olympus 4x/0.10 Plan. There is a nice article on extreme-macro.co.uk about tube lenses for use with infinity microscope lenses.
Industrial Macro Zooms
Just like there is a demand for macro lenses in regular photography, there is a demand for (sometimes highly specialized) macro optics in the industry and scientific community. Some are designed for dedicated camera systems, some are made for microscopes, and some are made for other purposes. Examples include the Unitron Zoom 1:6.5 and Optem Zoom 70XL. The former is meant more for industrial microscopes, the latter for C-mount cameras in industrial settings.
Microfilm Projection Lenses
For a long time microfilm / microfiche has been used (and still is being used) as a storage medium for text, images and information in general in a small form factor. This of course necessiates special lenses which can reduce the size of a given object and project a smaller image of the object onto the film to create a microfilm as well as lenses which can do the opposite for viewing the miniaturized media.
Both types are candidates for high-magnification macro photography. Examples include the Olympus 40mm f/3.4 and the Otamat 20mm f/2.8.
Relay Lens Systems:
There are quite a few lenses (mostly for industrial and scientifical use) which produce an image circle smaller than the sensor you are projecting the image on. In order to get the image circle to a sufficient size, a relay lens is introduced to the system. This lens / adapter will, depending on the type chosen, either keep the magnification but extend the barrel length (useful for endoscopes, for instance) or magnify the image circle to cover the image sensor.
Examples for lenses which can be used for relay lens system macro photography are wide-angle CCTV camera lenses. The user kds315* wrote a short summary of such a lens system on the mflenses forums.
Another example of a dedicated, ready-to-buy relay lens system (well, not yet, but it has been announced) is the Laowa 24mm Snorkel Relay Lens which reportedly sports a respectable 2x magnification. You can see a video of a pre-production model on Camera5D's youtube channel and their coverage of Venus Optics' booth at Photokina 2016. Apparently it should come out sometime in 2017, or maybe 2018.
Recommended Links:
- Mr. Michio Akiyama has an overview of very rare Nikon lenses. Originally the information was only available in Japanese but has recently started to get translated into English. The translations are, from what I have read, not as complete as their Japanese counterparts and the English micht be a bit broken at some places, but the site features very rare information which is extremely hard to find.
- http://redbook-jp.com/redbook-e/index.html
- One very interesting lens mentioned there is the 400mm Fax-Ortho-Nikkor, a shipyard projection lens. It was built to project plans on huge slabs of steel accurately so that they could be cut accordingly. Given the magnification and precision, this might be an interesting lens for macro photography.
- Mentioned multiple times in this instrutable Mr. Enrico Svazzi deserves yet another shout out here. His website offers impossibly detailed overviews of all sorts of lenses he has tested for a variety of purposes though mostly for their use for scientific (macro) photography.
- http://www.savazzi.net/photography/default.htm
- Additionally I feel obligated to mention that Mr. Savazzi has also written extensive tutorials for close-up and macro photography put my instructables to shame. Check out "Theory and Concepts", "Lens Tests and Comparisons", "Equipment" and "Technique" if you have some hours or days to spend, it will be worth it.
- If you are looking for photomacrographic lenses to buy, I do recommend his article series "Photomacrographic Lenses", especially Part 7: The Accidential Photomacrographic Lenses.
- He has also written an even more extensive and detailed book, Digital photography for science: close-up photography, macrophotography and photomacrography, which happens to be on my wishlist for ovious reasons. Given that this is only one of my hobbies I'll have to put the purchase off a bit as it is not exactly cheap.
- Also featured previously on here, coinimaging.com is a splendid resource of information about lenses and such.
- It features highly detailed articles about optics and the science behind photography, including articles about the topics I have covered here:
http://coinimaging.com/photo_articles.html - There is a large amount of extensive lens tests:
http://coinimaging.com/macro_lens_tests.html - More importantly, there is a hall of fame where you can select a desired magnification and it will show you a ranking of the best lenses for the given magnification from those that were tested on the site:
http://coinimaging.com/hall_of_fame.html
- It features highly detailed articles about optics and the science behind photography, including articles about the topics I have covered here:
- John Hallmén (flickr) has also written a nice comparison of nine mostly affordable lenses on the dpreview forums. His images are highly impressive, and he included some shots of the setup as well:
https://www.dpreview.com/forums/thread/2734284
Step 18: Image Stacking and Camera Control

Camera Control Software: What is it?
Camera Control or Tethering Software as it's usually called is software which lets you remotely control at least parts of your camera up to giving you full remote control of your camera. This might either be by a USB or other wired connection between your camera and the device running your camera control software, or be wireless.
Camera Control Software: Which ones exist?
In the last few years, tethering software has been cropping up left and right, both freeware and paid, and has been progressing steadily to ever-better and feature-rich software which is really helpful to the imaging workflow. I will give you a rundown of a select few tethering software options that I know of, or have used personally. This is by no means a complete overview, but should give you an idea of the possibilities.
- Adobe Lightroom
- Ever since Lightroom version 3, a camera tethering option has been added to the software. As many photographers already have this excellent piece of software for developing their RAW images, this is a welcome addition. Available for Windows, Mac and I think even tablets ever since the CC version came around.
HOWEVER:
Lightroom offers a very limited control over the camera and its options and does not offer any live view capabilities. I mention Lightroom because many photographers have it, but highly recommend getting a dedicated camera control software. There's enough freeware and affordable software around, after all.
- Ever since Lightroom version 3, a camera tethering option has been added to the software. As many photographers already have this excellent piece of software for developing their RAW images, this is a welcome addition. Available for Windows, Mac and I think even tablets ever since the CC version came around.
- ControlMyNikon / ControlMyCanon
- The first tethering software I have bought, some years ago when there weren't that many alternatives. This by no means indicates the software is bad, in fact I'd say this is a fantastic piece of tethering software. Lots of features, easy-to-use, reasonable prices, nice upgrading options and support for automated stacking using supported rail systems such as the StackShot. Available for Windows.
- dslrdashboard / qdslardashboard
- After I got myself a USB-OTG-capable tablet I figured it'd be nice to have a tethering software which works on Android, too, which is what qdslrdashboard is. While a bit wonky and not that easy to use, it is surprisingly powerful and a real weight-saver as it allows me to use a tablet instead of lugging my laptop around. I think there is a free trial and you should definitely play around with it and the available alternatives before buying it. That being said, prices are quite reasonable. Available for Windows, Mac, Linux, Raspberry Pi, iOS and Android.
- Freewares
- While I have not tried them mostly because I am happy with what I have going on, there are freewares available for camera tethering. For instance the Canon EOS utility, digiCamControl, Entangle (Linux, for now) and so on. Just google "Nikon free tethering software" or something like that, of course replacing "Nikon" with whatever brand of camera you are using. Try out the software and see what works for you. Many have instructions or maybe even how-to videos on their homepage or youtube.

Pictured above is a screenshot of ControlMyNikon, a very extensive, flexible and reliable (but paid) camera control software. As an example I have used the live view funtionality to focus on the upper letters of this coin.
Stacking Software: What is it?
In previous steps you've often heard me talk about stacks, and slices, and so on. Well, slices are single pictures with a DoF not covering enough of the area or subject that we want. We thus take multiple images which are sharp at different regions, and call all that a stack. Deep stacks are stacks with lots of pictures and small steps, shallow stacks take few images with potentially bigger DoF.
Now why could we not just, say, read in all those images as layers and just manually mask the areas out of focus, putting the time requirement aside?
The problem comes in the form of distortions. Focus stacks are generated either by moving the camera, and thus moving the focus plane, or by adjusting the focus to a different distance from the camera. Unfortunately, both forms introduce distortions. The former method is similar to zooming in, as you are getting closer to your subject in ever so tiny steps. The latter has an effect called 'focus breathing', where the field of view of your lens changes slightly depending on where you put your focus. The former is somewhat easier to correct for as it is more predictable and consistent. As such it is recommended by experienced high magnification photographers to move the camera rather than adjusting the focus for better results. Plus with the rght equipment you get much more control and can take deeper stacks than possible by focus adjustments.
Additionally you can get vertical and horizontal movement of the camera or subject, a changing distance, rotation or all sort of other effects which ruin this approach.
This is where stacking software comes in. A stacking software is a software which takes your stack of images and, hopefully, gives you one perfectly sharp image in the end. The first step is usually aligning, resizing, and rotating the images, and after that the sharp areas of each image are detemined and the new image generated from the sharpest possible parts of the available images.
Stacking Software: Which ones exist?
As with many software types, there's more than I can cover here. I will, however, give you a small selection, along with my personal opinion after having used them for a while:
- CombineZ (and affiliates)
- Freeware
- Several stacking methods, generally works well enough
- Unfortunately, no updates since 2010 or 2012. The homepage was down and the dates are floating around the web.
- Still worth to keep around as it's free
- Picolay
- Freeware
- May adjust a few settings to influence the results
- Works ok-ish for me
- Worth to keep around as it's free
- Adobe Photoshop
- Professional, paid image editing software which includes a stacking module
- Next to no settings to adjust, mostly automated processes. However, very powerful possibilities for manual touch-ups.
- Works ok-ish for me. Sometimes CombineZ or Picolay are better, sometimes Photoshop is.
- If you're doing editing you likely have it anyways. I definitely wouldn't buy it solely for the stacking capabilities.
- Helicon Focus
- Professional, paid software. There is a Pro version which is a bit better, or so I've read.
- Actually meant for focus stacking
- I have not yet used it, but heard that it works pretty darn good
- Zerene Stacker
- Paid, professional software.
- Actually developed for focus stacking, by one or more of the people behind the amazing forum photomacrography.net (as far as I know at least)
- Tried the trial version which does not have all features of the full pro version. Dang, it's fast and the results are amazing.
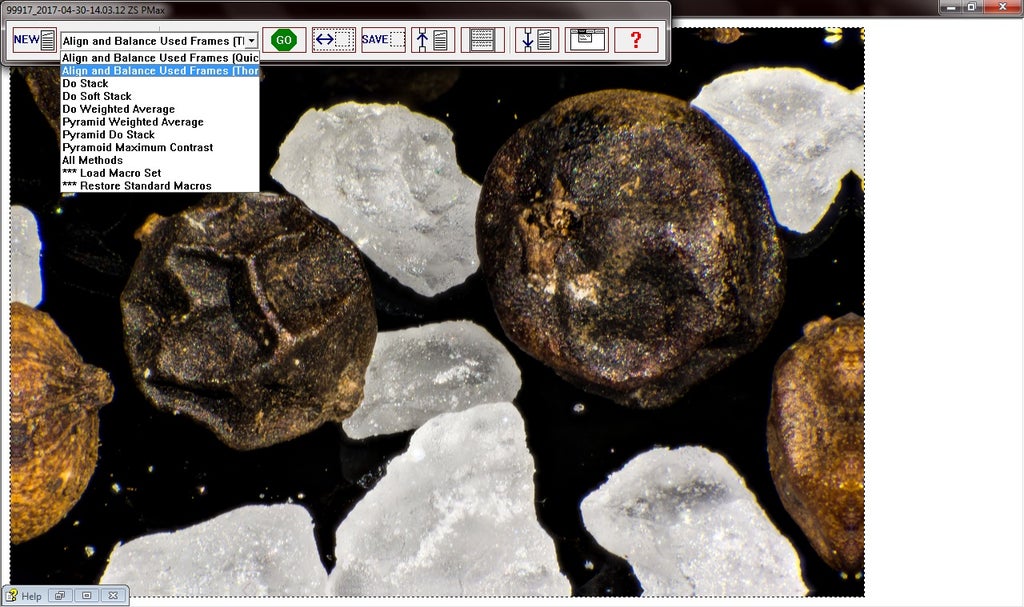
Pictured above is a screenshot of the freeware stacking software CombineZ, which sadly has become abandonware. You can still download and use it with fairly good results. After loading all the images I tend to go for a thorough align and balance, then go for all methods for the stacking.

Pictured above is a screenshot of the excellent albeit pricy stacking software Zerene Stacker. After loading all the images to be stacked I tend to go for both stacking methods to have some choice with the final result. Compared to all other softwares I have tested, Zerene is a bit more reliable and quite a bit faster.
Stacking Software: Side By Side Image Comparison
You have seen the stacks and images presented here in previous steps, so I'm not going into detail about how they were taken and such. This is about the tools used to stack the pictures. Note that different tools align images differently, so I needed to crop them in slightly different ways.
CombineZ Results:


Pretty darn easy to use, quite a few different algorithms and gets decent results most of the time. At least one of the six stacking algorithms does. Typically one or two of the bunch are good, the rest not so much. Not the fastest software, fails every now and then, but hey, it's free.
Picolay Results:


I have a hate-love relationship with this software. It has quite a few settings, does some things fairly smartly, and the results can be pretty neat as evidently shown here, but it has the annoying property of popping up all the time when aligning and stacking. If you have two screens this won't be a problem, nor if you minimize it or just let it work and do something else without your computer. One more thing, it took me like 10 tries to get the horsefly right, for whatever reason. Maybe it didn't like the file sizes I threw in, in the end it was happy with a 2048px wide image. Don't ask me why. Still, worth having as it's free, small and doesn't need installation.
Photoshop Results:


Photoshop is a bit cumbersome for stacking as it has no direct routine, at least none that I am aware of. You have to take a couple steps to end up with a stack. Additionally, there's not all that many settings to choose from. I mean, yeah, you can click quite a few checkboxes, especially for the aligning, but there's no thresholds to set or anything. From what I have seen, if it works it works slightly better than the freewares, but it may fail as well, like it did with the horsefly. I could probably fix it by manually going through all the layers and fixing it all up, but spending hours on that isn't worth it if another program can do it better in 5 minutes. That being said, it also has the most powerful tools to manually fix it if something went wrong.
Zerene Stacker Results:


I find no fault with the stacked images and certainly none with the software. It is crazy fast compared to the others, taking less than a minute for each of these stacks (note: images for all softwares were resized to 2048px width for stacking purposes) where all others took several minutes for all the aligning and stacking. And the results are at least as good if not better I'd say. I for one thing know what Santa will bring me this year ...
Overall:
Let me be perfectly clear here:
Any and all of those softwares may work for you. This ist not about saying which one of these actually is better, or more versatile, or gives the best results. What I am doing here is presenting three stacks and the best results I have gotten out from the given software. If the results don't look too good, maybe it was my fault. Maybe the stack sucked. Also, anything I wrote at the listing of the different softwares was, is, and will be, my personal opinion.
Small tip for you:
If the stacked image doesn't look right, try resizing your pictures, making them smaller and then repeating the stacking process. Sometimes, for some reason, it works better. Same goes for leaving some images out of the stacking.
Step 19: Gear and General Tips on Shooting

Many of the tips and equipment that I will present here have been mentioned over the course of this instructable, but it does not hurt to repeat them to drive the point home.
Tips:
- General:
- If at all possible, shoot RAW instead of JPEG. RAW format allows you to losslessly set the white balance of the picture after you have taken it, and holds much more information so you can pull out more out of the same image.
- If you have the chance to do so, go for macro photography of inanimate objects in the studio / at home. It is much, much easier to shoot non-moving subjects and indoors you have vastly more control over the lighting and other factors such as wind compared to shooting outside. Plus, taking deep stacks of subjects outside is challenging at best and next to impossible on average.
- Use a stabilizer, prefereably a sturdy tripod. Beanbags work, too, or you can brace your camera against the ground, rocks, wood or whatever is available to stabilize it. Tripods which can reverse their central pillar where the camera is mounted so that it points downwards or flip around their legs 180 degrees to get the same effect are very useful to get your camera closer to the ground. To a lesser extent, Gorillapods or similar constructs work well for this purpose, too, albeit the overall stability of the system may suffer a bit. For studio situations enlarger or repro stands are a good choice as they are usually fairly heavy and stable to begin with. Or you build your own setup.
- Remote control. Especially useful for high-magnifiacation macro work, use a cable or wireless remote, tethering software or the like whenever feasible.
- To further decrease vibrations, use mirror-up mode and a delay of at least 3 seconds before taking a picture. If you can, go for EFCS (electronic front curtain shutter) or maybe even go with a mirrorless camera system.
- Lighting is going to be critical if you're going for higher magnifications. Small battery-operated LED lamps / panels, high-powered LED torches or flash systems (including ring flashes) may prove to be absolutely essential to taking good pictures.
- To avoid harsh light, carry diffusers with you. This can be anything from a piece of milky plastic, thin white fabric, tracing film or even paper kitchen towels in a pinch. Use these offset from your light source to get more even, softer lighting.
If you are photographing in bright daylight, a white umbrella (such as shoot-through umbrellas) are great to position over your subject to get nicer lighting. - Another good thing to have would be reflectors to bounce back some additional light to the subjects. This is especially useful if you only use daylight or a single light source.
Reflectors may be simple pieces of plastic, paper, cardboard, foamcore board, aluminum foil or such. A4 / letter size is usually sufficient for macro photography applications. - Take a couple of colored pieces of cardboard with you as well. These can be used as background in your shots, or also as reflectors which will bounce a bit of color into your images.
If you don't have these at hand you can use leaves, the sky, or bodies of water as a backdrop which contrasts from the subject you're photographing. - Be careful when using different light sources at the same time. Their color temperatures (essentially the color of their light) might differ and give your images a color tint. Mixed lighting is quite annoying to fix in photo development, too.
- While flash is very nice to freeze action of even flying animals, many macro methods suffer from little light available for focusing. The viewfinder may actually be so dark you can't see anything. In these cases you should either use constant light sources such as LED panels or torches (at least for focusing) or maybe use the Live View functionality of your camera as the digital images projected on the screen are often adjusted for brightness.
- To avoid harsh light, carry diffusers with you. This can be anything from a piece of milky plastic, thin white fabric, tracing film or even paper kitchen towels in a pinch. Use these offset from your light source to get more even, softer lighting.
- Inside:
- The higher the intended magnification, the heavier and vibration-resistant your setup should be. Concrete floors for less vibrations from you walking, heavy mounting surfaces with the camera attached securely to those, Sorbothane for additional vibration reduction, you get the idea.
- Mount your subject in a flexible manner. Third hands are freely available and affordable, lab jacks help with height adjustments. There are dedicated specimen holders such as the Dino-Lite MS16C, but they can be a bit expensive.
- Outside:
- If you're keen on shooting outside, you may want to start with plants, rocks or the like first, just to get some experience under your belt. Moss, mushrooms, flowers and the like are typically very thankful subjects and much more interesting close up than they appear to be. In Summer / Fall you may try to find leaves which were eaten by caterpillars - they often only leave a skeleton of the leaf, which looks amazing against the sky as a background.
- Shooting outside, potentially living subjects, the following advice may be helpful to you. Note that the advice becomes more and more important as your magnification increases. You may get away with hand-holding at half-life-size or life-size, but try to handhold at 5x and get a sharp picture. You'll see just how difficult that is.
- Live Animals:
- When shooting live animals, take care of your shadow. Many animals flee when a shadow suddenly falls over them as it might belong to a predator. Therefore if you can manage it, approach the subject with the sun coming either from the side or from the front.
- This is kind of obvious, but mover slowly and make yourself small, staying close to the ground - the less of a threat you appear to be, the more likely your subjects will stay still. This is how I managed to approach perched dragonflys and get as close as 20 or 30cm to them with fairly good success rates.
- Mind your feet and breath. Aside from the possibility of stepping on an ant trail or something (depending on the species this might be rather painful for you!) you want to avoid the vegetation close to your subject from moving too much as that too might scare them away. Slow, steady and careful wins the race here. Breathing too hard may also move the grasses a dragonfly is perched on, so try to avoid that as well.
- If you do scare off a flying insect such as bees, dragonflys or the like, don't move, keep focused on the perch they were on previously and observe them. Quite often after a few seconds they'll land closeby or on the same perch and you'll have another chance.
- Be patient. Take one or two like-minded friends with you and have a whole macro field day. Don't rush it, you'll get some amazing pictures sooner or later.
- Start early. Insects are much less active in the morning when it's colder and possibly damp due to morning dew. You can get away with much more and take deeper stacks of live subjects at mornings.
Gear:
I mentioned it in the tips and previous pages already, but again here is a bullet-point rundown of what might be useful to you for macro photography. Camera, lenses and the direct ways of achieving macro photography (such as reversing rings, extension tubes, etc.) as well as adapters will not be mentioned again.
- Sturdy tripod
- Preferably with a center column which can point downwards
- Good, easily adjustable tripod head
- I prefer three-way panheads over ballheads for macro work, but admiteddly I do not own a high-quality one of the latter, so those might be awesome, too. Geared tripod heads are well-suited for macro work as well
- Decent macro focusing rail or linear stage
- You can buy the cheap 10-20$ ones, but you will need to disassemble them by removing the tiny allen screws on the side, clean everything up, add some high-quality lubricant and finally assemble everything making sure the allen adjustment screws are tightened such that the rail does not rattle but still moves smoothly.
Alternatively you can go for more expensive ones, such as the Manfrotto 454 or the macro focusing rail made by really right stuff. - Once you exceed maybe 4-5x magnification you'll really want a good linear stage with 10 micrometer accuracy or better. There are motorized systems which in combination with some tethering software may work automatically, but they are expensive. An example for such a system would be the Cognisys StackShot.
- You can buy the cheap 10-20$ ones, but you will need to disassemble them by removing the tiny allen screws on the side, clean everything up, add some high-quality lubricant and finally assemble everything making sure the allen adjustment screws are tightened such that the rail does not rattle but still moves smoothly.
- Lights
- You can start off with regular LED torches for studio work. 300lm or more work pretty darn well, and these lights cost maybe 5 bucks.
- The next upgrade would be a flexible LED light, such as IKEA Jansjö lamps. Not that bright, but good enough for many applications
- LED panels / light will give you plenty of light which you can modify in a number of ways
- Flash units are great for freezing the action and getting lots and lots of light, usually so fast that most animals don't mind it all too much. The lack of constant light may make focusing harder.
- Strobes are dedicated studio flashes, big and powerful. They might be overkill, but if you have them there's no real reason against using them.
- Diffusors / Light Modifiers
- You'll need to be able to diffuse and / or focus the light where you'll want to have it. Focusing the light can be done with a so-called snoot. There are foldable snoots around, they work fairly well. In a pinch a rolled piece of paper or aluminum foil, or pringels cans do pretty well.
- For diffusion you can get dedicated diffusion foil, tracing paper, paper towels, thin white fabric or the like.
- Color gels (basically colored, translucent pieces of foil) can be used to add color to your light and get amazing effects going. Especially useful for illuminating a white or gray background to be a different color.
- Reflectors
- In order to bounce a bit of light back onto subjects reflectors are invaluable. They can also be used for indirect lighting with flashes or strobes.
- Pieces of paper, cardboard, foamcore, aluminum foil or such are well-suited. For most macro applications, A4 / letter size is already llarge enough
- Backgrounds
- A couple of differently-colored pieces of cardboard or even printouts of pictures serve well as backgrounds for macro shots. As the background is typically blurred beyond recognition anyway, colors and general shapes are more important than the details.
- Again, A4 / letter size is typically good enough
- All sorts of stands, clamps, and such to affix A to B or hold C in place over D.
- A combination of wire and stage tape (the easily removeable brother of duct tape which leaves no residue) can get you through a lot of tough spots.
Step 20: Getting Affordable Gear or How to Save Money Buying Gear

I could not pass by this opportunity to sneak in this quote. Of course I mean buying second-hand gear to save you big bucks and get more and / or better gear on a budget.
My own gear and general experience:
In this instructable you have seen a lot of different photographic gear that can be prohibitively expensive which, unfortunately, is outside of the possibilities (and wallets) of most people. Funnily enough, that includes your hopefully beloved author of this very instructable - I could not and still can not afford to buy all the gear you see me show off and talk about. So how did I do it? Rent or borrow it? That's one way to do it, but I went with a lightly different route - Buying a bunch of it used.
Something between 25 and 50% of my photographic gear was bought used, including but not limited to my Tokina 100mm f/2.8 Macro lens, all of my Nikkor EL and microscope lenses, the Close-Up lenses/filters, various stands and fixtures, the linear stage and much more. And I rarely paid more than half of the original price, even though the gear I bought was as good as new. Heck, I got some stuff so cheap I felt bad about it, like an 800€ goniometer stage I won at an auction for 30 bucks, good as new. Yeah, let that one sink in. This is pretty much the only reason I can have so much gear in the first place.
So where can you find used gear?
Sources for used gear:
- eBay
- Got anything from linear stages to microscope lenses here for very affordable prices
- Classifieds
- Craigslist, eBay Classifieds, ...
- Most of what I got used, I got from classifieds
- Flea markets
- Takes a bit of browsing, but may find incredible stuff here at good prices
- Sometimes people sell their own stuff, or stuff from relatives, or stuff they got from somewhere without knowing what it actually is and how much it's really worth.
- Garage sales
- Basically smaller flea markets
- People in these often just want to get rid of stuff and throw it out at good prices
- Used gear stores
- Some specialize in photographic gear, some are general-purpose. Like a flea market, this might take some digging and a good portion of luck but you might find something amazing here.
General tips for buying used gear:
For starters, you want to be patient. It took me over five years to accumulate all the things you have seen in this instructable. If you see something interesting pop up, but it's above your budget, just pass and wait. It'll pop up again at a better price some time. That being said, you should have a realistic idea about the prices of stuff. For instance, if it's lenses expect to pay 50-75% of the new price for one in good condition. Tripods, fixtures and such might go for 50% or less in at least useable condition. Just look around and get a feel for the general price level of the thing you're looking for and you'll be able to recognize a good deal in time. Mind scammers though - if a deal seems too good to be true, it might very well be. For instance, I saw a deal for a high-end Nikon DSLR including a couple of high-end, professional lenses, all in mint condition, for somwhere around 10-20% of the new price. It only took one mail to be certain that this was a scam. Shame, really.
Next, if you can, check out the goods thoroughly in person before actually buying them and if you can not, go for legitimate sellers only. If it's mechanical, check if it operates smoothly, check for rust or any other defects. Check the basic functionality as well as you can.
For lenses, there are some specific things you should be looking out for which are too many to really rund down here, so I'll give you links to a couple of videos I found very helpful and which I use as a reference when buying used lenses:
- Matt Granger's "Used lens buying advice" video. He goes through 6 steps to choose a second-hand lens, pointing out exactly what to look out for.
- Theoria Apophasis' "The Angry Photographer: How to check used lenses before buying". This guy is legit and knows his stuff very, VERY well. Excellent advice, excellent channel overall, especially if you're a Nikon shooter. Do mind that he is quite...direct with his language. PG13 or so, maybe higher up.
- "Buying second hand lenses with Karl Taylor", by Karl Taylor. Professional photographer giving you a good rundown of all the things you'd need to know about buying used lenses.
Overall, use some good old common sense.
Gear review sites:
Now then, you know what to look out for when buying used stuff, but how do you know if the thing you're buying is good and/or useful in the first place? What you're going to need are decent gear review sites where you can get an idea if the item offered is worth getting in the first place. As I do not know what exactly it is you are after, I'm just going to drop a couple of links in general which I might hit up when I stumble over something.
- Amazon. If it's something recent, and it's on Amazon, the ratings might give you an idea if the item's any good.
- DxO Mark. Huge site which tests both cameras and lenses thoroughly.
- Ken Rockwell. Mostly about Nikon lenses, and some think he's a bit phony. I think his reviews are worth a read and should give at least an idea on if the item's bad, good or mediocre.
- Photomacrography Forums. If it's about macro gear, you'll probably find someone on here owning and maybe even reviewing it. Chock-full of absolute professionals.
- Enrico Savazzi's Website. Macro specialist, has a bunch of reviews on very specific gear.
- Coin Imaging. Has a bunch of tests on some rather rare pieces of kit for macro photography.
In general you might also wnat to google the specific thing that is offered in a deal, and then add "review", "forum" or something like that to the query to get a better idea.
Step 21: Dead or Alive

If you are photographing inanimate objects, this will be of no concern to you. If, however, your subjects happen to be alive, maybe you should give this part here a read.
My main focus will be on insects, arachnids and the like, as these are common subjects for high magnification photography.
As you might or might not know, there are big, long, ongoing and recurrent debates about the moral implications of killing your subjects to take pictures more easily. Some argue that this is nothing other than trophy hunting on a smaller scale - killing just to get a picture or two.
I will not go into any details of such debates here. I won't judge if you're going that route. Do read up on recommended ways for insect euthanasia (wikipedia) though. Hint: Swatting or frying are not recommended.
Still, I want to present a few pros and cons and finally move on to methods which allow you to take deep stacks with living subjects (mostly aimed at insects). The morality of some of these methods may be questionable too, but it sure beats termination.
As a side note, I do admit to killing insects, though very, very rarely for the sole purpose of taking pictures. Mostly this was because they were in my house and I thought they were annoying, and after kiling them I thought that if they're dead already, I might as well take a couple of pictures. In my defense, I do tend to catch intruding bees, spiders and even wasps alive and release them outside as the former is critical for pollination and the latter are efficient pest control and I'd like them to continue doing their job.
In any case I'm not riding on a moral high horse here, I'm just as guilty as the rest of you.
Pros (termination):
- Hours, days, weeks, months and up to years of time to take pictures of the subject
- If speciments are properly preserved, possibility to revisit the subjects at any time
- (Almost) complete control over the position of the subject. Usually you can't really move the body or limbs, but you can move the specimen themselves.
- (Almost) complete control over motion / vibration
- Complete control over lighting situation
- Complete control over composition
- Complete control over background
- Complete control over depth of stack
- So much easier and more convenient
Cons (termination):
- You've killed a living being
- Subjects look less vital in the picture
- Colors may have faded (especially the eyes)
- Subjects might be dried out and deformed (cracks in exoskeleton, limbs folding inwards)
- Termination may have led to external damages which make the pictures less impressive
- Due to lacking knowledge, the given species might have been under protectionand you might have committed a crime by killing it
- If particularily unlucky, you just killed a member of an as-of-yet unknown species (not as rare of a chance as you might think, and chances go up with decreasing subject size)
- Probably a bunch of other reasons that you can read up on if you feel like it
So now we got the touchy-feely part out of the way, what can you do to keep your subject alive but still get awesome pictures? Here's a rundown of a couple of methods and snippets of advice:
- Patience
As lame as it sounds, some pro photographers such as ThomasShahan (two seperate links) state that sometimes it takes them weeks of going outside and taking pictures every day until they get one single good one.
Let the road be your goal. Enjoy nature. You'll get better and get some amazing shots sooner or later. - Knowledge and Experience
Learn the habits of your subjects.
Some spiders stand perfectly still in their nets for hours on end.
Other spiders can be positioned in a way you like by having them chase something (e.g. a cotton stick).
Sometimes you can catch insects protecting their eggs, sleeping or resting, so they will be perfectly still.
Look around and find them preoccupied with other things - eating, sleeping, mating, whatever - they will usually ignore you if you are not percieved as an immediate threat.
Avoid casting shadows over many insects, as they tend to think a threat is approaching and will flee.
Move slowly. If you are percieved as part of the environment, many insects will ignore you.
Find the preferred perches of flies, dragonflys and such. Oftentimes when they flee they'll fly around a for a bit only to sit down on the very same or rather closeby perch. - Bribery
Lots of insects love sugar water, honey and the like. If you have a small container of sugar water and a pipette with you, you can position a drop of it in front of them, and maybe bribe them into staying still for a couple of seconds or even minutes while they are eating. The bonus of sugar water is that it looks just like a water droplet! It will not interfere much with your pictures. This is one of the preferred methods of the awesome photographer Nadav Bagim (HIGHLY recommended video on B and H's youtube channel - they have more such videos / talks / presentations, so be sure to check out the channel).
This also works on other animals - find what they like to eat, and give them the opportunity to feed. You might get some really awesome shots out of this. - Temperature
Many insects are endothermic, which means their body temperature is primarily dependent on the ambient temperature. They get very lethargic and up to immobile when temperatures fall. This means that your chances of getting a rather immobile insect are much better on colder days, mornings, and evenings.- Active Cooling
If you have to you can catch your subject, put the box into the fridge for a while (NOT the freezer), take a couple of pictures and finally release the insect, ideally close to the location where it was caught. Be careful though, some insects can't deal with too low temperatures even if above the freezing point. Look up some good temperatures if you want to try it. - Cooling / Freezing Spray
There are cooling or freezing sprays on the market, but I'd argue against their use. Many of them contain harmful substances and could end up killing your subject and/or harming the environment. Additionally, flash freezing will probably result in killing your subject, too. - Ethical Concerns
As a note, cooling / freezing generally seems to be considered unethical as well (Wikipedia On Insect Farming, Wikipedia on Insect Euthanasia). But as anywhere opinions differ, so read up on it to get your own well-funded opinion. Please do read up on it before practicing these techniques.
- Active Cooling
- Water spray
Sometimes a little bit of water from a spray bottle can be used to slow down an insect a bit. Some find these water-droplet-covered insects a bit tacky and overdone, but they can be pretty captivating nonetheless. - Anesthetizing
Again, this a a bit tricky moral-wise. Read up on it, be well-informed (Paper: "Anesthesia, Analgesia, and Euthanasia of Invertebrates", John E. Cooper, ILAR Journal Colume 52, Issue 2). There are guidelides around for ethical anesthetizing.
That being said, from what I have read (Paper: "Drosophila Fly Anesthetic: A New Technique", Benjamin W. Bahney, The American Biology Teacher, Vol. 58 No. 4) there are three main methods of anethesizing Drosophila (fruit fly), which should work more or less well on other insects, too. First one is properly applied Ether (flammable, toxic), second one is CO2 (usually hard to apply, effectiveness is discussed) and third is specilized anesthetics such as FlyNap (Wikipedia).
CO2 application in gas form has been mentioned to be a bit tricky, so workarounds using devices such as CO2 dusters (Photomacrography Forum) and dry ice (solid form of CO2, see the drosophila paper by Benjamin W. Bahney mentioned above) have been used successfully.
Do note that anesthetics can have long-term effects (bunch of Drosophila studies on NCBI) on any subject and if improperly applied may lead to the death of the subject as well.
I recommend talking to professionals before thinking of using such means for immobilization.
There's probably more methods, but I am fresh out of what I know of.
If you know some more advice, plese do share so I can add it here.
Step 22: Acknowledgements & Resources

This is a list of places and users that have helped me in understanding more of macro photography and have enabled me to write this instructable. Many thanks to all those involved!
Websites:
- The photomacrography.net forum
- Quite likely THE resource for aspiring high-magnification macro photographers, just as therpf is the place to be for replica builders. The amount of knowledge, skill and help accumulated and present in this forum is staggering. I have read somewhere that each year a significant number of the Top 20 of the annual Nikon Small Worlds contest / awards are regular users of this forum. One of the administrators is the founder of the company making the superb stacking software Zerene Stacker. If you need any help on high-magnification macro photography, ask here.
- Akiyama Michio's website Red Book
- Mr. Akiyama is a huuuge Nikon fan and has collected a lot of information on rare and typically unknown Nikon lenses, including industrial ones. This website is the version he translated to English from the original Japanese webpage, so there is likely a less information on it and it might not be written as precisely, but for finding some imformation about really rare and amazing Nikon lenses this is the place to look.
- Enrico Savazzi's Homepage
- The well-known and highly skilled macro photographer and author on the subject has accumulated a wealth of information about macro photography, including information about setups, lenses, backgrounds, techniques and more on this website. I especially recomment his "Theory and Concepts" series of posts and his "Lens tests and comparisons". He really, really knows his stuff.
- Mark Goodman's CoinImaging website
- Quite similar to Mr. Savazzi's page, Mark Goodman offers quite a bit of information on macro photography, including technical backgrounds and very detailed lens tests. His articles are worth a read as well.
- Johan J Ingles-Le Nobel's Extreme Macro Photography Homepage
- Again, just a wealth of articles on the subject, including but not limited to techniques, lenses, lighting, equipment and more. Read your way through it.
- Nikon's MicroscopyU Homepage
- Virtually everything you need to know about microscopes and microscope lenses. This information is very helpful for using a microscope lenses for high-magnification macro photography.
Videos:
- Thomas Shahan's "An Introduction to High-Magnification Macro Photography"
- I have to begin with this video as this is probably the video which infected me with the macro fever. Just watch it, you will not regret it.
- Thomas Shahan's "Methods in Macro Photography with Thomas Shahan"
- Somewhat a follow-up to the previous video, this one goes a bit more into the gear as well.
- B and H's "An Introduction to Macro Photography" by Tim Cooper
- This is an almost 2 hour long video which will run you through a lot I have mentioned and touched in this instructable as well, along with a lot of techniques, example images, anecdotes, and more. The important difference is, this is done by a professional photographer.
- B and H's "Wonderland: A Small New World" by Nadav Bagim
- Unlike the more technical video of Tim Cooper in this almost hour-long video the professional photographer Nadav Bagim puts a lot of focus of what is going on behind the photo and how to work with live subjects. His photos, tipps, tricks and experiences are simply amazing and were an inspiration for the sample images and "behind-the-shot" style writing I have added to this instructable. This video is truly a treat and I highly recommend watching it.
- Levon Biss' "Microsculpture by Levon Biss"
- This is bleeding-edge macro photography right here. In this project, Levon Biss took literally thusands of pictures of a single insect, stitched and stacked them to get insanely high-quality, high-resolution images which he printed in huge formats and exhibited them at Oxford University Museum of Natural History. I also recommend the PetaPixel article about this project, the Microsculpture Project Homepage, and finally Levon Biss' very own homepage. The last one might not be PG at some places.
- Mike Howard's jpeg2RAW Photo Podcast #86, featuring Don Komarechka
- It's a long Podcast where Don Komarechka is talking a bit about his gear, his setups, and most importantly a lot of his amazing, truly stunning pictures, how he took them, and what was happening behind the scenes. Check out his homepage as well, especially his snowflake, water drop and insect pictures.
Instructables Users:
SelkeyMoonbeam and his Instructable "How to Embed Photos in an Instructable". This allowed me to place pictures where I wanted them to be able to tell more about how they were taken, and what happened behind the scenes. Works with gifs, too! At least provided you uploaded them to an external provider.
- Related to this, bwrussell for pointing out that a pro account is needed for this feature to work correctly. He pointed it out in the instructables answers question "How can I embed images in an instructable?", asked by IverB.
- Tylercard's Instructable "Macro Photography and Photomicroscopy". It has some amazing pictures and gave me lots of ideas for mine.

First Prize in the
Photography Contest 2017

Participated in the
Untouchable Challenge


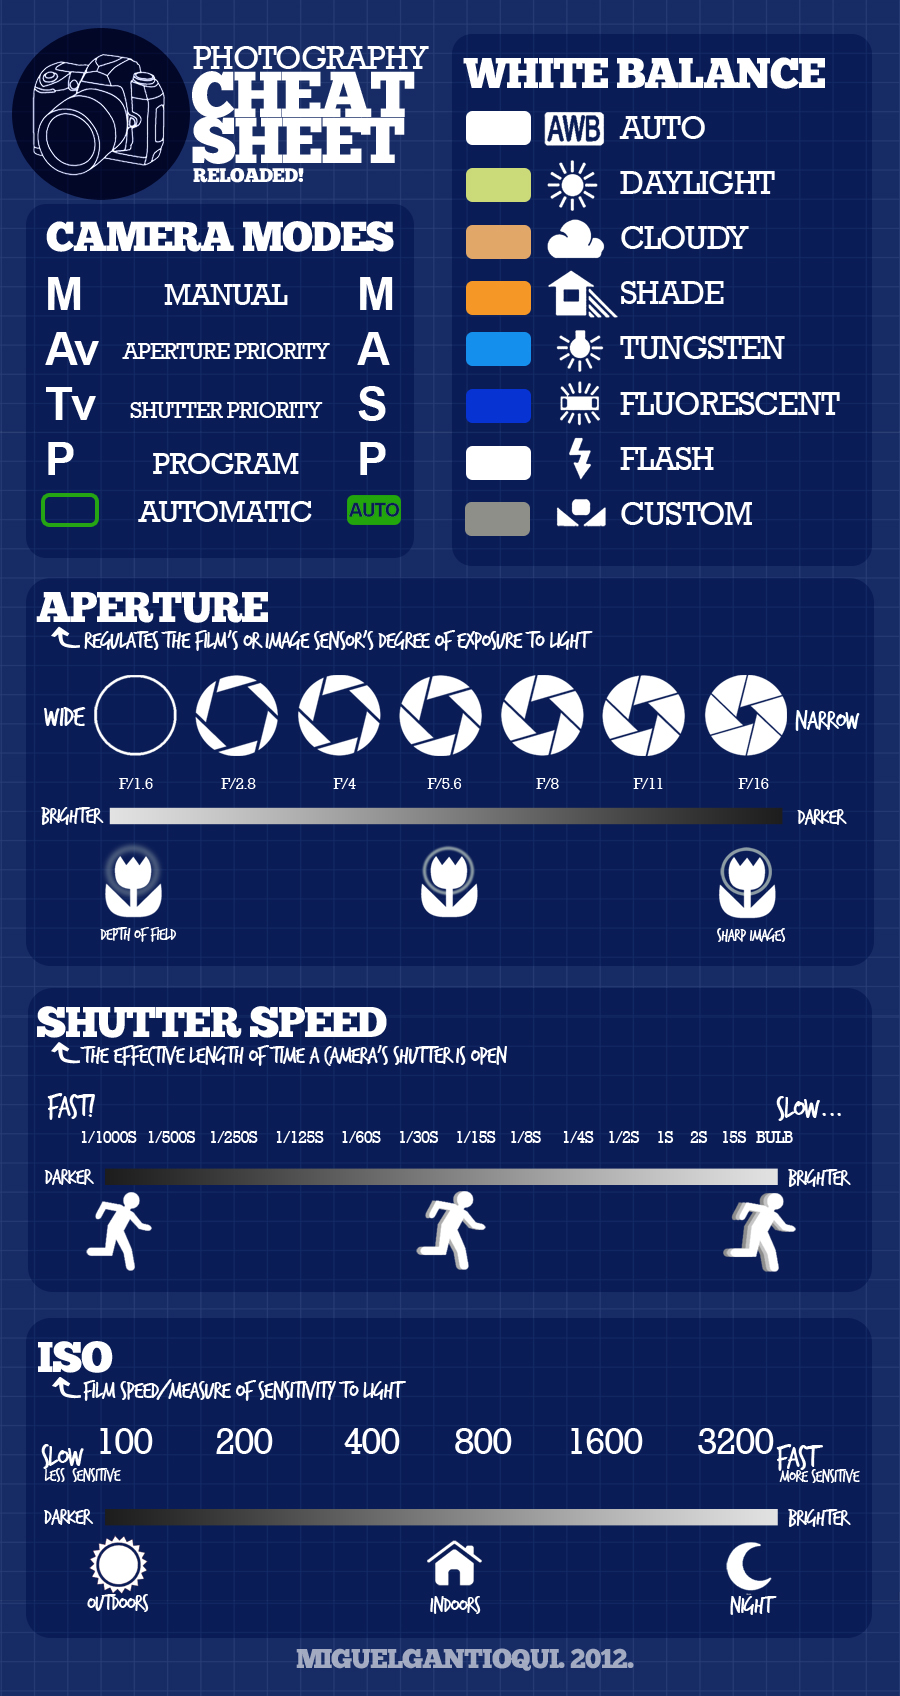