

Introduction: Spooky Sounds With 555 Timer


Happy Halloween Everyone!
I heart oscillators! This project is born of a workshop that I'm running in Brooklyn, NY at 3rd Ward. I'm teaching an ongoing series of basic electronics workshops called Electro Lab. Each time I do it, there is a theme. Last summer (2010) it was the Robotics Edition. This fall, it's Halloween Edition, and this circuit is the culmination of our work.
Note: This Instructable will be amended with video and more notes at the end of the workshop. For now, enjoy dorking out at the 3-D oscillator!
If you've ever done much work with a 555 timer, you know that you can make sounds (A-Stable), and also that you can turn things on (or off) for a given amount of time (Mono-Stable). Some of you may have even gone as far as creating a warbling siren. This Halloween, I wanted to make a spooky sound.... like the kind the ghost makes on Scooby Doo. It's a low tone, that raises and lowers pitch slowly, and has a kind of vibrato. "Perfect", I thought, "I'll use a 555!". Well, a pile of 555s more like.
I found a few examples of tone modulation online, and this one gave me the variation in tone that I was looking for to slowly raise and lower the pitch. The basic idea is to connect the first 555 Threshold/Trigger pins to the second one's Control V pin and send a low freqency wave that occurs as the capacitor charges and discharges. That works great, you get a nice US police siren warble.
Then, I needed to add that creepy vibrato, so I looked around and found a few other ways of adding oscillation to my oscillator. Here is an example of a type that takes the Output of one timer, and ties it to the Discharge pin of the second. That makes the tone change in pitch, like a Euro police siren (bee-boo-bee-boo). I played around with the wires and found that if I connect from the Threshold/Trigger pins, It worked to smoothly change the tone! Then I added the Monostable circuit to control the on duration of the audio.
I've got a picture of the circuit, and a schematic to follow along. It's all been double checked, I promise. More accessories, including an IR doorway switch to turn it on, coming soon!!
Joel
Step 1: Spooky Sound Machine Schematic
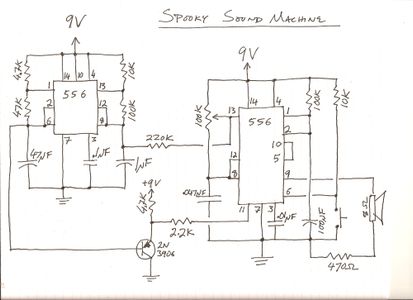
This is a working schematic for the Spooky Sound Machine. It has been triple checked for errors ;]
Click the [i] in the upper corner to see the image without the yellow rectangles.
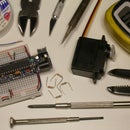
Step 2: Spooky Sound Machine Breadboarded
Here's a nice clear image for those who want help breadboarding or troubleshooting their work.
NOTE THE ORIENTATION OF MY CHIPS PLEASE!


