

Introduction: Stainless Steel Coloring Technique


Hi guys this is my first experimental Instructables and I am not often doing this kind of stuff. The thing I like about this is that it took the stainless-steel articles to a whole new level. Although it's not constrained to stainless steel, you can use this process on any type of steel and I found that hardened surface holds these colours much better. The principle is very basic, when you heat the steel at a certain temperature it changes colour and that colour comes due to the reaction of the top layer with oxygen. Now, these colours are definitely not that much robust like painted surface or like anodizing but if you used them onto the place where constant rubbing action didn't take place over that area it's completely ideal. I am using this technique nowadays on many stainless projects and this technique definitely took them to a whole new level. There are definitely a few things which you need to consider while doing this colouring technique which I am going to discuss in this instructable. Now if you take a look at the steel heating chart before it gets to red heat, it passes through many different colours stages. Some of them can be kept permanent while most of the higher degree heat remain temporarily and once the metal cools down it converts to black, which we don't want. Some of you might think that in stainless steel it deteriorates the top layer and stainless no longer remain protected but I didn't find any problems in that if the steel is 304 grade. During this Instructables 3 different techniques, I am going to share and all of them include heat but different material to change the colour. There are definitely many more chemical ways to do this colouring but they are a bit difficult to do. If you have any other method then definitely let me know.
Supplies
Tools and material used.
For this particular demonstration, I am using
1. stainless steel 304-grade finials
2. Used motor oil ( burnt engine oil)
3. Brass wire brush ( it needs to be pure)
4. Acetone or mineral spirit ( for cleaning purpose)
5. Fire brick
Tools used
1. Jewellers torch
2. Tongs for holding the hot metal
3. Locking plier
Step 1: Finished Metal Surface
The first thing to have is the metal which has an even surface finish. Now this finish could be brush or high gloss. Usually, the articles already have finished surface onto the top so that you dint have to do that work but if that's not the case then make sure to get an even surface finish because first of all it looks even and second is that with even finish the heat distribution is much better.
Step 2: Cleaning the Metal Surface.

The second important thing to do in this process is to clean the surface. Make sure no dirt remains on the surface and once the metal is completely clean make sure not to use your hands because there is always some oil on your hands so it's important to either use some tongs or gloves do the job. I highly recommend using your tong.
Step 3: Heating With the Torch
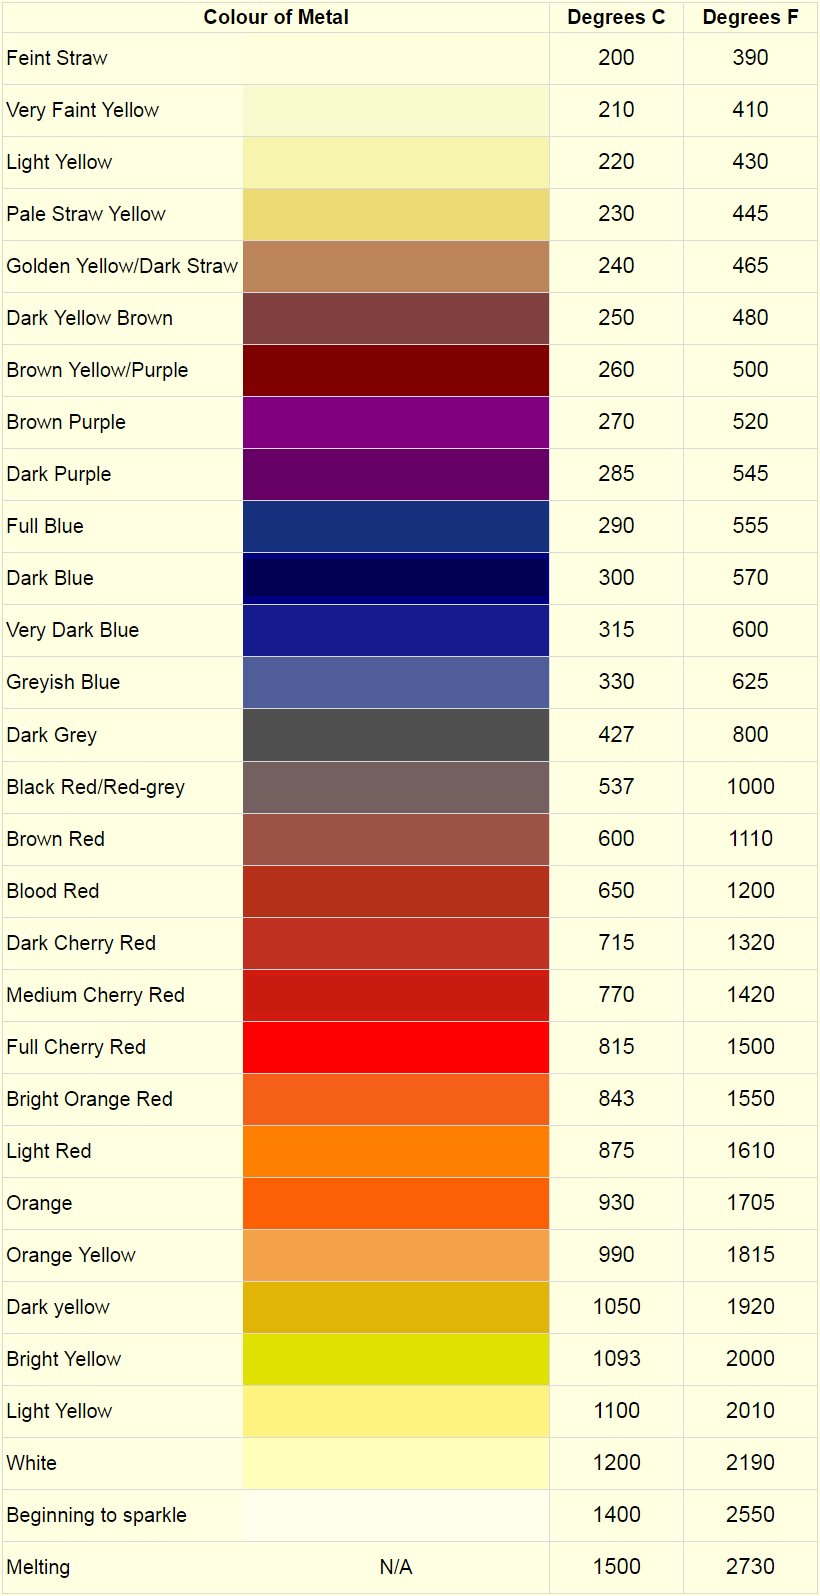


Once the cleaning is done I made the setup and start the heating process. Now if you take a look onto the heat chart then color up to 330° C is achievable and more than that starts to deteriorate the surface finish. Now in the spectrum, there are a bunch of different colors and if you start heating them and constantly heating the surface then it starts to show you all the colors are shown in that chart.
An important thing that needs to be considered here is the property of steel. Steel has a very low thermal conductivity which means that if you heat a particular area it will not able to distribute heat to the surface evenly through the metal, which leads to irregular color grade. Now point here to consider is that make sure to move the torch constantly through the process so that heat will not concentrate on a particular area. Also if you want a pale straw color then make sure that before getting that color pause the heat for few seconds and the reason for doing this is that heat took some time to spread evenly inside steel, so if you wait for a while then the heat spread evenly and you didn't even need to apply more heat to the metal. But on the other way if you kept on doing that then you will surely overshoot the temperature and gets a different shade.
In this particular video, I played with only two colors,s and the reason for choosing them is because they are quite easy to get, and judging those colors during the heat is also very easy. The key to success here is to go slow and steady and spread the heat evenly.
Step 4: Oil Dipping


The second colour technique is the oil dipping method. In this technique, you need burnt engine oil which turned completely black. The darker the oil is better the finish you are going to achieve. For this particular colour, you need to heat the steel up to blue colour or around 300° C and from thereafter immediately dip it into burnt oil. During this make sure until the material completely cools down do not wipe the oil from the surface. Once it's cooled down wipe the oil with acetone and the surface is ready to use.
Step 5: Brass Depositing


The third method in this list is brass deposition. Now for this method, you need a wire wheel which made out of pure brass, only those type of bristles can be used for colouring steel. One thing you need to keep in mind that if your finish is high gloss then it will turn into a matte finish. So the process is like you need to heat the metal and once it's reached to light pale color start rubbing the brass wheel onto the surface. I hold the brass wheel into a drill and start rubbing onto the final. During this process, I fix the torch and hold the piece into a locking plier so that it's able to bear the force. After a few rubbing, the workpiece is ready to use.
Step 6: Final Thoughts


I would say it's definitely a useful thing if you wanted to customize your articles but one thing is to remember is that area where constant rubbing is going to happen avoid those areas. But if you want it much more long Lasting then use few coats of clear varnish.

Runner Up in the
Explore Science Challenge


