

Introduction: Steampunk - Turbo Lighter (Howto)


In this howto.
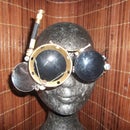
We build a Steampunk Turbo Lighter
the lighter with a flexible nozzle is in a leather case.
The flame can be adjusted with a gear.
Step 1: What You Need

You need:
a turbo lighter, with a flexible jet.
Brown leather.
Black leather.
Solid black sewing thread.
A thin needle.
A small gear (decoration).
Two large gears (one for decoration).
A brass rivets.
A ball chain (key chain) or a Keyring .
Craft glue and maybe Superglue .
Step 2: Disassemble the Lighter.
Step 3: Leather Cover


Let's start with the front side.
[Pic 1]
you need a big black leather strip.
[Pic 2]
Spread the lightercover with craft glue.
you must not use superglue in this substep.
because, so you can sew the leather later.
the ending for the caps should remain free of craft glue.
[Pic 3]
Let the glue dry a little.
firmly press the leather on the lightercover.
wait until the glue dried a bit.
[Pic 4]
cut the edge of the leather.
cut the switch hole free.
that works best with a nail scissor.
[Pic 5]
repeat the last step for covering the back.
of course without cutting a switch hole.
[Pic 6]
now you need a solid leather strip.
the size depends on the switch.
Next you need the brass rivets.
[Pic 7]
place the rivets on the front of the leather strip.
glue the leather strip with craftglue to the switch.
The rivets will now be at the pressure point .
[Pic 8 / Pic 9]
Cut the edge off the leather.
mount the lighter as a test.
if everything fits, it goes on.
[Pic 10]
sew along the leather rand.
do it as closely as possible.
that gives a nice edge.
[Pic 11]
Now stitch up the switch hole.
just like a button hole.
[Pic 12]
Mount the covers together.
test if the lighter works.
[all next Pics]
sew the leather covers on both sides.
Step 4: Back Cover


[Pic 1]
remove the back cap.
instead of the back cap we put on a brown leather strip.
fix the leather strip with craft glue.
[Pic 2]
cut the leather strip so that the nozzle is free.
[Pic 3]
sewing the ends of the strips of leather very tightly.
then sew the brown leather strip to the black leather.
[Pic 4]
cut a piece of soft black leather-like on the photo.
Watch the hole.
[Pic 5 / Pic 6]
put the gas nozzle into the hole of the leather strip.
sewing the round side of the leather to the bottom of the lighter.
[Pic 7]
if you like you can cut the other end of the leather strip a little bit thinner.
like me on the photo.
sew the rest fixed.
[Pic 8 / Deco]
now you can sew a small gear,yewelstone,button or what ever to the leather strip.
or
[Pic 9]
sew the other end of the leather strip, to the lighter.
Attach the ball chain.
[Pic 10 / Pic 11]
now we need a big gear to rotate around the gas nozzle.
so that it fits, you can enlarge the hole with an old pair of scissors.
turn the scissors in the hole of gear.
[Pic 12]
Mount the gear on the gas nozzle.
[Pic 13]
glue a gold ring to the lighter.
preferably from a ladies watch.
use superglue to do so.
Step 5: Front Cover


[Pic 1]
Glue with craft glue, a black leather strip to the front cap.
[Pic 2 / Pic 3]
cut off the edges.
sew the leather strip.
[Pic 4]
sew the new cap to the lighter.
[Pic 5]
sew a brown leather stripes to the cap.
[Pic 6]
cut corners out of the leather strip.
[Pic 7]
sewn together the leather strip.
[Pic 8]
stitch around the leather strip
[Pic 9 / Deco]
stick a big gear with superglue the lighter.
caution that no glue comes on the leather.

Participated in the
MakerBot Challenge


