

Introduction: UV-Fluorescence Steampunk Lamp


Hi everybody!
I can´t believe that my last Instructable-project started in June 2017.
Oh, some family affairs needed some more attention, so my workshop was closed for a long time. But now I can start again with the presentation of a small serial of new steampunk objects which I realized in between.
First I write about the UV-Fluorescence Steampunk Lamp:
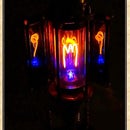
Two scientific High-Power UV-LED with different wavelengths enlighten some quinine lemonade filled in a round bottom flask. One light beam comes from the top, the other is shining through the bottom. The fluorescence effect gives an impressive blue light when you turn the switches on.
The following steps will show very detailed the construction of this steampunk-apparatus
I hope you will enjoy it.
Yours Aeon Junophor
Step 1: Some Theoretical Background Information


If you are interested in the explanation about fluorescence please read the article at wikipedia.
Important! Please note!
Instructables member gendragonfly asked me to give a special safety explanation about working with these UV lights! Well, I agree fully with his explanation and that´s why I copy his comment here.
gendragonfly writes:
"Just a safety tip for anyone who wants to build this project: UV wavelengths below 315 nm are harmful to the skin (not just the eyes) ! And the shorter they get the more damaging they are. If at all possible try using an LED for this build without the small peak at 245 nm, this is UV-C radiation and can be very harmful. Curing LED's (like the one used in this project seems to be) often have several peaks because its helpful in speeding up the curing process, it is however not good for your skin. (That's why they are only allowed to be used in closed environments where the harmful light can't escape.) Even at the low energy levels of one or two LED's long term exposure will still do damage. A black light LED (400 nm) or an LED that produces only one wavelength between 385-415 nm would be fine for this project and way safer. Anything below 380 nm isn't visible anyway, so unless your trying to get a tan, try to stay away from the shorter wavelengths. I hope, even though we all like shiny things with a nice patina, we also like to keep our DNA in one piece ;)"
And I want to add, that in this project I exactly followed these rules and used UV LED with 385 nm and 405 nm and tried to avoid a direct beam of UV Light to the eyes by this special construction!!
Quinine has like all other fluorescence stuff a special fluorescence spectrum which you can see here. To get the best result I worked with High Power UV-LED of two different wavelengths 385 nm and 405 nm. These LED take 500 mA each while working. A "classic" LED take 20 mA! I also used a borosilicate glass bottle which is the only glass that let UV-light come in and out without a quality loss.
A turbid lemonade with quinine spreads the light better than a clear one like tonic water, that´s why I chose this lemonade after testing various sorts.
UV light at such a high power level and on these wavelengths is very dangerous to the human eyes and that is why I placed one LED under the bottom of the glass and the top LED in the sanded neck, so no one gets a direct beam of the UV light but everyone can enjoy the mystic (and not dangerous) blue-green light coming out of the bottle.
Very often I am asked for the electrical /schematic, so here it is....
Step 2: The Idea!


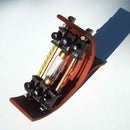
One day my local plumber gave me a brass made pump case out of his scrap container and asked me to create a new stylish steampunk object. At my workshop I took a round bottom flask tried and both fitted together in a perfect way. So the idea came to my mind to built this fluorescence reactor and it should look like an apparatus from a mad scientist´s lab.
Step by step I developed this object looking what might fit or not.
Step 3: Building the Base


The base is made of a plywood plate (1 inch) with a frame of profiled plywood on. The wooden part had been glued together at first. Then I took a plate of acryl glass to arrange the following parts in their right position and marked them. Next I used the acryl glass plate to transfer the marks for drilling the needed holes into the 3 mm plate of red coloured hard fibre.
Step 4: The Round Bottom Flask Holder


The brass made pump case needs four bolts to be fixed with the base. So I created these special bolts by gluing different brass parts from the scrap together with Epoxy Resin, as you can see step by step at the pictures.
The hole in the middle of the pump case will carry one of the high power UV-LED. The electrical wires run through the copper tubes of former heat radiators.
Step 5: The Cantilever Arm


The cantilever arm will keep the round bottom flask in the right position and carries the second High-Power UV-LED. To take the bottle out or in, this arm can be lifted up about half an inch and also can be turned around.
All parts were taken from the scrap an had been soldered together. The fittings therefore had been made by hand as you can see at the pictures.
Step 6: Modifying the Knife Switches


Nearly every apparatus at the mad scientist´s lab uses a knife switch. So I took two of them from the radio shack and changed the handles. I formed them with my lathe using laminated fabric sticks with 12 mm in diameter. The new handles are fixed with epoxy resin.
Step 7: Sprinkler Heads


Two old sprinkler heads give a good contrast to to blue light of the bottle The had been screwed in connectors for heating radiators
Step 8: Assembling All Parts


At the end all single parts come together. First I installed the wiring and after closing the base all other parts were put into their places.
I hope that you enjoyed this project
Greetings
Yours Aeon Junophor

Grand Prize in the
Make it Glow Contest 2018


