

Introduction: Stranger Things Programmable Hoodie


You may not ever have to spend time in a nightmarish world of monsters, but sometimes you just want to wear a shirt that says you totally COULD live there if you wanted to. Since such a shirt doesn't exist on the open market we decided to make our own. Now we can taunt our friends with a shirt that spells out various words or phrases on the sly!
We love the TV show Stranger Things and had been kicking around a lot of project ideas that emulated the word spelling Christmas lights of Season 1. Making a big wall display is fun it's really hard to show off to friends, family, and coworkers. While looking for a ugly holiday sweater we came across this perfect Stranger Things hoodie and instantly knew what we had to do.
We designed this shirt to spell out several holiday phrases but you can easily expand on it to spell out anything you want. The overall project wasn't too difficult but does require a decent amount of hand sewing and time to complete.
If you like this project and want to see more fun things that we make follow us in Instagram, Facebook, Twitter, or youtube.
Supplies
It's very helpful to have some basic sewing supplies and materials on hand for this project, as well as some experience sewing. You won't need a sewing machine for this project as it pretty much is all done by hand.
Sewing Supplies:
- Stranger Things Sweatshirt
- Conductive Thread
- Needles, scissors, and other general supplies
- Some strap fabric
- Glitter Fabric Paint (Red, White, Green, Gold)
Electronics Supplies Needed:
- Crazy Circuits Invention Board or Robotics Board (or other sewable Arduino such as the LilyPad)
- 3x AA or 3 AAA Battery Pack
- Crazy Circuits Screw Terminal
- 15 x Crazy Circuits Neopixels or Adafruit NeoPixel Sequins
Step 1: Designing Your Project


This project scales up and down very easily. You can, in fact, add a sewable NeoPixel to the shirt for every letter of the alphabet and then spell out every word in the English language. However thats a lot more sewing than most people ever care to do. What we did was come up with a list of words that we wanted our shirt to spell and then found out what letters they had in common. We even decided to throw out a couple of words because they had too many unique letters in them.
We very much DO NOT recommend trying to do more than 12-15 letters. The amount of sewing involved gets tedious very quickly and we do worry about signal issues between NeoPixel components after a certain point (due to the nature of conductive thread). If you've never done conductive sewing before try limiting yourself to one or two words on your first try.
Step 2: Cut Small Holes Where the LEDs Will Go

In our testing we found that even though the NeoPixels were quite bright they didn't do a great job of shining through the printed light bulbs on the shirt. We toyed around with the idea of putting all the NeoPixels on the FRONT of the shirt, but that ruined the look of everything. We decided that the best situation was to cut a small hole in each printed light bulb and then cover the NeoPixel with puffy paint.
First you'll want to cut a very small hole in the silkscreen of each light that will get an LED. It doesn't have to be very large as the NeoPixels themselves are only 5mm x 5mm in size.
Once you do that urn the sweatshirt inside out.
Step 3: Lay Out Your Circuit


We designed our circuit out on paper (see diagram above) before we started sewing. Lay your pixels out according to the holes you made in the last step. Note that the circuit will run like a snake, so the negative holes in the Neopixels on the first row are on the bottom, but the second row on the top, and the third row on the bottom again.
NeoPixels can chain together using only three lines of thread; A Positive, a Negative, and a Signal Line.
The key is to make sure you don't overlap these lines (or if you do that you're super careful not to short them out) and that you make sure you NeoPixels are aligned correctly in regards to their Signal In and Signal Out holes.
On our Crazy Circuits NeoPixels and the Adafruit NeoPixel Boards everything is labeled quite well so this shouldn't be an issue.
Step 4: Sewing the Circuit


Sew the components in place with regular black thread. Tip: Don't sew all the way through the fabric! Only sew through the fleecy backside so that the stitches don't show on the front.
Sew each Neopixel in place through at least two of the holes (such as one Positive hole and one Negative hole, try to avoid the Signal In and Out holes). Align the LED with the hole you made in the shirt.
Sew the Crazy Circuits Invention Board just above the sweatshirt pocket.
Sew the power connector with the connection facing toward the inside of the pocket. Cut a hole in the shirt so that it fits through.
Make all connections with conductive thread as shown.
The threads need to cross near the Crazy Circuits board. Use a piece of electrical tape to make a small barrier between these threads to prevent a short circuit. *Photo #2 If you wanted to you could also go to the other white circle Negative hole on the top left side.
You can use one long piece of thread to connect the power and ground holes. BUT, you need to finish and start a new piece of thread for each of the data holes (in yellow). This way each pixel will be individually addressable. Watch out for the ends of your conductive thread making contact with other lines of conductive thread. Use nail polish or glue to help keep things in place.
Step 5: Connect the Battery Pack


Turn the sweatshirt inside out again.
Insert the battery pack wires into the power connector with a small screwdriver.
Tuck the battery pack into the pocket. While wearing, you can turn the sweatshirt on/off with the switch on the battery pack.
Some of you may ask "Brown Dog, why not just power everything from a USB Power Bank instead!" which makes sense and MAY work in some situations. The big worry is that when at full brightness a single NeoPixel can take upwards of 60mA of current. When you get 5-10 going this adds up quickly and can easily burn out your Arduino. The way we have power set up in this project both the Arduino and NeoPixels are sharing power from the battery pack, and the Arduino is just sending information through the Signal Wire. Since you're probably going to put a lot of work into this project it's best to play it safe.
Step 6: Make the LEDs Visible

Use small scissors to trim back more of the sweatshirt so that the entire pixel is showing.
Don't worry if this isn't the cleanest of cuts for yourself. Any imperfections that you may end up making will be covered up by the paint later on.
Step 7: Add Glitter Fabric Paint
*You may wish to test your LEDs with some simple code before doing this step.
Add glittery fabric paint in colors matching the lights using a paint brush. This diffuses the light coming from the NeoPixel and helps not blind people looking at your shirt.
We found that covering the entire shirt light bulb with paint had the best overall look and feel.
Step 8: Upload the Modify the Code
*If you've never used an Arduino before STOP! Download the Arduino software and try some simple test code before anything else. The #1 problem new users contact us about is that they're unable to connect their Arduino to their computer due to driver or permissions issues.
Download or copy and paste the code from this link into the Arduino IDE.
The code has instructions on how to change the order in which the LEDs blink to spell words. They're pretty easy to change in the code, but here are a couple of things you should probably double check.
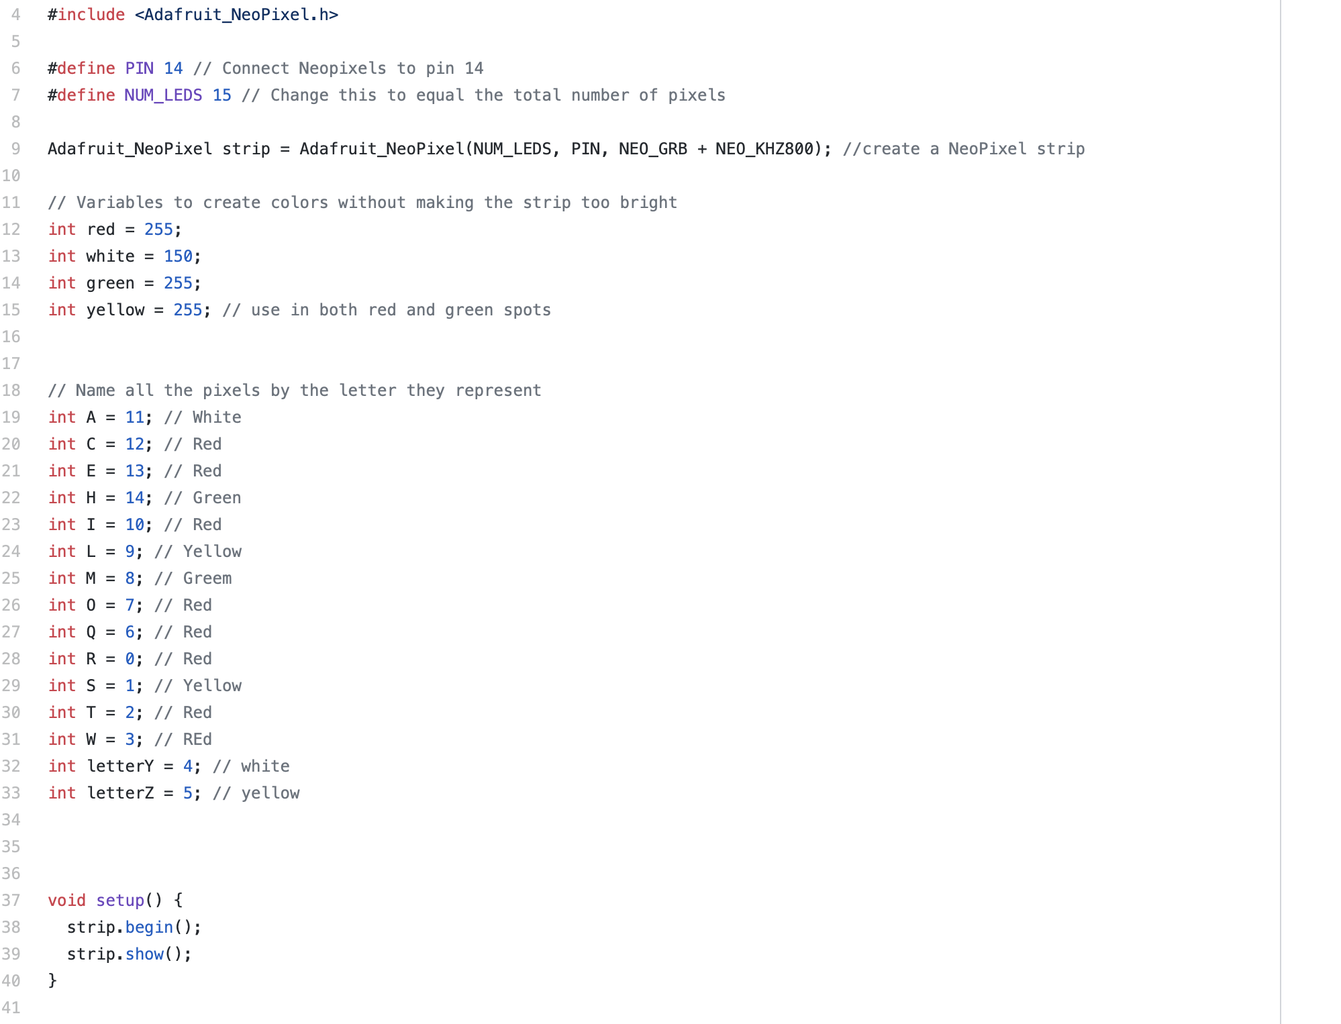
In Line 6 you'll want to make sure that the pin listed there is the Arduino pin you're using for your Signal Line.
In Line 7 you'll want to make sure that the number there matches the number of NeoPixels you're using.
In Lines 18-33 you'll need to define where each letter is in the string of NeoPixels and what color your bulb is. For instance in our code Letter A is the 11th LED in our string and we want it to be White.
In Lines 104-121 you'll be laying out the order in which the LEDs blink. Our code is spelling out Merry Christmas. More or less use the "turnOnLetter" command followed by the letter and what color you'd like it to be.
Upload the code to your Crazy Circuits Invention board (or sewable Arduino board of your choice).
If this is your first time connecting, follow the instructions under "Software" in this Crazy Circuits Guide. If you're using the Crazy Circuits Invention Board you'll need to install a couple of quick add ons before it'll work with the standard Arduino software.
Disconnect the USB cable, then put on your hoodie. Turn on the battery pack and you're ready for your next Christmas Party!
Step 9: Wear and Enjoy!
At this point you're either trouble shooting weird shorts in the shirt, something weird with the code, or enjoying your new shirt!
We recommend wearing an undershirt along with this as skin can sometimes do weird things to complex conductive thread, and the circuit boards are kind of rough as well.
You can use this exact same approach with all kinds of shirts and wearables using NeoPixels, especially around Halloween or Christmas. Just find a fun shirt online and add some LEDs to it.
If you like this project and want to see more fun things that we make follow us in Instagram, Facebook, Twitter, or youtube.

Participated in the
Make it Glow Contest


