

Introduction: Super-insulated Black Glitterball Pizza Oven


"Dad - can you build us a pizza oven?!"
If you've ever had a wood-oven fired pizza, you know they are the best!
At a family meal last October, everyone admitted they were a bit bored of Christmas dinner. For the previous two decades we had always had either roast dinner or baked salmon. We wanted something different for a change!
My daughter had a brainwave:
"Why don't we do build-your-own pizzas instead?!"
Great idea. Only one snag - we didn't have a pizza oven and this was in late October. From this, the following challenge was laid down: "Dad - can you build us a pizza oven?!"
Obviously the answer was yes - I would just have to work out how later how to build a pizza oven from scratch in about 6 weeks. No pressure then.
And so, here it is - how I built a pizza oven that works (really well, it turned out).
What's in this instructable
Research findings
- research done in advance for the design process
- a summary of my findings about oven concepts
- different approaches to constructing pizza ovens
- handy tips from experience of how I built our pizza oven
Construction details
- woodstack base
- reinforced plinth
- internal parabolic chamber using a single monocoque concrete shell
- full details of insulation layers of the dome.
- chimney and oven opening arch
- fireproof door
Importance of good insulation
- I recommend a special focus on the thick insulation used
- this makes it extremely efficient for high-heat pizza cooking
- it also means it retains heat for low-and-slow overnight cooking
- It uses a surprisingly small amount of wood for the fire
Fire control
- details of how the fire can be managed to cook very hot or low and smoky
- basic example of how the oven temperature decays over many hours
- using thermometers to help manage cooking
Examples of food cooked in it:
- Obviously pizza!
- High-heat roasting - such as meat joints, Tandoori chicken, chips
- Baking - bread, pies
- Slow-cooking and smoking - low-and-slow overnight cooking for brisket and pulled pork and getting meat joints rich and smoky
Supplies
NB - costs are in UK pounds approximate as of June 2023. I don't have all receipts. For any free items, this will be because I have used reclaimed materials, picked up when other people have discarded or donated them. I always try to reuse things. This is generally a good thing and obviously saves money. The main costs were for specialist and generally not very cheap fireproof materials that you have to buy - like Ciment Fondu, ceramic wool and Pearlite (although you may be able to get the latter cheap from garden wholesalers) . You might also be able to use old fire blankets or fireproof mineral-fibre roof insulation, but be very careful they are safe and not old asbestos etc. I haven't included costs for small things like screws that I used to hold the concrete mould together etc.
Materials - physical build
- Reclaimed red clay bricks - used for the wood stack walls (about 220 - free - reclaimed)
- Ciment Fondu - very high strength heat-resistant cement used in furnaces. This is important. you shouldn't use normal portland cement (which can break down at the higher heat of a well insulated wood oven) (2 bags for £97.80)
- Fast setting cement - high strength and speeds up build for non heat-facing concrete (3 bags for £60)
- Pearlite - an aerated mineral grain used as insulating ballast in the dome concrete (100 litre bag for £27.99)
- Ceramic wool - extremely good mineral (glass) insulation, the main insulation in the oven dome (5 metres 50mm thick for about £160)
- Gravel (stone aggregates/chippings) - used in base concrete (3 or four bags - about £12)
- Sharp sand - standard binder for creating a good strong concrete mix (2 bags about £7)
- Builders sand (soft sand) - standard binder for brick mortar (5 bags about £15)
- Fire bricks - for the oven floor (free - reclaimed)
- Steel rods - for reinforcing concrete (6 metres of 10mm about £20)
- Steel chimney flue for the chimney (free - reclaimed)
- Reclaimed vented cowling/cap - chimney cover adjustable as smoke controller when slow cooking (free - reclaimed)
- Ceramic tiles, broken - used to create the lovely crazed reflective black finish of the dome (free - reclaimed)
- Reclaimed red terracotta roof tiles (broken) - used for paving the standing area and surround (free - reclaimed)
Materials - mould making
- Drawing materials - used to draft the parabolic template
- Plywood - for the internal parabolic mould (free - reclaimed)
- Hardboard - for covering the plywood of the parabolic mould (free - reclaimed)
- Acrylic sheet - for heat-shaping a bespoke mould for connecting chimney to dome (free - reclaimed)
- Aluminium coated foam board - for the oven floor retaining mould (free - reclaimed)
- Duct tape - for holding modular mould sections together temporarily (maybe a roll - about £4)
Materials - oven door
- Plywood - for the exterior door (free - reclaimed)
- Waste elm block - used for door handle (free - reclaimed)
- Steel sheet - beaten to make the cover for inner heat shield to protect outer wooden door (free - reclaimed)
- Ceramic wool - insulation used inside steel heat shield cover (leftovers from above)
Tools
This build didn't need a huge number of tools. It was mostly building tools for cementing and so on.
- Spade - for mixing concrete. I used a small one, because it is less effort to mix
- Float trowel - the big flat rectangular one - used to smooth the dome exterior rendering
- Pointing trowels - for mortar work mainly on the brick arch
- Circular saw - for general cutting of wood
- Jigsaw - for cutting wood when making moulds
- Angle grinder - for cutting steel bars
- Metal snips - for cutting steel mesh
- Large serrated knife - for cutting insulation (e.g. breadknife)
- Impact driver - for screwing together shuttering timber for containing concrete
- Hammer for breaking tiles etc
- Spirit level - for checking concrete mould edges are level etc
Step 1: Designing the Oven and Researching


Above - cutaway side view of oven design structure.
To get a good design involved doing a fair bit of (re)searching online. There is no point trying to start from scratch when there is a load of stuff on YouTube (and Instructables!) from other people explaining how they had managed it.
I found a load of really useful info, with some different approaches. One thing I discovered is that there are a fair number of people saying: our ovens are great/I know all about this (probably), etc. You should be critical about these claims - on close reading, some are less convincing than others. Also, you sometimes need to vary your search terms because search ranking can repeatedly highlight already popular, but average content.
Roughly the stuff I found also fell into a few categories of online content providers...
- hobbyists - generally very generous and willing to share their mistakes - Instructables and YouTube both had plenty of good ones. Cheers people - here is my effort.
- marketorial - videos purporting to show how it is done, but really mainly focussed on selling stuff, brand building and occasionally people just bigging themselves up. To be fair, some of these do actually have useful facts and tips amongst the hype
- traditional makers - I didn't find a huge amount of content about exactly how historically pizza ovens were constructed - people in the two categories of content providers above asserted that things like: " traditionally, ovens were made like this...", but there was little evidence to suggest they had ever researched it properly. Most felt like they had read someone else's hobbyists site and assumed that was true.
- engineering content - I did find some good information in industry building construction content, on the differences between types of cement and ballasts for making different types of concrete. These could get very technical with chemical composition or crumbling and hardness testing results for different concrete. Useful when trying to verify some claims on hobbyist sites, although quite hard-going to read.
Research findings
The general consensus was:
- a parabolic oven shape is the most efficient to focus heat from the top of the oven evenly down onto the cooking area. Same principle as car headlights and parabolic reflector heaters.
- BUT parabolas are not essential - actually semi-spherical and barrel shapes are traditionally used and work fine, so it probably doesn't matter that much, apart from improving heat distribution for more even cooking. It felt like your cooking technique (e.g. judging when crusts were getting close to burning and rotating them) might make a more significant difference to good cooking than the exact shape
- the cooking chamber needs to be heat-proof (duh!), but it was not that obvious in advance, which common building materials are actually heat-proof (e.g. basic cement-based concrete can break down if the oven temperature goes above a certain level), so take care looking at your choice of cement in particular
- for structures facing direct heat inside the oven you should use fire bricks, specialist refractory concrete and/or clay that mineralises and get more stable on heat
- It is very important to create good insulation between internal oven space and the outside. This makes your oven much more efficient by keeping in heat for ages. It also means the top of your oven doesn't get too hot to touch
- You also need good insulation between oven floor and supporting platform
- you can choose to layer pre-cooked bricks to build up the dome, or go for a single monocoque concrete layer with moulded concrete. I chose the latter.
- You need specialist cement for making concrete inside the chamber. Ordinary Portland cement is not recommended as it can break down. I used Ciment Fondu. If you like to know why, then Ciment Fondu is a type of calcium aluminate cement - see this Wikipedia page for more info: https://en.wikipedia.org/wiki/Calcium_aluminate_cements
Design approach - structural
After comparing and contrasting a load of how-tos, I chose to
- build a parabolic dome (or as close as I could get it, without overworrying about it being a pure parabola)
- to do this with a single monocoque moulded-concrete shell layer, rather than build it up using bricks, because this makes it much easier to get a bespoke shape
- to reinforce concrete with steel for tensile reinforcement as required. I used steel rods in the base it was supported on, and steel fencing grid-mesh and chicken wire in the parabolic dome.
- to use a plywood and hardboard multi-part mould as the former for the main dome (so it could be removed in parts)
- to use acryclic sheet and tape for moulding the tricky chimney-throat area
- to use ceramic wool for the insulation
- to use Ciment Fondu for the internal concrete exposed to direct oven heat
- To use Pearlite as aggregate in the Ciment Fondu in the oven walls to give additional insulation
- To create a base that also serves as a wood-stack base upon which to build the oven. I built this from ordinary bricks with gaps in the side walls to allow airflow through, so that scavenged and foraged wood I find can be seasoned naturally. This is very effective. I mainly saw up old pallets for quick fires and small logs from tree branches for better flavours when slow cooking and smoking etc. They all dry out quickly in the wood stack.
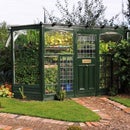
Design approach - aesthetic
A pizza oven is quite an imposing structure, so we wanted it to look good
- the garden has a lot of red brick paving edges, so I used red bricks, and brick-red terracotta tiles, to blend in with the existing look
- The main dome was glazed using a small-sized crazed tiling
- We chose black because we like it. It also blends in nicely with the black steel chimney and door. You naturally get black smoke marks on the door opening of a wood oven where smoke comes out, so that blends in too.
- For the surround to the oven and the small tiled standing area, I blended colour and pattens with other features for a harmonised look
- I blended the COLOUR of the red terracotta tiles with the bricks of the woodstack stand and the arched oven entrance
- I blended the crazed PATTERN of the horizontal floor and stand tiling with the crazed pattern of the dome
- The end result was a very pleasing overall look.
- The good insulation also means the outside of the oven does not get hot so that plants that grow round the oven are not damaged by heat, and the greenery adds to the overall effect.
Step 2: Laying a Solid Base Support


Obviously, for a heavily-built construction you need a decent foundation. For this I created a support slab of concrete.
On all the front-facing sides, I built a low wall bricks to contain the slab for a nice look. At the back, I just made shuttering with boards without wasting any bricks that wouldn't be seen.
This was a standard 4:2:1 mix of 4x aggregate(25mm gravel): 2x sharp sand: 1x basic portland cement.
It's about 6 inches thick (150mm). I didn't bother using any steel reinforcement as the only real load on it would be compression from the weight of the rest of the build. There is no significant tensile load on it and it also has solid earth under it, with broken bricks as a base layer on the soil.
The concrete slab was levelled by sliding with a baulk of timber in a see-sawing motion. I also used this to bash the concrete mix so the bubbles got released and the top layer was a pool of cementy slurry which gives a good smooth, even surface when set.
This was standard portland cement. This was fine as this layer would not get exposed to any heat. This takes a good two or three days before you want to build anything else on it, so it can stabilise and set properly (full strength is not actually for about 28 days!)
Step 3: Building a Support With Built-in Woodstack


This base acts as a support, as well as creating a sheltered woodstore to accumulate wood. The side and back walls have aerated courses, with holes in between bricks to allow good air flow which dries the wood out, for clean burning.
Once the slab was set sufficient to build upon (usually OK after 2-3 days. I left it one week), I built a pedestal base to mount the oven on.
Before building it, I laid out the bricks to check the best way to bond them. NOTE - the holes in the back are deliberate to allow air to circulate inside the wood store. This is the best way to season wood - allowing air to blow through and carry off moisture.
In the photo of the brick wall being laid, I have laid the first three courses with mortar. The higher courses are not yet laid. This was just me setting them out to check where best to position the bricks.
You'll note the walls straddle the concrete base and the side bricks of the base container wall. This was to help bond these side bricks into the overall structure, and stop them tending to come loose.
The mortar for this was a standard 4:1 mix of 4 parts builder's sand with 1 part standard portland cement. To make it easy to lay, I used a good amount of washing up liquid as a plasticiser. This helps it all stick together and makes the mortar easy to work with.
Once I had a good pedestal of bricks, I constructed a big old support slab to sit on top of the base walls, which would form the main support for what would be a pretty heavy oven.
The first thing was to build a mould (aka a "former") to contain the slab. This was created from vertical supporting brace frames both inside and external to the brick walls, using 50mm x 50mm timber.
I screwed horizontal base plates of plywood on to these frames, to form the mould base.
On the sides of these, I then screwed on outer containing walls, at right angles to these base pieces, to complete the mould.
As you can see, this wooden mould was made from any old wood I could find. The horizontal floor pieces generally needed to be thicker to bear the heavy weight of the concrete. The vertical outer containing walls were lighter, as these do not need to bear direct gravitational weight. They are just there to stop the sloppy concrete pouring off the edges and to create a nice clean square edge.
The gaps between wood and brick were padded with old newspaper, to prevent the concrete leaking out. The minimum mould depth for the slab is a little over 2 inches thick (55-60mm) although it varies across the whole piece.
Once the mould was finished I would fill it with concrete.
And given that the main oven would be pretty heavy, I used 8mm and 10mm steel reinforcement rods to add tensile strength to the slab. Essentially these mean the slab won't snap under heavy load...
Once the mould was sound, I mixed a concrete using high-strength/fast-setting cement to fill it all in.
This is also a 4:2:1 mix of aggregate (25mm gravel): sharp sand: high strength cement (Blue circle rapid setting cement)
I made this quite wet, so the top layer would flow well and bubbles would rise out easily. This was helped by using a length of timber across the frame, to level it out. By tapping the wood, you can also agitate the bubbles so they pop out of the concrete. This is the same as I had done in the base.
Step 4: Drafting the Template for the Parabolic Dome


My design choice was to make the inside of the dome a parabola. The maths makes sense, because in the oven hot gas gathers at the top of the oven and radiates heat out in all directions. Wherever this radiated heat hits the parabola, it is alway reflected more-or-less vertically downwards. This means heat is much more evenly radiated downwards.
So parabolas are great, but they are also a bit fiddly to draw.
I didn't take very good pictures of how I created the parabola, but it uses a builders square and a nail to draw a constant line between focus and reference line. This involves marking out a series of point that are equidistant from the nail (left of pic) that represents the focus, to the wooden bar that represents the directrix (fixed reference line).
Essentially you use a fixen baton of wood as a guide rail, then move the corner of the square along the rail in small step and as it is restricted by the square, it creates a set of lines that then create a parabola.
BUT the best way to understand this is to watch it being done. This is what I did - I got this from this great YouTube video - respect to this person
https://www.youtube.com/watch?v=lVbfLlSLrZA
Sounds hard. It isn't. Watch the video :)
Satisfyingly, it is basically using the same method that small children used to use to make pin and string drawings in the 1970s, when you made your own fun from anything you could get your hands on.
Step 5: Using the 2-dimensional Template to Make a 3-dimensional Dome Mould Former


I drew the parabola on a white hardboard sheet (actually the backing from an IKEA cupboard). This is about 4mm thick and is like a piece of very strong cardboard. It is ideal to use as a template because the big edge means running the pen round it is easy and doesn't slip.
I then cut this out with a Stanley knife (folding craft knife) and used it as a template to cut plywood parabolic buttresses, to support the mould.
I used some small sheets of plywood that I'd scrounged out of a skip. With some forethought, I found I could cut two of these from each sheet of plywood. Waste not, want not.
I used a jigsaw to cut out eight of these. Then used gaffer tape to joint them together to check the parabolic shape looked OK.
This looks like a great mould, but actually it is not practical to use like this, because it is an internal mould and once concreted over, you'd struggle to remove it.
Later on, I had to deconstruct it and build into removable modular sections, that would keep the overall parabolic dome shape, but that could be removed through the narrow mouth of the oven.
Step 6: Working Out the Floor Plan for Dome and Door Arch


I had decided to make the floor of the oven from firebricks. These are specifically designed to hold heat and being flat, you can make a floor with them by effectively paving it in any pattern you want.
I chose to arrange them in a herring bone pattern to allow the pizza shovel to slide in easily.
To make the floor I needed to cut out a load of bricks that matched the dome I would build over them later.
To do this involved
- laying out bricks in the pattern I wanted
- placing the dome arch mould former on them
- adding bricks at the front to represent the oven entrance arch
- drawing round the mould and bricks with charcoal
- numbering all the bricks (important it's hard to work out which one goes where, later, otherwise!)
- cutting the bricks to match.
Cutting bricks is fiddly
To cut the bricks, I used a diamond edged tile cutting blade in an angle grinder. It is a bit fiddly doing this as the outer edges needed to be rounded. You need to make a seried of cuts to get a polygonal edge, then use the grinder blade manually to smooth off the corners
Step 7: Adding a Fireproof Insulated Oven Floor


Once I had cut all the fire bricks for the base, I transferred them to the slab.
I lost a few photos in this step, unfortunately. (what they involved is shown in bold below)
This is what I actually did
- Not shown, but very important - first of all I laid them on top of a 25 mm layer of ceramic fibre insulation (important to protect the slab concrete underneath from getting hot and decomposing
- Laid a tight steel mesh reinforcement on top of it (galvanised square fence mesh)
- Left the mesh long, so it could be linked up to the dome later, for reinforcement strength.
- Created a 4" perimeter mould round the outside. This is essential to define the shape and then confine the wet concrete before it set.
- The mould the same rough shape as the bricks and was made from aluminium strip so it could be bent to shape easily, but remain strong enough to contain concrete. (see image above)
- It was about 1" wider than the bricks
- Applied a 2" layer of the Ciment Fondu/Pearlite insulating concrete to bed it down.
- Laid the bricks out on top of the concrete as tightly as possible (using a rubber mallet to tap them together)
- Filled in round the bricks in the mould to create a retaining edge
- Made sure the extra mesh was sitting up, so it could be bonded into the concrete dome later for strength
Step 8: Constructing the Main Oven Chamber Over the Dome Mould


Of all the stages in building the oven, exactly how I'd do this using a mould was definitely the one that I had been least certain about how to approach.
Im my research, almost all the pizza ovens were usually built using special fire bricks, built up into a hemisphere (easiest way to do) or occasionally into a parabolic shape (better heat distribution, but not easy to build using bricks).
My design was to build a single self-supporting concrete monocoque shell over the mould. Using a mould is by far the easiest way to get a specific shape. In my case I want a (near-enough) parabola. Would it have mattered if I'd just used a half-sphere? Honestly, probably not. Let's face it, if you have a 400C-500C oven, it's gonna cook stuff OK, no matter the shape, more or less, I reckon.
BUT, I knew that a parabola will give the most even radiation of heat from the top of the oven chamber down onto the oven floor where cooking happens, so I really wanted to make the chamber a parabolic dome. Basically, the parabola shape makes heat come down more evenly, like an overhead grill (in the UK "grill" means a gas or electric heater ABOVE food - in the US it's called an overhead broiler I think).
The mould needs to be removable
The diagram shows how I made the mould into modular parts for removal. The top half is essentially the cap of the wooden buttress frame shown above, cut off from the rest of the buttresses. The cap was also now split into two halves. Each is a set of buttress pieces with hardboard panels to fill in the gaps between them. The panels were screwed onto the buttresses, then reinforced using good old gaffer tape (duct tape). These are resting on more hardboard panels, all of which are taped together using more gaffer tape.
Once I had my modular parts, I recreated the original dome shape by connected them all back together using the gaffer tape. This was crude, but crude works. Using tape to hold the pieces togethermeant each part could be separated and removed in turn later, by simply cutting the tape
The photos also show the oven entrance bricks laid temporarily in place with the steel arch former. This hole is the size that each piece needed to fit through when being removed.
I'd also added a lip to the front of the dome to prevent the concrete slopping off the mould. This shot shows the first structural layer of the dome concrete. The wood poking out of the dome mouth is supporting the mould, but in a way that can be removed later, when set.
Also clearly visible is some of the 15mm square steel mesh, used to add tensile strength to the concrete. Some of this mesh is from the base and some was added as I built up the dome concrete layer.
You need to use special heat-resistant concrete
It is critical that you DON'T use normal cement for the concrete. I used a 1:4 mix of Ciment Fondu (the super strong, heat-resistant cement mentioned earlier) to Pearlite.
Pearlite is a type of volcanic glass mineral that occurs naturally. It looks like fluffy white beads, much like polystyrene beads, but being glass it can tolerate very hight temperatures. It is an extremely good insulator partly because glass is a poor conductor of heat, but also because it is full of holes that trap air.
The concrete is sort of equivalent to making chocolate rice krispie cakes. The Ciment Fondu is the chocolate glue and the Pearlitre is the lightweight padding. Despite being quite lumpy, it is quite easy to trowel on and spread out.
Built up using two layers
This first layer of Ciment Fondu/Pearlite was about 35-45 mm thick (about 1.5" or just over). This was not really thick enough, even with the steel reinforcement mesh, so once the first layer was set hard, I added another layer over it to get the thickness up to a good solid 60-70mm (roughly 2.5" thick or just over).
Removing the dome mould
I don't have any good pictures of this, unfortunately. I have drawn out the way it works in the diagram. The mould is in three parts and they are made from the plywood dome arches, covered with hardboard panels, held together strongly, but removably with gaffer (duct) tape.
After the concrete was set hard (I left it several days), I carefully removed the mould. This required cutting the tape of the mould pieces and slowly easing out each of the lower pieces, one at a time. Once the bottom halves of the mould were out, the top mini-dome could be dropped down and then cut apart, so it could be removed through the front arch, too.
Note - when setting the concrete sticks to the tape a bit and some tape was left on the inner conrecte face. You need to remove it from the inside of the dome. It comes off quite easily as long as you don't leave the concrete to set for weeks.
Step 9: Incorporating the Chimney Flue and Building the Arched Opening


Once the main oven chamber dome dome was constructed and fully set, I moved onto building the the brick arch for the oven mouth
Building the brick arch for the oven mouth
For this, I used a custom steel arch support. I made this from an old steel shelf (about 2mm thick), by bending and shaping on the anvil. This steel arch was used a former, upon which to support the bricks when building the arch, before the mortar set.
This steel arch support also acted as a base upon which to mount and support the chimney pipe at the rear of the brick arch. You can't see it here, but the central span of the steel arch has a semi-circular hole in the rear-facing face. This is to allow a flue hole to be formed at the mouth of the chimney. The chimney pipe has a diagonal cut across about 2/3 of its rear-facing lower end which forms the other half of the flue opening already half-formed formed by the section cut into the arch support.
The pictures show the build after I'd built the arch and added about half the extra layer of the top of the dome. The steel mesh is showing on the near side, where that layer had not yet been fully applied.
The oven mouth gets hot so I also used the fireproof Ciment Fondu for the bricklaying mortar with a 4:1 mix of builder's sand to cement .
Incorporating the chimney pipe between dome and arch
Once the arch was built, the chimney flue hole was just higher than the mouth of the oven, so hot smoke and fumes created by the fire would reach the chimney opening inside the oven and naturally flow out of the chimney and not out of the mouth of the oven.
Also, not easily seen, is the moulding piece, between the first layer of the dome and the steel plate. This is a piece of acrylic sheet moulded by softening with a blowtorch to fill in the gap between concrete, chimney pipe and steel arch. The acrylic is about 4mm thick and again is held in place using removable tape - in this case masking tape.
The mix where I filled in the gap between dome and the arch of the oven mouth was the same as the rest of the dome - a 4:1 Pearlite to Ciment Fondu mix. This was quite fiddly, but once all the moulding was secured, I could build up the side walls and then fill in the gaps. The total thickness of this inner dome varies, but it is at least 60mm - 70mm thick (about 2.5") over the main dome and in most places a bit more. It is even thicker in the areas where brick joins dome/chimey and also at the base.
Removing the archway mould
This shot from the front shows the wooden internal support that props up the acrylic part of the mould, before the concrete had set. It was removed later. The acrylic is actually screwed onto a plank inside the oven with further planks to bear the weight.
This shot showing the oven mouth was taken about two days later, when the mould and its supports have been removed. By this time, I had also applied another layer of the insulating concrete to form a cleaner, more even shape.
Step 10: Adding Really Good Insulation


Do not miss off this step!
The insulation of your oven is really important. This is what makes it so effective. It means you need much less wood to fuel it and once hot, it stays hot for ages. You don't want to have to be adding more wood mid-cook of a pizza party because your oven has cooled down too fast.
In the photos, you can see how good this is when I was cooking on a cold morning. The outside of the oven still has ice on it from the morning frost, but the inside of the oven dome at the top directly under this area was nearly 460C after the oven had been fired up for 20 minutes or more.
Use ceramic fibre
Although Pearlite is a good insulator, it is set in concrete, which itself is only a so-so insulator. So, although it is a much better insulator than standard concrete, you still need more insulation. For this I added ceramic wool. This is a ceramic fibre spun out to form a blanket. This is an extremely good insulator. Don't scrimp. It should be at least 2" thick (50mm).
I believe ceramic wool is about 5 times more effective at insulating than the Pearlite concrete. This means to make it as effective using concrete would mean building your concrete dome an extra 250mm (10") thick!
To add the ceramic wool, I just just laid it over the internal chamber dome and then cut it to shape, adding filler pieces as needed and packing them all nice and tight to avoid any gaps. I have a 14" ham slice knife I used for this, but it is easy to cut. You could use a breadknife.
Estimating how much insulation you need to buy
Someone asked how much ceramic wool you need to cover the dome in the middle layer. I bought five metres and used between four and four-and-a-half metres. This was not a lucky guess. Surprisingly I could still remember the formula for the surface area of a sphere from maths many years ago. You can just Google it, but anyway, it is this:
Surface area of a sphere = 4π r2 (4π x radius squared)
BUT of course you are not trying to cover a sphere, only half a sphere, so...
Surface area of half a sphere = 2π r2 (2π x radius squared)
The dome you need to cover is the concrete inner dome - the first layer of concrete over the mould. It is not exactly a sphere obviously, but it is close enough to do your quantity-surveying estimation!
My dome varied in thickness because the inner cavity is a parabolic dome and the outer surface is closer to a hemisphere. It is thick at the bottom. I used a value of 3.142 for π.
Roughly the dome had a radius (half the width of the dome base) of between about 800mm and 900mm. In metres, this is between 0.8 and 0.9 metres.
So with the radius in metres the calulation showed me I needed between four and five square metres of ceramic wool
Lower end of range = 2π r2 = 2 x 0.8 x 0.8 x 3.142 = 4.02176 metres squared
Upper end of range = 2π r2 = 2 x 0.9 x 0.9 x 3.142 = 5.0868 metres squared
Health and Safety
Ceramic wool contains lots of tiny fibres. These are not loose when you get it out of the packaging, but they get released when you cut it -
- USE A MASK. You do not want to breath these in
- USE EYE PROTECTION - you also don't want them in your eyes
Once I had a good gapless blanket over the dome, I stretched a tight mesh of chicken wire over it. This does two things. It holds it in place and also acts as a key and steel reinforcement for the first layer of concrete rendering that I laid over the ceramic wool. When you apply the rendering, it weighs down through the mesh and once set, makes the outer dome much stronger, by adding tensile strength.
As with the internal dome, this outer dome was applied in several layers. Each one was about 20mm thick and as I built each one, I smoothed the mortar render to a finer and finer dome shape.
The mortar used for rendering did not need to be Ciment Fondu as it doesn't get unduly hot, because it is over the insulation layer.
For the mortar, I used a 4:1 mix of builder's sand to high-strength cement.
Each layer was smoothed out to an even contoured shape to create the pleasing almost hemispheric final shape. This was done by layering on the mortar render, then using a wetted trowel to smooth it out to a lovely even curve, so it could be tiled.
Step 11: Applying the Black Crazed Tiling


The crazed tiling was done using cheapish bathroom/kitchen tiles from a local DIY shop. These were called Cosmopolitan Black, no less! Obviously you can't tile a curved dome with flat tiles, so I then broken them up with a hammer. Each piece has about a 1"-2" edge. When breaking them, I hit the back of the tile, to avoid damaging the glazed finish.
You should always wear eye protection when doing this. Tiny little shards of glassy tile fly off which you don't want in your eyes.
To fix the tiles, I mixed a 5-1 cement-builder's sand mortar mix and made it pretty runny. I used fast setting cement. This makes it easy to manage, because the tiles grip and stay gripped more quickly. Because it sets so fast, you shouldn't mix too much at a time. A couple of buckets's worth is plenty for each mix.
Using thin rubber gloves, I applied the mortar using my fingers to slop a blob of mortar onto the dome shell, then push the tiling pieces into it. To fit the pieces nicely, this was quite time-consuming. The whole dome took about 3-4 hours to tile.
It's worth cleaning off the excess mortar and any odd stray blobs as you go - they dry before you know it. Also, if you let the mortar dry too much before you wipe the excess off, it is harder to do and you risk having to scrub it a bit, which can scratch your tile glaze.
You will note a bit of crystal blooming on some the drying tiles. This is caused by using quite a wet mix. It is calcium salts in the water seeping out. These salts are left behind as a residue when it dries. This wipes off easily enough.
Step 12: Adding a Reclaimed Chimney Cowling


A simple way to control your fire
I got lucky with this this cowling. I found it in a skip (dumpster). I just needed to clean it up and then I painted it with black heatproof paint to match the chimney.
The original use of the cowling would be to provide protection from rain on a gas boiler outlet. I use the cowling as a choke on the chimney. Depending on how closed it is, it controls the flow of smoke gases out. By combining this with variations in how open the oven door is, you get a good basic range of control of air flow and therefore fire control.
It is also still handy to leave on the chimney when the oven is not in use, to stop rain getting in
- When starting the fire, I take it right off and the smoke rises fast and this draws air into the oven fast so the fire roars into life easily
- When roasting and baking, I rest the cowling on the chimney at an angle and it lets smoke out but not so fast it cools the oven down too much. It reaches an equilibrium between heat from the fire making the oven hotter and smoke releasing cooling it down. I use the door thermometer to see how this is working
- There are two diagonal angles it rests at. One lets out slightly more flow than the other.
- When slow cooking overnight or smoking, I put the cowling on completely, so the air to the fire becomes restricted. A fire can smoulder away for up to 10 hours if you do this. It is nice and low for slow-cooking and it is generally quite smoky, so everything tastes great
Alternatives for smoke control
Quite a few ovens you will see when researching will have a permanent cowling, mainly as a rain protector. If you use a fixed cowling, you will need another way to control the smoke flow. I had initially considered building a choke valve into the chimney. This is a common mechanism you will see in designs. It involves a circular plate inside the chimney, mounted on a rod that can be turned from outside the chimney. By opening and closing the valve, you control the flow.
It is probably a bit fiddly to make and fit one of these, but not impossible. I didn't bother because the cowling method works so well. You could also just use a tile resting on the chimney top. By adjusting the gap with the tile, you'd have another easy method. I like the cowling, because it looks smart.
Step 13: Laying the Crazed Terracotta Standing Area and Oven Surround


When you use your oven, you stand around in front of it a lot, so it makes sense to have a good solid area for this. I wanted to make this look good, so I laid a simple paved area. I laid out a curved perimiter of bricks directly onto the earth. They were dug in so the top face of the bricks was flush at ground level. I also added some broken bricks and other hardcore as a base leaving the level about 3" lower than the upper brick edge.
I then laid a layer of high-strength concrete over it, leaving it sufficiently lower than the upper brick face, that I could tile over it later and the tiles would be flush with the upper brick face.
The tiles here are terracotta roofing tiles. I reclaimed these from a skip (dumpster). I didn't even need to break them up as they were already broken up by the roofers who had thrown them off a roof when stripping them.
I used the same tiles on the edge surrounding the oven dome. I like the informality of these. They have a rustic charm.
Step 14: Making a Fireproof Oven Door


The oven chamber can get very hot, so obviously, you need a fireproof door. Initially I had used a plywood only door on the first few cooks because I didn't have time to make a proper one. The oven quickly burnt a hole in that after about three or four cooking sessions!
My door is not hinged. My approach to was to create a kind of insulation plug with a handle on. This allows the door to be take right out when cooking with the door open, so it doesn't get in the way (and it can be hot so you don't want to touch the exposed inside of a hinged oven door).
The recess at the front of the arch opening of the oven means you can open the door slightly by standing it diagonally to leave about a 25mm (1") gap down one side. This is used as part of the airflow control. When roasting or baking, with the door open a little, the fire will burn quite a bit hotter, because air can get in easily. You can control this by closing it a bit more.
I had thought of making a nice heavy solid metal door, but metal conducts and loses heat quickly. It is also very heavy. With a loose door that is not hinged, picking it up and moving it is something you want to do quickly, easily and safely, so I decided against it and used a lighter composite plywood and steel sheet door with insulation inside.
The door is made of a plywood outer board with a metal cap attached to the inside. I covers a generous layer of the same ceramic wool that is inside the oven chamber dome. This allows the oven door to be plugged shut with confidence that it is not leaking heat and that the outside will not get hot and burn you.
I made the metal cap from a 2mm metal shelf from a garage shelving system. This was shaped to fit the size of the inner steel arch opening of the oven entrance like a plug. This sheet had an angled edge that I could use as a containing edge on two sides. I used an angle grinder to cut the curved shape for the top edge that fits into the doorway arch. To add a lip to this curved side required making lots of little cuts on the edge. These were cut to the depth of the lip on the other side. I then just folded each one over right round the curved edge. You can see this in the photos.
The outer face plate of the door is made from two pieces of plywood. These are bigger than the shape of the metal cap. They were cut to fit the recess between the inner steel arch and the outer brick arch. The insulation was laid on top of this plate this and then the cap was positioned over it and attached to the back of it using 4 screws.
A door needs a handle. I added a simple hood grab handle for picking it up. I carved this from a piece of elm reclaimed from a dead tree in my garden a few years ago. This is attached with screws on the inside of the outer plywood panel of the door. The screws are protected by the insulation, so they don't get hot and loose.
Once made, I painted the door with black heat-proof paint for wood burners, to match the rest of the look.
Finally, I fitted a barbecue thermometer. This has a dial on the outside and a probe that pokes through a hole in the door
Step 15: Reflections on the Build
This is not difficult, but is quite a big task
This is not a build to take on lightly, but an especially satisfying one. The method of using a removable mould is very effective and means you can make any shape you want. My mould was quite crude, but it worked reall well. If you are generally handy and are up for a challenge, building a pizza oven is a great project. I built this on weekends and this took me about 3 months overall to finish. If you worked on it continuously, it would probably still need at least 2-3 weeks. There is a lot of concreting which needs one course to set before starting the next.
I was slightly apprehensive that I would spend ages building it and then it wouldn't work. Happily, it not only works, but works really well. It is incredibly easy to cook fantastic pizzas, and a whole load more by using it as just a wood-fired oven.
Some thoughts...
Good insulation is essential!
Don't scrimp on this and don't rely on the concrete alone to provide insulation - use ceramic wool
- the oven is incredibly efficient
- a fire based on a pile of waste wood of about 16" across will heat it up to the very high heat you need for pizza and then because of the excellent insulation, it keeps its heat really well for other cooking methods
- The oven roof can easily get as hot as 500C (and hotter - my thermometer can't measure above 550C)
- This will grill and char-roast things really nicely.
- Tandoori chicken and marinated wings cook fast without steaming and taste great
- The oven floor can get to 300C+ so your pizzas will cook fast from above and below with crispy bases.
- it also will stay hot for hours, so it is great for slow-cooking - pop a marinated pork butt or brisket joint in it and close the door at about 140-150C and let it cool down overnight for 8-10 hours and the meat falls apart
- I have also baked bread and potatoes in the the residual heat
Use the right concrete and aggregates
You must use heat-proof cement or your oven will break down over time when it gets very hot
- Ciment Fondu - look it up. It is not cheap, but it is the one you want. It might be called other names in the US. It is used for furnaces
- Pearlite - insulating beads of glassy volcanic material
- Fast setting cement - this is useful for non-heat-critical work as it sped up the process a lot. You only need to wait about 2-4 hours between layers, instead of 1-2 days
You are not alone
I did this and so take what ideas you want and ignore the rest, but don't just take what I did - also check out everyone else's experience. That is what i did first.
- Instructables obviously - some good ones on here
- YouTube - quite a few companies that sell oven kits have useful videos
- Google it - you'll have other questions I haven't answered and someone, somewhere has tried it, got irritated by it, solved it and posted it!
- watch a few videos of how other people have done it, then choose a method.
- I like to use reclaimed materials, because it is good to give things new life, and also because it is much cheaper. People who are throwing away bricks etc., will usually be happy for you to take them, so they get re-used and also because it can cost money to dispose of them as hardcore
Step 16: Cooking in a Wood Fired Oven 1 - Fire Control


The picture above is a rather slapdash chart of the cooling over time of one session using the oven. Cooking over many hours needs only a pretty small pile of wood. This comes from the attention taken to insulation. This chart shows a session started from a moderately high heat. The starting heat can be as high as 250C.
NB - temperatures here are taken from the door-mounted thermometer. It measures heat from a probe as far away as it is possible to get from the fire itself. It is also mounted at about 130mm (5") from the base of the oven.
These door-mounted thermometer readings should be treated as a guide. The heat in the oven can be quite a bit higher, further inside and higher up in the dome which radiates down onto the oven floor, but not the door. As you start to cook in your individual oven, you will need to get used to these readings and intepret what the readings mean for cooking things further inside the oven.
Cooking in a closed wood-fired oven
Fire control of the oven is managed by two factors
- How much wood fuel you add
- How you control the flow of air to the burning wood and burning gases coming from the fire
Managing the flow of gases (air and fumes) is the one to get you head round. For cooking Pizza, you need a reasonably generous amount of wood and a good flow of air to it, so it burns clean and hot.
To control air, you have the oven door. When you are starting the fire, you want the door off so the oven entrance is fully open and lots of air gets sucked in. You also want the chimney fully open, so smoke and hot gases can escape fast. Between the two, this will get a fire raging pretty quickly.
After that, you can choose to open and close the door and chimney opening in various combinations:
- For high-heat quick cooking - e.g. pizza, flat breads, searing steaks etc - leave both door and chimney open to keep the fire blazing
- For roasting leave the chimney open, with the door almost closed, except for a small gap so a bit of air comes in
- For baking, you generally need the oven door closed, but with the chimney slightly restricted
- For smoking, you need to get the fire burning well first, then close the door and the chimney, to starve the oven of all but a tiny bit of air, so the wood smoulders and burns with a lot of smoke
A well-insulated oven can get very hot
First thing to note -
- Wood-fired ovens can get way hotter than a domestic oven (more than 500C)
- Pros - super fast cooking of pizzas and pittas, naans etc
- Cons - if you don't pay attention to the top down radiated heat, you will burn the outside of things before the inside is cooked
After the initial intense heat that is good for pizzas and roasting potatoes, the oven stays hot for hours, so you can slow bake other things like bread in the leftover heat.
A small amount of wood can cook lots of different things over many hours.
- When super-hot with the door open, you can do the pizzas and flatbreads in a few minutes
- When very hot with the door closed, you can roast things like roast potatoes, tandoori chicken, hot wings etc
- When cooling down from about 140C down to 56-60C you can slow-cook for hours (I usually do this overnight for at least 8-9 hours) for super succulent pulled pork and brisket, or pot casseroles
Buy thermometers
The thermometers are your friends - I use three types:
- A spot-testing gun thermometer, which you point and click at a surface and it will take a spot reading. This is especially used for pizza cooking, when you will want the oven roof hot enough to grill the pizza fom above and the oven floor hot enough to cook the base at the same time
- A meat thermometer with a steel probe for testing internal heat of joints. The joints keep cooking slowly inside even after the fire has died right down. This probe helps you see how this is going
- An ambient temperature thermometer - this is set in the oven door and measures the general temperature of the overn, rather than the very local temperature of surfaces. This is used for keeping control of your general baking, roasting and slow-cooking.
Step 17: Cooking in a Wood Fired Oven 2 - Pizza and Flatbreads


Yes, pizza can be made perfectly in a pizza oven - somewhat unsurprisingly!
What a pizza oven gives you that a normal cooker can't, is that you can get it really really hot. Because the oven is so well insulated, it is easy to get it up to temeratures much higher than you get in a normal domestic oven.
The oven will also cook your pizza simultaneously in three ways. From the top, the bottom and the side. You get used to how to judge when the oven is ready. This is made a lot easier using a spot thermometer to check.
- From the top - The roof of the oven needs to be really hot - at least 400C-450C (750F - 850F) and because of this the top down heat grills the cheese and all the toppings
- From below - The brick floor needs to be 240C-280C (460F-480F) hot because it cooks and crisps the pizza base.
- From the side - this is the one you have to watch. The fire will radiate heat straight at the pizza from the side, so you need to turn them, as the edge facing the wood fire will burn if you don't.
You need to attend the pizzas. They only about 4-5 minutes to cook and you need to keep a close eye on them to turn them as the edges are crisping up into delicious crusts.
This instructable is not about recipes, so I'll leave you to decide what type of dough you use, sauces, toppings etc. For the dough base, I sometimes use sourdough which has a distinct taste that some people prefer, but is more fiddly and takes longer to prove. You need to have a live sourdough culture going to do this. If I want to make pizza at short notice, then I just make a dough using packet yeast which is much quicker to prove and doesn't need a culture. Occasionally, I use a combination of soughdough with added packet yeast. This gives the interesting sourdough taste, but makes it much quicker to prove and also adds more flavour from the yeast.
Step 18: Cooking in a Wood Fired Oven 3 - High Heat Roasting


A pizza oven is just a wood-fired oven. Because it can be fired up really hot, it is great for roasting things. I have made quite a lot of spicy chicken wings in it. It also makes really excellent roast potatoes and oven chips like nothing you will get out of a freezer packet.
It can also be used as a Tandoor for making tandoori chicken. For this I just use a yoghurt mixed with a tandoori marsala spice mix, that you can get in cheap big packets. I marinate chicken breast pieces in this for an hour or so. To cook, I get the oven super hot, then get a generously oiled oven tray hot in it. Then I just pop the chicken in the tray and get it back in the oven. They don't take much longer than about 5 minutes to start charring nicely. I turn them once to char the other side, then cook a bit longer by giving them a shake occasionally.
Step 19: Cooking in a Wood Fired Oven 5 - Baking Bread and Pies


After you have used the very hot oven for making pizzas or roasting, it stays hot for hours, so you can make use of the heat to bake in it, as it cools.
I have made lots of loaves of bread in it. This is easy. You do need to turn them ocassionally as you get more side heat from the back of the oven (where the fire is) than the front (where the door is).
I also bake pies in the oven. It takes time to judge the right time for baking. If you haven't let the oven fire cool down enough, you can get uneven cooking with too much top heat (great for pizza and roasting, not so good for a pie or loaf).
I've included a few photos of pies and bread with slightly overdone top crusts. These were from my first attempts. It is just about getting used to how your oven cooks. It doesn't take long to get more skilled at judging what temperature readings will tell you about how your oven will cook something. Hand made ovens will all have their own quirks. This is not a mass-produced thermostatically controlled fan oven. It has character and you have to get to know your oven :)
Step 20: Cooking in a Wood Fired Oven 4 - Low-and-Slow Cooking, Smoking


As well as high-heat cooking and general baking, the oven is really really good for slow cooking and not bad at all for smoking. I usually either use pork shoulder joints (pork butt) or brisket, but I have also slow-cooked whole chickens.
This is so easy.
To do slow cooking, I usually pop the meat into a heavy cast iron casserole bathed in a well-flavoured stock. I put them in when the oven is about 140-150C. I put the lid on, close the oven door and just leave them for hours without opening it - usually overnight. They then just sit there cosily cooking. The heat dies down gradually and gently cooks the meat. After about 8 hours the meat just falls apart.
Once cooked for ages, I sometimes smoke them. To do this, I remove the cooked joint onto a solid cast iron griddle pan and cover loosely in foil. I then get a small fire of hardwood going in the oven and position two bricks inside the oven in front of it. I then just put the pan on the bricks so it is sitting quite high in the oven where the smoke gathers.
Then I just close the door and put the cowel on the chimney to restrict the air to the tiny gap between door and oven opening. This chokes the air to the fire and the wood just smoulders away making a lot of lovely smoke. An hour or two of this adds a rich smokey flavour.
Another thing that is easy to do is smoke-cooking a gammon joint. In this case, I use the smoking technique, but with a slightly larger initial fire. This cooks it at about 120C initially then slow cooks it in the smoke. The ham off this is delicious.
Step 21: Cooking Tools


Finally, a note about cooking tools. You don't need many tools to cook with the oven. Most you can buy cheaply. I made two myself:
- Large pizza paddle/slider - You need one of these for pizzas. When putting pizzas in, I use semolina (coarse grainy wheat flour) on the paddle under the pizza. You can then slide it off easily onto the oven floor. You can buy these paddles. They are quite pricy. I made the one shown from a galvanised steel plate with some nice elm I had lying about for the handle. The handle is attached with bolts. Once tightened up, I hammered the nut to turn the bolt into a rivet.
- Rake for the ashes - I made this too, to match the paddle. It is a converted garden rake. The standard rake tines are good for pulling out lumps from the ash when moving the fire about. I added a croupier-style flat scraper blade on the back of head of the rake. It allows you to drag ashes out when cleaning, or push the fire into the oven etc. This is the same galvanised steel and is attached to the rake head using pop rivets (blind rivets)
- Long handled tongs - useful for grabbing the edges of pizzas for turning
- Long handled barbecue spatula - generally useful for getting under things that are cooking to check they are not stuck
- Gun thermometer - highly recommended. This allows you to do spot checks on the internal surfaces of the oven without having to put anything inside the oven (like your arm!). Handy when it is radiating heat at 500C!! It has a little laser point to aim where you want to want to do a temperature check.
- Meat thermometer - the probe allows you to check the internal temperature of slow cooking meat etc.
- Blowtorch - handy if you have a fire going for slow cooking or smoking and want to add more wood fuel and get it burning a bit more. This allows you to give the embers a blast to have enough heat to get the new wood burning.
- Non-plastic plant-bristle brush - useful when cooking to sweep off any ashes fom the floor of the oven before putting pizzas on it. It stops them getting gritty bits on the base. Also useful when cleaning ashes out of the oven. Obviously you can't use any type of plastic brush. The one I have has some sort of plant bristle. You can get these from fireplace stores

First Prize in the
For the Yard


