

Introduction: Super Stuck Two Stroke Cylinder - 47yrs?


I've been attempting to 'Resto-Mod' a 1968 Suzuki T305 for a friend. for about 18months.
When I got it started it had much louder than the 'normal' two stroke rattle and ring, probably worn piston rings or cylinders which means the 'top end' has to come apart for inspection.
The right side was very tight to remove, one cylinder stud was stuck pretty good in the hole in cylinder
The cylinders probably haven't been removed since it was built in 1968.
The odometer reads almost 16,000 miles which many people will feel is very low but anyone with experience of 'high performance' two strokes will know is actually quite high miles for minimal servicing.
The service interval is variable depending on use, high rpm will wear things out much faster than mid range operation.
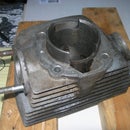
Step 1: The Offending Parts - Explanation With the 'easy' Cylinder


The problem is relatively easy to describe but the solution has been very difficult (and is still 'in progress)
The cylinders have holes through which are a relatively close fit on 8mm studs. As majority will know, aluminium likes to oxidise and form a white 'fluffy' coating. Unfortunately, when there isn't room for it to expand, it grips so tight onto 'stuff' it's almost welded. I kinda documented the steps so far in attempt to remove cylinder from crankcase WITHOUT DAMAGING ANYTHING
The first thing to do was the common, fill with release oil and wait 24 hrs. Well, I waited about 2 months (or more, Chris wasn't in too much of a rush) testing every day or so , not even the slightest movement. After 6 months it was getting ridiculous and frustrating.
Step 2: Measuing and Making - First Attempt


Took some measurements of cylinder and started making a 'core drill'
Had to modify a 7.8mm drill bit to get swarf clearance after hitting full depth, didn't quite work as expected
Step 3: Second Attempt


Drilled hole first, piloted with 3/16" 'aircraft drill then enlarged to final size. I didn't think even a new sharp cutter would work so made a holder for 4-1/2" angle grinder and ground outside to 8.4mm
Step 4: .........Check Your Material


first two core drills wouldn't harden, first I thought it could be decarburisation (?) -where the carbon in steel gets burned out of very thin sections
had to go for a third 'core drill', stainless steel just wasn't going to work instead of drill rod so made one out of an old swing arm bolt (couldn't find my 3/8" drill rod and didn't want to turn down 3/4"
Another failure, the section was so thin it folded in on itself (I only hardened tip as I didn't want to risk 'drill' snapping inside hole)
Step 5: Things Getting Serious


The clearance holes for the tube nuts holding head down are slightly under the tapping size for a 14x1mm tap.
With various parts and pices in the way, a tap handle can't be used but the square end of tap is very slightly larger than 10mm across flats and fits 'just nice' into a 10mm 12 point socket ( 4 sided tap fits into 12 point socket)
Step 6: Hydraulic?


Bolts made, holes tapped, add some grease to get hydraulic pressure down sides of studs. extra thin rule worked for adding grease and removing most of the air bubbles
Step 7: At Last, I'm Winning (maybe?)


Applied a bit of heat from propane torch, melted strap a bit more. Grease 'leaking' from between cylinder base and crankcase top, I know that stud isn't holding anything any longer and cylinder has actually moved about 1/2~1mm
Had to cut some board to fit under front of cylinder/exhaust port to apply more pressure
It's still 'WIP' but at least I know it will come apart without resorting to the final solution of drilling out 3 studs and finding (or making) new ones
So far this is a couple of hours a day for about 2 weeks.
When it's apart, the 'easy bit' Honing cylinders 1/2mm oversize for new pistons. which is next 'Instructable'
Step 8:

Participated in the
Car and Motorcycle Contest


