

Introduction: Target Practice With Arduino and Laser Pointer


So let's say you're an imperial stormtrooper. You're constantly gunning for rebel scum but when you're face-to-face with the enemy you couldn't hit the broadside of an AT-AT with your laser rifle.
Worry no more! In this instructable, we'll be making a target practice circuit with an Arduino, LEDs, and a photoresistor so you can practice your aim with a laser pointer or even a flashlight.
Let's get started!
Step 1: Gather the Materials
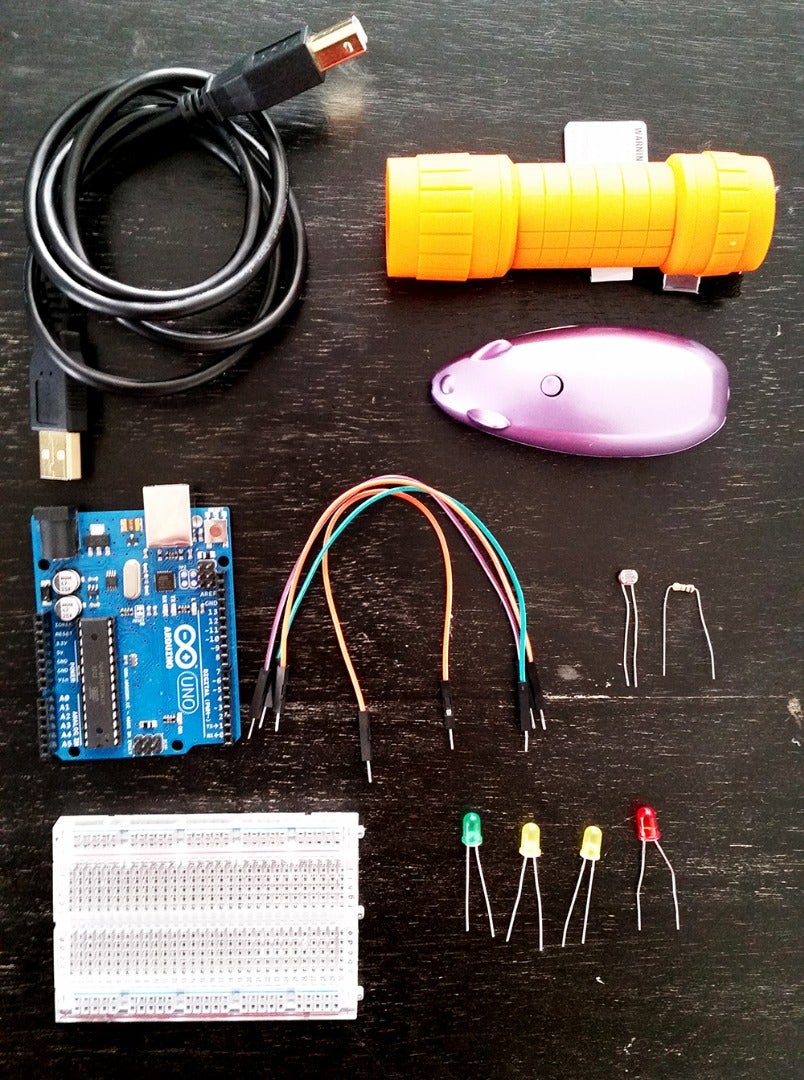
What you'll need to complete the circuit.
Arduino Uno
4 LEDs (Any color, I used: 1 Red, 2 Yellow, & 1 Green)
1 Resistor (10k)
4 Jumper Wires
1 Photoresistor
1 Laser Pointer or Flashlight
1 USB Cable
1 Breadboard
You can get all of these parts and a lot more with the Ardusat Space Kit, available here: http://store.ardusat.com/collections/frontpage/pro...
Step 2:

Follow the wiring diagram to build the circuit.
Step 3: Upload the Code to Your Arduino
The code:
<p>/*<br> * =====================================================================================
 *
 *       Filename:  TargetPractice_photoresistor.ino
 *
 *    Description:  Uses a photoresistor to detect how long it takes a player
 *                  to hit a target with a laser pointer after a countdown.
 *                  http://www.ardusat.com
 *
 *                  This example uses many third-party libraries available from
 *                  Adafruit (https://github.com/adafruit). These libraries are
 *                  mostly under an Apache License, Version 2.0.
 *
 *                  http://www.apache.org/licenses/LICENSE-2.0
 *
 *        Version:  1.0
 *        Created:  2/24/2016
 *       Revision:  none
 *       Compiler:  Arduino
 *
 *         Author:  Chris Hoffman (chris@ardusat.com)
 *   Organization:  Ardusat
 *
 * =====================================================================================
 *</p><p>*-----------------------------------------------------------------------------
 *  Includes
 *-----------------------------------------------------------------------------*/
#include <arduino.h>
#include <wire.h></wire.h></arduino.h></p><p>/*-----------------------------------------------------------------------------
 *  Constant Definitions
 *-----------------------------------------------------------------------------*/</p><p>long top = 38;
boolean win = false;
boolean gameOn = true;
boolean Started = false;
boolean timer = false;
long startTime;
long endTime;
long randomTime;
float elapsedTime;
int ledPin2 = 2;
int ledPin3 = 3;
int ledPin4 = 4;
int ledPin5 = 5;
const int sensorPin = 0;
int lightLevel, high = 0, low = 1023;</p><p>/*
 * ===  FUNCTION  ======================================================================
 *         Name:  setup
 *  Description:  This function runs when the Arduino first turns on/resets. This is
 *                our chance to take care of all one-time configuration tasks to get
 *                the program ready to begin the game.
 * =====================================================================================
 */
void setup(void){
  Serial.begin(9600);
  pinMode(ledPin2,OUTPUT); //red LED
  pinMode(ledPin3,OUTPUT); // yellow LED
  pinMode(ledPin4,OUTPUT); // green LED
  pinMode(ledPin5,OUTPUT); // "go" sign

  Serial.println("All systems go. Watch for the countdown.");

}</p><p>/*
 * ===  FUNCTION  ======================================================================
 *         Name:  loop
 *  Description:  After setup runs, this loop function runs until the Arduino loses
 *                power or resets. We go through and update each of the attached
 *                sensors, write out the updated values in JSON format, then delay
 *                before repeating the loop again.
 * =====================================================================================
 */
void loop(void){

    Serial.print("lightLevel: ");
    Serial.println(lightLevel);</p><p>   lightLevel = analogRead(sensorPin);
   lightLevel = map(lightLevel, 0, 1023, 0, 255);
   lightLevel = constrain(lightLevel, 0, 255);
   manualTune();  // manually change the range from light to dark

  if (gameOn == true){
    digitalWrite(ledPin2,HIGH);
    delay(2000);
    digitalWrite(ledPin2,LOW);
    digitalWrite(ledPin3,HIGH);
    delay(2000);
    digitalWrite(ledPin3,LOW);
    digitalWrite(ledPin4,HIGH);
    delay(2000);
    digitalWrite(ledPin4,LOW);
    Random();
    digitalWrite(ledPin5,HIGH);
    Serial.println("Fire!");
    gameOn = false;
  }

  if (lightLevel >= top){
    win = true;
  }

  if (win == true){
    Stop();
    int i=0;
    while (i <= 9){
      digitalWrite(ledPin2,HIGH);
      digitalWrite(ledPin3,HIGH);
      digitalWrite(ledPin4,HIGH);
      digitalWrite(ledPin5,HIGH);
      delay (200);
      digitalWrite(ledPin2,LOW);
      digitalWrite(ledPin3,LOW);
      digitalWrite(ledPin4,LOW);
      digitalWrite(ledPin5,LOW);
      delay (200);
      i++;
      }

    delay(3000);
    win = false;
    gameOn = true;
  }</p><p>  delay(10);
}</p><p>/*
 * ===  FUNCTION  ======================================================================
 *         Name:  Random
 *  Description:  Delays the time inbetween the initial countdown and detecting the
 *                laser pointer.
 * =====================================================================================
 */</p><p>void Random()
{
  randomTime = random(4,10);
  randomTime = randomTime*1000;
  delay(randomTime);
  Start();
}</p><p>/*
 * ===  FUNCTION  ======================================================================
 *         Name:  Start
 *  Description:  Starts a timer so we can report to the player how quickly they
 *                hit the light sensor with a laser pointer. Calculated in millis.
 * =====================================================================================
 */</p><p>void Start(){
  startTime = millis();
}</p><p>/*
 * ===  FUNCTION  ======================================================================
 *         Name:  Stop
 *  Description:  Stops the timer and reports the player's elapsed time between the
 *                go light and hitting the sensor.
 * =====================================================================================
 */

void Stop(){
  endTime = millis();
  elapsedTime = (endTime - startTime)+5;
  elapsedTime = elapsedTime/1000;
  Serial.println("Direct Hit!");
  Serial.print("Time, Seconds: ");
  Serial.println(elapsedTime);
}</p><p>void manualTune()
{
  lightLevel = map(lightLevel, 0, 1023, 0, 255);
  lightLevel = constrain(lightLevel, 0, 255);
}</p>
Next
Step 4: Play the Game
Plug the Arduino into a power source. The LEDs will light up in sequence. When the last LED turns on, point the laser pointer or flashlight at the photoresistor as quickly as you can. If you connect to the Arduino serial monitor, you'll get a readout of how fast your reaction time was.
Have fun!
photo credit: Trooper... Stormtrooper via photopin(license)

Participated in the
Full Spectrum Laser Contest 2016


