

Introduction: Purposeful Snacking (Pre-K to 10th Grade Math)


So I made waffles for my kids this morning, and suddenly it hit me:
Waffles are the perfect tool for teaching math!
We've often seen math taught with other household items, such as Legos. However, waffles can be used as blocks and units (like Legos), plus SO MUCH MORE.
Did I mention you can eat them!? Mmmm, mmm. (Legos might be a little tough to munch on.)
Waffle it to me, baby!
Step 1: Make Some Waffles!


1. Preheat your waffle maker. Set the maker to the darkest setting.
2. Make your waffle batter as directed in your recipe or on the box.
3. Spray your waffle maker well, and fill the maker with enough batter that it covers every edge (so you get complete squares), but not enough to flood it over the edges.
4. Take out your waffles once they've browned up nicely. Don't necessarily burn them (unless that's what you like), but make sure they're not soggy either. They will hold up better to precise cutting and lots of hand-use if they are crispier.
Now you're ready to play...
Step 2: Blocks, Units, and Place Values


The first way to use waffles for teaching your child math is to turn them into blocks and units.
You can do this different ways, but the most common way (like they use in school) is to separate them into (as seen in first picture):
100 blocks (I would just use the whole square for this even though it's technically only 49 squares--NOT the whole waffle that comes out of the waffle maker, but the whole square once it's been pulled apart into four parts).
10 blocks
1 units (single squares)
OR:You can split some waffles into (see second picture):
1 whole
1 block of 8
1 block of 6
1 block of 4
1 block of 2
1 block of 1
Use this second approach for counting, addition and subtraction, etc.
OPTIONAL: For a "1000 block," you could use the entire waffle as it comes out of the waffler maker and consider it a 1000 block. Just for visual's sake and ease of counting. OR you can be technical and use 10 quarter waffle pieces (10 of the 100 blocks) to make 1000 (but it probably doesn't matter too much because each quarter waffle doesn't have 100 literal squares in it anyways).
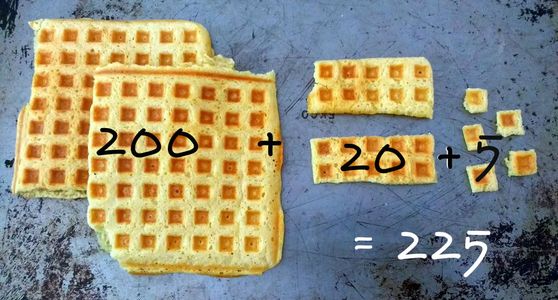
HOW TO USE BLOCKS AND UNITS: Just as you would in school, use blocks and units to count, find place values (as noted below), add and subtract, multiply and divide, etc. As in picture one: 2 "100 blocks" + 2 "10 blocks" + 5 "units" = 225.
HOW TO FIND PLACE VALUES WITH BLOCKS & UNITS: If you are teaching your child place values, an easy approach is by using the blocks and units you just made. For example, in the last picture you can see that there's 2 "100 blocks", 2 "10 blocks", and 5 "units". This number would be written 225. The 5 is in the ones place, the middle 2 is in the tens place, and the beginning 2 is in the hundreds place. Use a big "1000 block" to make bigger numbers and practice higher place values.
You can practice having your child identify the written number from the waffle visual (as aforementioned) OR you can write out numbers and have them make the visuals for it.
Step 3: Exponents


For older kids, use waffle pieces to create exponents.
In the above example, 3 ^ 3 (three to the third power) = 27.
WHAT'S AN EXPONENT, again? (Brushing up on our math skills, lol.) An exponent refers to the number of times a number is multiplied by itself.
The above picture shows how to figure out an exponent in a visual way...
3 ^ 3 = 3 x 3 x 3.
First you multiply 3 x 3 which = 9.
Then you multiply 9 x 3 which = 27 (as shown).
Put in any numbers you want...assuming you made enough waffles ;)
For example: 4 ^ 3 would be 4 x 4 x 4 (the number multiplied by itself as many times as the power says). So you would put four sets of four in the top row. That would be 16 pieces total. Then you would multiply 16 x 4...so make four total rows of 16 each. This will equal 64 total pieces (see the second example). An so on.
*For larger amounts, count each individual square inside each waffle (in each of my waffle quarters, as mentioned previously, there are 49 individual little squares).
Step 4: Fractions (Finding, Adding, Subtracting and Simplifying)


This is a gimme. Waffles are just begging to be made into fractions!
First start out with a whole.
Then cut it in half once. Now you have some halves. Take one of these and you have 1/2.
Cut these in half. Now you have quarters. Take one of these and you have 1/4.
Cut these in half again. Now you have eighths. Take one of these and you have 1/8.
You can cut them into any fractions you can think of. :)
HOW TO ADD (OR SUBTRACT) AND SIMPLIFY YOUR WAFFLE FRACTIONS:
In picture number 5, if you add 1/8 + 3/8 = 4/8 which shows that it's 1/2 (simplified) of the whole.
Or you can reverse it and subtract (see picture 6). You have 4/8 - 2/8 = 2/8 which would then become 1/4 of the whole when simplified.
Step 5: Adding, Subtracting, & Skip Counting


Add, subtract, and skip count with waffles for younger kiddies.
There are many variations of these approaches. See above for some examples, but it's easy enough to come up with whatever you want to teach that day!
Skip count by 2s, 3s, 4s, 5s, or 10s. You can count each individual square inside of the waffle pieces for bigger numbers.
You could also have your child fill up the squares/cups of their whole waffle with toppings to aid in counting, adding, and subtracting. Subtracting could look something like: they fill up all their squares/cups, and then eat part of them to minus that number. ;)
Step 6: Multiplication & Division


Use the squares and/or the blocks and units from Step 1 to multiply and divide with your waffles.
Use them as visual aids for long multiplication (as seen in the first picture), or make multiplication models with the blocks and units such as in the second picture.*
In the second picture, you see that there's six rows that each contain five "10 blocks," and then there's 6 rows that each contain three "1 units." To multiply it, first multiply 6 x 50 which = 300. Then multiply 6 x 3 which = 18. Then add 300 + 18 which = 318 (the answer). *Picture from: http://www.blairturner.com/2013/10/multiplying-mul...
To divide using blocks and units, here's an easy tutorial from YouTube:
**NOTE: Blocks and units aren't necessarily the easiest way to understand for every child. If your child likes it or you feel it's a great way to teach them their multiplication and division first (before they've learned another way), then by all means please enjoy using this approach. If you feel it will confuse your child, then you can forgo this step. Do whatever is best for your child. :)
I'm sure you can also figure out how to use waffles in Algebra for older kids. Maybe to find out what the value of X is? Play around with this idea and let me know what you come up with in the comments below!
Step 7: Shapes, Tangram Puzzles, & Geometry


Whether teaching your younger child basic shapes (square, circle, heart, rectangle), or teaching an older child more complex shapes (rhombus, trapezium, parallelogram, heptagon, nonagon), you can use waffles to help you out (and your child can have a lot of fun doing it in the process)!
1. Identify what characterizes the shape: how many sides, how many points, longer and shorter sides, etc.
2. Identify how to remember the name of the shape (for older children): octagon (octo means "8" or "having 8"), pentagon ("penta" means "5" or "having 5"), etc.
3. Have your child eat away the sides to make each shape, and count the sides and/or points when the shape is complete to make sure they got it right. (This adds a bit of yummy fun!)
USE THESE SHAPES FOR TANGRAM PUZZLES AND GEOMETRY:
Print out some tangram puzzles (as seen in the second to last picture*), or design your own for your child to figure out what shapes make it up. Make this easier or harder dependent upon the age and grade level of your child.
*Picture and more info from:http://losstt-in-math.dm.unipi.it/bp/TangramInMath...
Use the shapes as-is for plane figures (although they're technically three dimensional shapes because they're made from waffles, we can call them "flat" here because we will make 3D shapes that stand up in the next step...) and give each one different amounts so your child can practice figuring out length, width, area, and perimeter. If you need to refresh your memory as to how to find each of these per plane figure, use the cheat sheet in the last picture. (Picture from: http://www.tutorvista.com/content/math/plane-geome...) NOTE: You can give your child (and you, lol) some paper and a pencil to figure out each problem on.
Step 8: 3-D Shapes & Geometry


Lastly, make some 3-D shapes (that stand up)! You can experiment with different approaches for keeping them together (such as toothpicks, "glue" made from frosting or peanut butter, etc) or just hold them together with your fingers and then devour them! ;)
Using these 3-D shapes, you can continue practicing more geometry. Help your child find volume and surface area of the 3-D shapes by using the cheat sheet above (last picture) and assigning different values to your child's waffle-made shapes for them to practice. Picture from: http://www.math-salamanders.com/geometry-cheat-she...NOTE: Once again, you can give your child some paper and a pencil to figure out each problem on.
Step 9: Clean Up Time!


When mathtime is over, be sure to have your kiddies make some awesome buildings, castles, cars, trucks, planes, animals, or whatever other things they can make up!
After all the playing (and learning!) is done--if there's any waffles left at this point--be sure to clean up your mess...CHOW DOWN! Nom, nom, nom. :D
Let me know if these ideas helped make learning more fun and interesting for you and/or your child.
Also, let me know below what other ways you find to use waffles for teaching math!

Participated in the
Home Hacks Challenge

Participated in the
Snacks Contest 2016


