

Introduction: Temperature Controlled Hot Compost Bin


I built my own temperature controlled hot compost bin. I use an Arduino to modulate an aquarium aerator which forces cool air up through the compost media to maintain optimum temperatures. I hope to later try to measure the heat output (watts) of the 150 L composter. This writeup documents the build and results.
Step 1: Composting Introduction
Composting is a natural process. It starts with inputs of organic matter containing energy sources in the form of fats, carbohydrates, proteins, cellulose, lignin in wood etc. Bacteria, fungi and insects metabolise this energy source to fuel their own reproduction. They release heat as a by-product. Eventually the energy of the organic matter is used up, the populations die back and the result is a soup of simpler molecules that are bioavailable for plants.

In environments with oxygen, aerobic bacteria thrive and the product of the metabolic processes are heat, carbon dioxide and humus.
I think it’s worth mentioning that nutrients such as potassium, calcium, magnesium, phosphorus etc don’t get created or destroyed. They are present in the initial organic matter that is put into the composter and the same quantities are present towards the end.
Nitrogen is one exception, some bacteria can turn atmospheric nitrogen into a form that is available for absorption by plant roots (this "fixation" requires a lot of energy). I don’t think these types of bacteria are present in a compost heap though. The nitrogen cycle illustrates the various ways nitrogen can go in and out of ecosystems.

Anyway, the composting process is not creating nutrients but rather unlocking them so that they can be easily absorbed by plants. There are nutrients in a broccoli stalk but the roots of a plant can’t absorb any of them until this composting process has had at it.
There are many types of bacteria and they thrive in different temperature ranges. Thermophilic bacteria are the dominant ones in hot composting and thrive at 50-75 degrees.
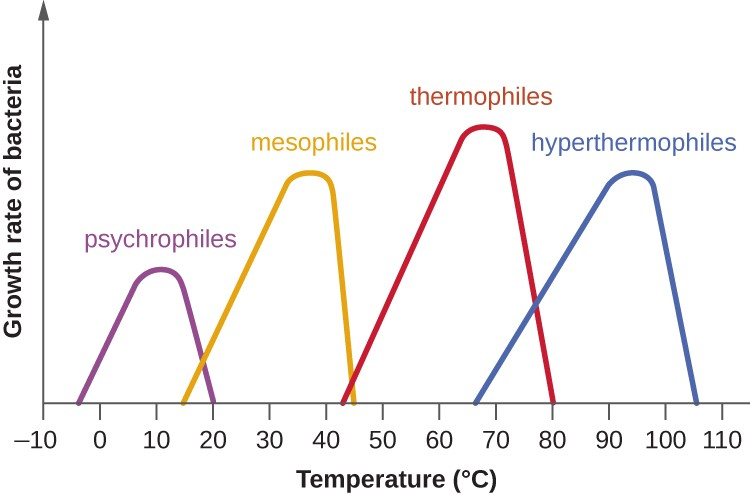
The metabolic activity of thermophilic bacteria peaks at about 60-70 degrees and tails off rapidly beyond this. If the compost gets too hot the metabolic rate decreases until an equilibrium is reached. By cooling the compost to keep it within an optimum temperature range you are able to compost faster.
Step 2: Construction


I built a thoroughly insulated composting bin. I used a 150L plastic oil drum as the container mounted within a wooden frame with 50mm thick polystyrene panels and copious amounts of spray foam to fill all gaps.
I then added feather board around the outside to hold everything in and make it look a bit better.
Theoretically a 70x70x100cm box with 5cm expanded polystyrene insulation (0.035W/m∙K) at 40C above ambient loses 100W of heat. These are the dimensions of the unit however the insulation is a fair bit thicker in areas so I think 100W sets an upper bound hopefully.
Step 3: Aeration


I used a perforated false floor and air pump to aerate from below. The idea was the air would perforate up through the compost cooling and oxygenating it.
I didn't know how much heat to anticipate or what sort of airflow I'd need. The airflow had to be adjustable with the max flow able to keep the compost from rising above 65C even at its peak composting rate. I tried to google watts/m^3 produced by aerobic composting but struggled to find a good answer.
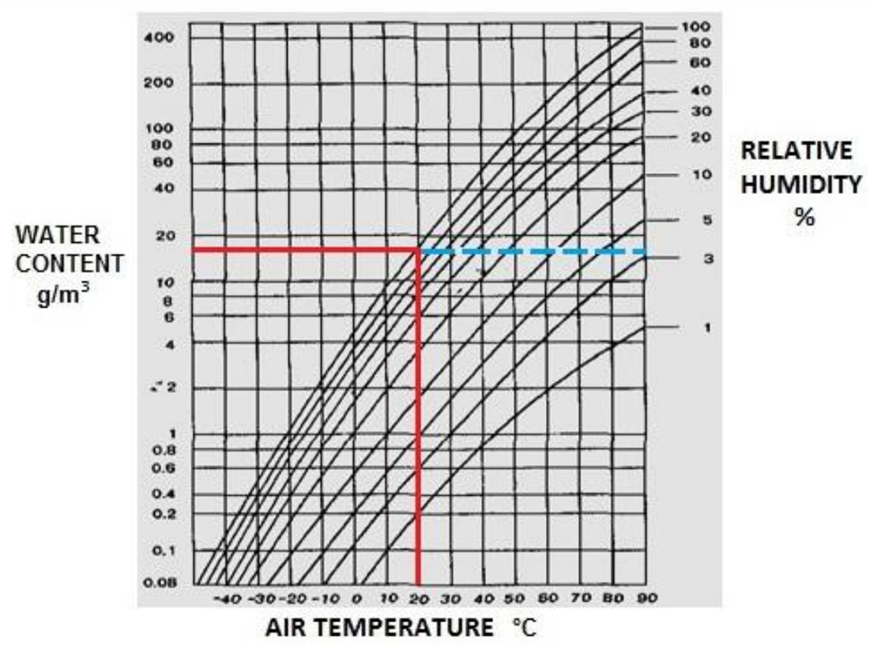
I decided to utilise a Koi pond aerator for the air flow. This was advertised as pumping 90L/minute (at no head pressure). I calculated that 60 L/minute of air flow going from 20C@50% humidity to 60C@100% removes about 350 Watts of heat (50 W from heating the air up, 300 W from the evaporation of 500ml of water per hour). This sounded good enough.
I figured I could turn the pump on and off depending on the temperatures in the heap. I silicone sealed a thermistor in the tip of a crimped aluminium tube. I used an Arduino to read the temperature and switch on/off the air pump via a solid state relay.
Step 4: Ventilation

The hot moist air needs an exit route out of the container. I didn’t want this air just escaping around the rim of the lid because the air would cool, condense, soak and rot the wooden frame.
To address this issue I built in a 32mm vent pipe and mounted a small computer fan externally to suck air from the unit. The idea being this would pull a slight negative pressure inside and any cracks around the lid would leak fresh air into the unit and that’d be sucked out the 32mm vent pipe along with the rest of the moisture.
This idea worked for about 24 hours before the fan stopped working. I did an autopsy and found the hot moist CO2 rich air had completely corroded the fan motor and electronics…
So I tried a second iteration with the fan motor to the side of the pipe as pictured. I 3D printed the mount. This is working so far but as to its longevity I'm not sure. The fan blows air over the hottest part of the piping too which helps cool and condense the moisture of the exhaust air. The condensate drips out the bottom which I collect. This is distilled water.
Step 5: Software

An Arduino runs some simple software. Every 10 minutes the air pump is switched on for 30 seconds regardless of the temperature. This ensures there is plenty of oxygen. If the temperature is above a setpoint of 60 Celsius then the pump will remain on for longer. If the temperature reaches 65 Celsius then the pump stays on permanently. It’s very simple. The code is on GitHub.
Step 6: Measuring Heat Output
I've wondered how to measure the heat output of the composter. One way I have thought of is to fill the unit with inert material but similar in thermal conductivity and moisture content to active compost. I could then embed an electrical heating wire in the media and heat it up artificially. I could then measure the required power to maintain 60C. I think I'll try this once this batch of compost has matured.
In the meantime I'll measure the 24 hour distilled water production. 1kg of condensate equates to 628 Wh of heat. I will update this write-up with any results.

Second Prize in the
Home and Garden Contest


