

Introduction: Tools and Materials for 3D Scanning


The skills we are going to be learning in this class are mostly about technique and software understanding, not fancy equipment or supplies, but you will need a few basic things to get started. A lot of the tools on this list are optional because if you know what you're doing, you can get some pretty good 3D captures with a minimum of equipment. But in certain situations having some nicer gear will go a long way.
- Camera (anything from a phone camera to a fancy DSLR): Free-$800
- Tripod or monopod: $15-$100
- Chalk spray paint for shiny objects (optional): $15
- Lazy Susan or motorized photography turntable (optional): $50-$170 depending on weight of object
- White or black seamless photography shooting backdrop, paper roll or cloth (optional): $10-$75
- Diffused clip lights (optional): $20-$100
- Autodesk ReCap Photo (or another 3D capture program): ReCap Photo is part of ReCap Pro which is free for 30 days, $40/month for a subscription, or free for students or educators
- Autodesk Fusion 360 (optional): free forever for hobbyists, startups, students or educators
- Access to a computer with Windows 7, Mac OS X 10.9 or later and at least 12GB of RAM
- A three button mouse with a scroll wheel: $10-$30
- Access to a 3D printer or printing service (if you want to print your 3D model)
- Access to a Laser Cutter (if you want to create a 3D version of your model with Slicer for Fusion)
- Something to scan (preferably a medium sized, stationary matte object with some surface detail, we'll talk more about this soon)
Step 1: Choosing a Camera for Photogrammetry

In this class we will be using a 3D Scanning method called photogrammetry. This method uses photos taken from multiple angles to reconstruct a 3D model of an object with both geometric and visual features. In order to perform this kind of 3D reality capture, you will need a camera.
If you have a phone with a good camera, it should be a perfectly adequate tool for shooting the photos you will need. However, if you do have access to a fancier DSLR camera, or want to spend some extra money, a higher quality camera will generally give you better results, especially if you know how to use one.
A high megapixel DSLR camera with a 35mm lens, and manual and automatic capabilities will give you the best options for capturing very good photos for photogrammetry, but a point and shoot with some manual features will work pretty well too. It's really just up to you to choose a camera you feel comfortable with.
Before you go spending money on an expensive camera, I would suggest trying the camera you have, and seeing what sort of scans you get after following the shooting strategies I recommend in the next few lessons. If you still aren't happy with the results, you might need to upgrade. For more tips on choosing cameras and understanding how to control their basic functions, you can check out audreyobscura's awesome Photography Class.
Step 2: 3D Capture Set-Ups

Accurately capturing an object with photogrammetry depends partially on how you set up your object in relation to your camera and the environment.
The two basic scanning strategies are:
Moving your camera around an object

Leaving your camera stationary while rotating the object

I usually prefer the second method, because it gives you more control over your lighting and let's you take really consistent photos. But either method can work well depending on how well you set up and use your camera, so I'll be showing you how to do both in this class.
To shoot around an object, the minimum amount of equipment you'll need is a camera and an evenly lit space to shoot where nothing is moving in the background. However, having a tripod or monopod for your camera will really help you get clear, consistent shots, especially if the lighting conditions aren't great. I would highly recommend investing in a tripod, and you won't need anything special or expensive.
The right kind of lighting is crucial to photogrammetry, so If you can't find even natural lighting, you'll need to have a few diffused portable lights. You can buy more pricey versions of these lights or you can create a relatively cheap DIY version using clip lights and shower caps by following the project in this lesson of audreyobscura's great Photography Class.

Elevating the object you are scanning on a pedestal or stool will help make it easier to walk around, and also isolate it from it's environment in a way that can create a cleaner 3D model.
In addition to this, you may need a way to fixture some objects in a specific position to capture as much of them as possible in your scan. For example, to scan this artichoke, I created a simple fixture by pounding a nail through a square of plywood and sticking the stem of the artichoke on the nail, and when I was using the rotating object method, I attached a stiff wire spike to my lazy susan to hold small objects.


To shoot a rotating object, you need slightly more equipment. First of all, you will need some kind of manual rotating turntable or lazy susan to place your object on. Depending on how large or heavy your object is, you will need a different sized turntable. You could also make your own fairly easily by following this Instructable by the awesome tomatoskins.

When you are shooting a rotating object, you need the background to be as featureless as possible (I'll explain the reason for this later) so you will need to shoot against a seamless backdrop, a sweep, or inside a shooting tent. Black backdrops tend to work best unless your object is especially dark.

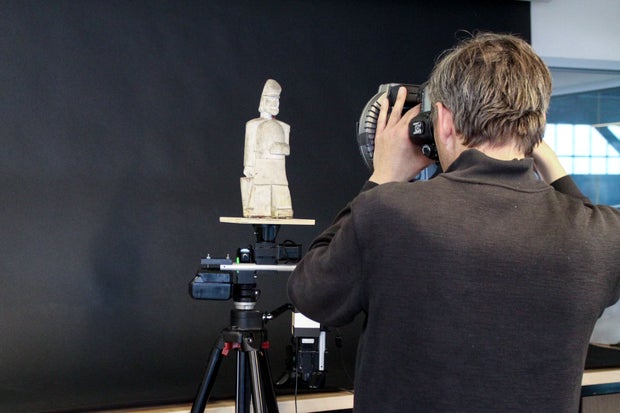
For this method you absolutely need a tripod to hold your camera in one place and some kind of lighting set up like the one described above. Another good lighting option for this type of shooting is a ring light that goes around your camera lens.
If you are really ambitious, you can try creating some kind of automated rotating capture rig like this one by Downunder35mm.
Step 3: Software Options

There are a lot of software options on the market that will turn your photos into 3D models, but the Photogrammetry software I'm going to be teaching in this class is called ReCap Photo (formerly Remake). In the interest of full disclosure, ReCap Photo is an Autodesk product, and Instructables is an Autodesk company, so my choice of software might seem like a biased choice, but I still think it's a good choice.
The technology of photogrammetric reconstruction is relatively new, and still evolving. Autodesk has been exploring this realm for quite a few years now and ReCap Photo incorporates what they've learned from several other software platforms including 123D Catch, Memento, and ReMake.
ReCap does not just reconstruct it is also and end-to-end product that allows you to edit your meshes, perform simple sculpting and export for all kinds of applications. I also think the ReCap interface is simple and user friendly especially for someone just starting out with 3D modeling.
ReCap Photo gives you the option to processes your photos on the cloud, which means you don't have to have a super powerful computer and lots of extra hard drive space to create 3D models, and 3D files are returned to you quickly.

You can try a 30 day trial of ReCap Pro with ReCap Photo for free, which gives you the ability to upload unlimited photos and create as many models as you want in that time. After that you can choose to purchase a pro version for $40/month or $300/year. ReCap Pro is free for 3 years for educators and students though! And the definition of student and educator is fairly broad here, so if you can, try to register for an education license.
The one downside is that ReCap Pro is only available for Windows. But there are ways around this if you are a Mac user like me. You can install Windows on your Mac using Bootcamp so you start your computer with either a Mac or PC interface, or use Parallels to run both systems simultaneously. You can also subscribe to Frame for $10/month which will give you a virtual cloud based Windows desktop.
If you are already familiar with another software platform, or have free access to something other than ReCap Photo, feel free to use what you are comfortable with. Most of the photo capture techniques, workflows and 3D modeling concepts I'll be covering in this class will probably translate fairly well to another program even if the specifics are slightly different.
Step 4: Coming Up Next...
In the next lesson we'll get you ready for 3D scanning using photogrammetry by learning a bit about how it works and what it can be used for. Then I'll show you how to download and set up ReCap Photo, and give you a brief orientation to the program.


