

Introduction: Tube Sound Light Converter


Ever since I started tinkering in 3rd, 4th grade, I was drawn to "sound modules" or lights blinking to the rhythm of the music. Over the years I made several versions, this is the Steampunk edition.
Features:
Integrated amplifier with speakers, 12V sound module with LED strip. 3.5mm stereo plug to connect with your phone, tablet or computer.
Amplifier can be turned off in order to work as plain lamp
Tools used:
Drill (press) and drill bits
Hole saw
Emerald paper (assorted graduations)
Screwdrivers
Rotary tool
Soldering iron + electronic solder
Hack saw and pipe cutter
Epoxy, hot glue and tape
Jig- and/or Miter saw
Wrenches
Materials used:
8 pcs. 1/4" - 20 1 1/4" hex bolts
8 pcs. 3/8" bushing I.D. 1/4" (to keep flange 'floating')
4 pcs. 3/4" NPT to 1/2" sweat copper adapter (2 of them drilled out with 5/8" drill to allow sliding through of the copper pipe)
2 pcs 1/2" 90° copper street ell
2' 1/2" copper pipe (cut off 2 ~8" pieces)
Fine wire mesh to cover the speakers
Assorted color coded cable
1/2" x 8"x8" plywood as base (stained and clear coated)
3" x 2" Sch 40 PVC Reducer Bushing Flush Style
2 1/4" x 12" clear acrylic tube
3" x 2' PVC pipe cut to 10"
1 set of old computer speakers (with amplifier) preferably 12V or you can order
15W+15W Audio Power Amplifier + speakers + 12V 2A power adapter
1 (rotary) switch (hardware store)
3.5 mm audio plug with cable to hook up your phone etc. to the amplifier like from (I had one from the computer speakers)
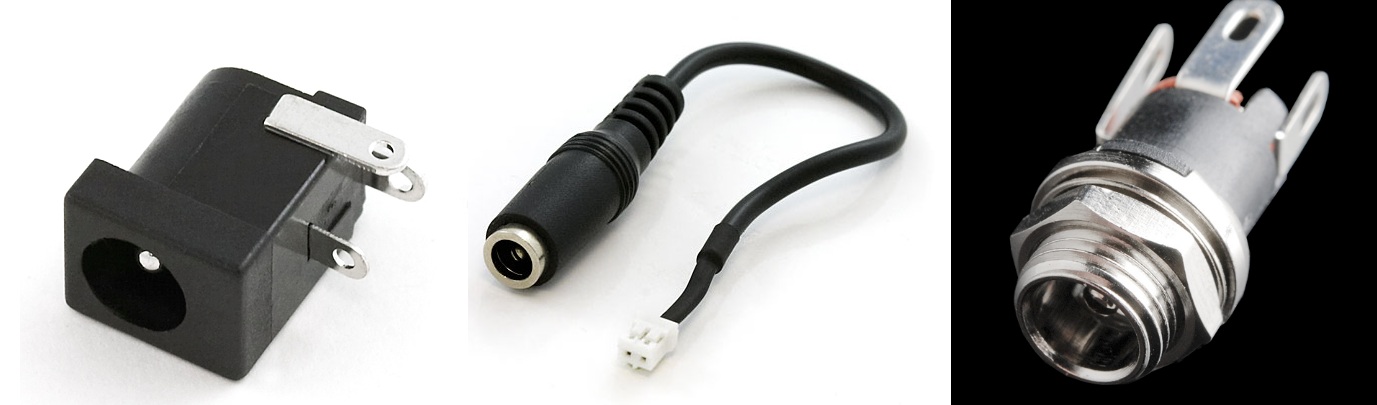
Miniature Power Jack matching your 12V Power adapter
RGB LED Strip Lights Sync to Music 16.4Ft/5M Waterproof Flexible
I am sure you can come up with alternatives should you not find the exact parts I used.
Please follow all the safety instructions, work in a well ventilated room or outdoors when spray painting, wear safety goggles when drilling, cutting or banging around and don't blame me when pinching a finger; in other words be careful and happy tinkering!
Helpful:
A good friend who is willing to lend a hand and has all the tools you need to borrow. Gallons of coffee, tea or your preferred stimulant to keep going and a glass of wine or beer or your preferred relaxant to think things over....
Step 1: Step 1: Gather All the Necessary Parts


To help you with assembling the parts refer to the visualisation made in SketchUp and the electrical diagram in the next step.
Drill 2 3/4" holes at the same height and exactly opposite of each other in the flange to accept the 2 of the 3/4" NPT to 1/2" sweat adapters.
Center the flange on the baseboard, mark the holes for the bolts. Drill the holes according to the marks with a 7 /32" drill. A 1/4"-20 tap is helpful to prepare the holes to accept the hex bolts. Mount the 3" flange with help of the bushings and hex bolts. 3 should be enough for now. Push the acrylic tube through the 3" to 2" reducer and insert it in the flange.
You should have drilled a 2 1/4" hole with the hole saw exact in the middle of the top pipe for the acrylic tube along with 2 screw holes to insert screws which prevent the tube from sliding further in. In the picture you can see also the openings for the amplifier (volume, audio in, headphones out) - Might be different in your case depending what you have on hand. I hope you figured out now how to mount you speakers at the end of the 3" pipe. Mine fit exactly inside the 3" tube and I used a cut off ring to prevent the speakers from sliding in further. Cut 2 pieces of wire mesh approximately 3 3/4" in diameter just fitting over the end of the tube. Now cut off 2 1/2" wide rings from the 3" PVC connector which will fit nicely over the ends holding down the wire mesh.
Insert street ells in the 1/2" sweat adapter at the bottom and the flange along with a 8" piece of 1/2" copper pipe. Measure the distance from the acrylic tube and add 1/2 the width of the copper pipe (5/16") That's the distance you have to drill 2 more holes for the 2nd set of 3/4" NPT to 1/2" sweat adapters. These need to be drilled out with a 5/8" drill to remove the stop inside which helps sliding in the copper pipe. Are you still with me?
Step 2: Electrical Parts


The mechanical parts hopefully fit together nicely.
Now on to the electrical and electronic parts! What you need are an amplifier with speakers that fit inside the 3" pipe, the sound module with microphone which needs to go in the top tube too, the 12V miniature power jack to go in the bottom to power everything. I used the handle of an old valve connected to a rotary switch to turn the whole contraption on or off and of course you have the LED light strip already wound around and taped to the bottom of the acrylic tube. There are instructables and videos how to solder on an extension to the LED-strip. A look at the wiring diagram should help you to hook everything up. Keep in mind that all the connecting wires need to be routed through the 1/2" copper tubes. Miniature plugs will help to connect the parts in the right order.
Turn on and try everything out before the final assembly! Is the amplifier working properly? Is the sound module picking up the music and is the LED strip flashing to the rhythm? Is the remote triggering the sound module?
If everything is working, continue....
Step 3: Spray Painting


Are all the holes you need drilled? Have you checked that all the parts fit together nicely?
Get the spray paint you want to use on your project. Read the warning labels and follow them. Read up on spray painting if you have no or little experience.
I recommend to start with black "All-Purpose Bonding Primer" I followed up with light coatings of Copper metallic and finished with hammered metal to achieve the effect I envisioned.
Final touch was distressing the Tube-Sound-Light-Converter with silver Rub'n Buff. Make sure you have only a miniscule amount on your finger or brush, you always can give it another go.
Step 4: Final Assembly


Is everything working, is the paint-job to your satisfaction?
Place the amplifier and the sound module in the top tube; connect the the speakers to the amplifier. The IR-receiver needs to poke out of the top tube and face the front. 12V connection and extension of the LED-strip are running from the base through one of the copper tubes up to the top module. The acrylic tube needs to be attached to the top tube. It's not very sophisticated but i wiggled the copper tubes in the sweat connectors at the top and bottom and everything fell in place. *wink wink*
So this is a description how I did it and I hope it acts as an inspiration for you tinkerers out there to make an 'Tube-Sound-Light-Converter" or something completely different! I'm looking forward to read your comments or answer your questions!


