

Introduction: Turn a Chest of Drawers Into a Deluxe Bird Cage


This was made to house my 4 budgies (parakeets). Picked this up from facebook market place for $20. This is a bigger challenge than the China Cabinet conversion because there are no doors. Doors needed to be fabricated from scratch.
Supplies
Materials
1 used chest of drawer or dresser drawer (I think the one I was working with was from Ikea). From this point I will just call it a dresser.
2-3 rolls of ½” spacing chicken wire / 19 gauge steel mesh / screen / hardware clothe
20 feet door trim lumber
10 feet ¼”x2” lumber.
10-16 feet scrap ½” x 1” lumber (the cheaper the better)
Assorted screws, nails, wood glue, paint
Heavy duty staples
4 small cabinet door hinges
4 strong magnets
Epoxy
Tools
Router and router bit.
Drill and drill bits
Miter saw or saw and miter box
Heavy duty staple/nail gun
Heat gun
Wire cutters (heavy duty)
Screwdriver
Hammer
Thick leather gloves (the chicken wire is sharp)
Dust mask, safety glasses, ear plugs.
Step 1: Prep the Dresser

Remove the drawers. Remove the metal rails that the drawers slide on. KEEP the bottom rails. KEEP one drawer for the bedding.
Prior to cutting out the large holes on the side of the cabinet, look inside for metal hardware that could possible snag the router bit. Remove them or if it part of the structure, plan your design to avoid them.
Take the scrap lumber and nail them to the outside walls of the dresser where you plan on making the hole. The scrap lumber will be your router guide. If you have the skill to make curves and intricate patterns for the router to follow, then do so. I don’t, so I just cut out rectangular holes. Make sure that the hole you cut does not go below the height of the bottom drawer.
I also cut holes on the top of the drawer since the top is below eye level.
Step 2: Make Huge Holes in the Dresser.


Put on your safety glasses, dust mask and ear plugs.
I don’t have pictures of me doing this to the dresser. But the process is the same as my china cabinet project, so I used those pictures.
Get out the wood router and install an appropriate bit. I used a half inch straight flute router bit. I set my initial depth to ¼” and used the scrap wood nailed to the cabinet as my guide.
Once I went all the way around I increased my cutter depth another ¼” and went around again. I repeated this until I got all the way through. I did the same to the other side and the top.
If you look at the third picture I made notes. Pay attention to what I did for my starting point.
Step 3: Cut Chicken Wire to Size and Attach to Dresser.


I’m sorry, I forgot to take a picture of this step. But I took some closeup pictures of the end product.
Use the wire cutters to cut the chicken wire to the correct size to cover the hole you just made.
For my project I found that adding 1 inch to the width and 1 inch to the height of the holes I am trying to cover is just right. Since the chicken wire size is ½ inch, that means that I have 1 full square past the hole on all sides. Use the staple gun to secure the chicken wire to the cabinet.
The chicken wire edges could be sharp and could hurt your birds. For this project I got some jewelers files and some sand paper. I filed and sanded the edges smooth to keep the budgies safe.
Step 4: Added Wood to Cover the Gap Between the Drawer and the Inside Walls.


We keep the bottom drawer to hold the bedding. However, there is always a gap between the drawer walls and the inside wall of the dresser. This gap is to make room for the drawer rails. This gap would be very dangerous for the birds. They could fall in, get trapped and get crushed.
Fortunately the solution is simple.
Take the ½” by 2” lumber and cut to length so that we can nail them to the top edge of the drawers. This lumber will cover up the gap. Use finishing nails and wood glue to attach to the top of the drawer. Test drawer movement to make sure it does not bind.
Step 5: Make Doors


The dresser I got had a wooden bar between the second and third drawer. At the midpoint of this bar, I epoxy two neodymium magnets about 1 inch apart. I covered the magnets with tape so that the birds don’t pick at the epoxy and ingest it.
I measured the front opening width and height, added a couple inches to the width for the hinges and a couple of inches for the height. I split the width measurements in half since I will be making two doors. Remember to account for the width of the lumber you are using when making your doors.
I got out the miter saw and cut a door frame trim lumber at 45 degree angles and glued and stapled a door frame. It was very flimsy, but I was not worried about it. I stapled the chicken wire to each door and the chicken wire added strength and structure to the doors. I put the hinges on and attached the doors to the dresser. I mark the doors where the magnets touch and attached the corresponding magnets with epoxy above the mark. Make sure polarity is correct. No need for a latch, the magnets are strong enough to keep the birds in.
Step 6: Paint and Finish


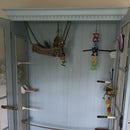
This part is optional but I think the birds will appreciate bright colors. After the paint dries, add hooks and hardware for the birds’ perches, nest, food, toys, etc.
Surprisingly, the budgies seem to like the dresser drawer bird cage more than the china cabinet bird cage right now. It changes month to month where they like to hang out.
Pictured is the animal room. The birds and dog hang out in this room. The door to this room is open all day and only closed at night so that the birds can get a good night sleep. Their cages are left open during the day and they are free to leave the room and fly around the house if they want. But the budgies have roosted in this room and don’t leave. We only close the cage door when they go to sleep at night. They put themselves to bed.
When I work from home, I work in this room to hang out with them. Human residents of our home take naps in this room (that's why there is a pillow on the floor).
Enjoy.

Participated in the
Modify It Speed Challenge


