

Introduction: Baby Touch and Sight Sensory Board


A sensory board (a.k.a a busy board) is an object that allows babies and toddlers to explore textures, colors and lights all in one place. The board is meant to let them feel contrasting sensations like; rough and smooth, soft and hard, dark and light. This project will use found items from grocery stores, websites and discount stores to provide children these contrasting stimulus.
Emphasis of this project is the SAFETY of the babies. The following criteria need to be met:
- Found objects are brand new
- Devoid of sharp edges
- Secured properly
- Does not have small choking hazard pieces
- Not have items that can entangle or pinch
- Are not blindingly bright
- The board must be securely fastened to the wall using appropriate fasteners.
Since this is an interactive learning tool for babies, interaction with the board MUST BE SUPERVISED. A baby should NEVER be left alone unless he/she is sleeping. So this is an activity done together with baby and his/her caregiver. Even though all items are properly secured, the caregiver must diligently watch baby to make sure baby does not rip an item off the board and harm themselves.
*** Note: I am entering this into a CNC contest. CNC portion of the instructable is in step 5, 6 and 7. Thanks.
Supplies
Parts:
Black ABS sheet 1/8 inch thick, minimum 24 inches square
ABS sheet, 1/8 inch think, about 18 inches square (any color)
#8-32 x 3/4 inch machine screws - about 20 of them
#8-32 nylon lock nuts - about 20 of them
High temperature hot glue
Wall anchor and screws for mounting the Sensory board to the wall
Colored films (for reducing the brightness of tap lights)
Suggested stimuli:
Can be found at grocery stores, Amazon, dollar discount stores.
Baby bath mittens
Silicon dish scrubber
microfiber car wash mittens
LED tap ligths
Wall doorknob shields
EVA traction pads (used on skim boards and paddle boards)
Exfoliating glove
Painted wood shapes from hobby/craft store (I went with two dinosaurs)
Tools:
CNC Machine or Laser cutter
Deburring tool
Drill
Screwdriver
High temperature hot glue gun
Scissors
Nail file
Colored Sharpies
Sand paper (300 grit and 600 grit)
Step 1: Gather the Items


Go to grocery store, big box store, dollar discount store, craft and hobby store, Amazon and find items with interesting textures and colors.
When choosing items keep Baby's Safety in mind. That means item must be new, strong, no sharp edges, no pointy corners, no parts that can come loose and get swallowed, no parts that are long and can entangle and strangle Baby, no parts that can pinch Baby or trap fingers.
SAFETY, SAFETY, SAFETY.
See pictures of items I collected for the sensory board.
Step 2: Attach Easy Items


Arrange items that are easy to attach to the board and put them on. The items I have that are easy are the painted wooden shapes, the EVA traction pads which I have cut into shapes, the wall door knob protectors and what ever other flat items you have acquired for this project.
Use you hot glue gun on the highest temperature setting with the quality high temperature hot glue sticks for items that do not come with adhesive backing.
Step 3: Dim the Bright Lights


The tap lights I purchased at my local dollar discount store where advertised to be 80 lumens bright. This level is too bright for little Baby's eyes and could be harmful.
To resolve this, I took 300 grit sandpaper and sanded the clear lenses until they were evenly frosted. I then took colored Sharpies and colored over the lenses until they were dim enough to look at directly.
For the LED light with the dimmer knob, I took the light apart and inserted Lee Gel Filters (one deep red, one deep blue). This not only dimmed the light but also gave the light a pleasant color that blends into a pink shade.
Now Baby's eyes are safe.
The lights came with 3M adhesive backing that stuck securely to the plastic board.
Step 4: Glue the Soft Shapes


Use scissors to cut the back away from the mitten type fabrics that we have. Then use hot glue at the highest setting to glue them to the board. To get the best adhesion, glue a small section of the material at a time. Don't apply the hot glue to the whole item then slap it onto the board. There is a chance the glue will cool and not adhere strongly to the backboard that way. Instead, roll the fabric back and glue 1 inch strips, and give a good firm press to make the glue stick really well. Then move on to the next inch. Repeat until the whole piece is attached. make sure to tuck in the corners and hide the seams.
Careful not to burn yourself (too much).
Step 5: Let Us Use the CNC Machine


The silicon scrubber pad and the exfoliating glove does not work well with any type of glue. The only way to really secure them to the board is by mechanical means.
I thought the best way then was to "frame" these pieces. I looks for suitable wood frames at the craft store but they were either too large or too fragile. So instead I machined frames out of the same tough ABS plastic the board is made of.
I launched the CAD software, drew up a real quick frame with rounded corners, generated the G-Code and started cutting away. A laser cutter or a water jet cutter would have worked too.
I used a sheet of paper to set my cutter depth since cutting the frame does not require too much precision. As you can see from the picture, i normally cut more complex designs on the CNC, so a rectangular frame is really quick work.
Attachments

Step 6: Round the Edges to Protect Baby's Fingers


When a part is CNC machined, the part usually comes of the machine with razor sharp edges.
This is not good for Baby.
What I use to get rid of these sharp edges is a deburring tool. I actually ran the deburring tool more times than normal and really round out the edges.
After the deburring, I made the edges even softer and gentler by sanding with 600 grit sand paper.
Step 7: Attached the CNC Frames With Screws


Use the machine screws to sandwich the silicon scrubbers and the exfoliating glove between the frame and the backboard. Then use nylon lock nuts on the back so that the nut does not work its way loose. Tighten so that the items cannot be pried out.
Step 8: Enjoy With Baby

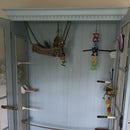
Secure the board to the wall and enjoy with Baby.
This is supervised exploration or texture, colors and lights. Do NOT let baby play with the board unattended. Baby should never be left unattended unless he/she is asleep.
Since this board went into a state license daycare facility, I cannot share photo's of this board being used at that facility. This is a state law I am complying to. This is both for the privacy of the families in that center as well as for the security of that daycare. I took pictures of the sensory board at my house before I donated it to the daycare center. Once they installed it, I can no longer take pictures of it.
I can happily say all the babies love the board. Teachers says they can play with the textures all day too.
ENJOY.

Participated in the
CNC Contest


