

Introduction: Underwater Camera Housing on a Budget.


For some reason, I decided I wanted to be able to take pictures underwater. I looked at waterproof housings and was discouraged by the prices. So I decided to build my own.
Step 1: Materials/Tools

A "T" intersection of 4" PVC pipe
An inset cap
Some plexiglass
A pair of rubber gloves
A Hose clamp
An old "mini jug" water bottle
and some silicone adhesive/sealant.
I tried super-glue and some marine sealant, but neither performed as well as I'd hoped. There was a lot of head scratching and going "now what?" on this project.
Tools
I didn't have a lot to work with.
I had a belt sander, a dremel tool (borrowed), a pair of scissors, my old bench grinder, and a pocket knife.
(sad, I know)
Step 2: Some Assembly Required


I started by shaping the front lens. I traced one end of the T onto the plexiglass and cut out a square as close to the edges of the circle as I could get. I then used the belt sander in a very unsafe manner and rounded off the corners until I had a circular disc of plastic. I also slightly beveled the edges as well as I could with the sander.
The next step was to cut a hole in the back of the "T", opposite the "nose" or "stem of the "T". I didn't do a very good job at first. (I drilled a bunch of holes close together and cut through them with an old coping saw.) I discovered that a dremel tool with a coarse sanding drum on it will go through PVC with no problem.
Now that I had a hole in the back, I could put one hand through to help with the installment of the front lens.
I peeled off the protective film, applied a ring or clear silicone to the PVC and to the plexiglass, and stuck it on! It worked!
I then applied a liberal amount to the outside of the joint as well. Once that was dry, I added a few more layers.
Step 3: Rear Window


So I enlarged the rear window using the dremel tool, and tried a few different materials for the window itself. I ended up cutting up a perfectly good water bottle. It was one of those little jugs that resemble a miniature office water cooler jug.
I cut a rectangular panel out of it, slapped it over the new and improved rear opening, and slathered on the silicone.
With the "optics" taken care of, I then cut a strip off of the wrist of the LEFT rubber glove and glued it rubber side up around the RIGHT side opening of the "T". This is basically a gasket. I also applied a layer of the ubiquitous silicone to help it seal.
Step 4: Does It Leak?


Next I glued and sealed the cap onto the LEFT side opening of the "T". So this just leaves the right side open with that weird gasket around it.
Almost all the controls on a digital camera are for the right hand.
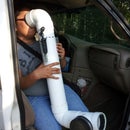
To operate this odd contraption, you stick the digital camera in it, put the right rubber glove on your right hand (Surprise!) reach into the housing with your be-gloved hand to a depth that lets you hold and operate the camera, then fold the rest of the glove over the opening and seal it with a hose clamp.
I eventually added a piece of foam to wedge the camera in place and keep it from flopping around.
So it worked.
I later cannibalized the parts from this project and made a periscope with the housing at the bottom. Will post that at some point.
I have no idea how deep this thing is good for. I've only put it down about 2 feet.
I take no responsibility if you build this thing, it leaks, and ruins your camera. :D
Step 5: Pics.


it worked.
I took it to a small boat harbor, lay down on the dock, stuck it under the Cold, Cold water, and took pics! Yay!


