

Introduction: Upgrading Older Ember Hardware for Pattern Mode


By default, the Ember 3D printer uses its projector in "video mode", in which the projector low-pass filters your slice images and resamples them to accommodate the 45° orientation of the mirrors in its DMD (Digital Micromirror Device). This results in some loss of detail and aliasing artifacts. In order to bypass that processing and directly control individual micromirrors, the projector must instead be used in "pattern mode", which reproduces finer details than parts printed in video mode.
If your Ember's model number reads 001-EMBR-0001 (the very first model we produced), you most likely won't be able to use pattern mode without making a few modifications to your printer. Occasionally an 0001 Ember will have the proper hardware, so we'll check for that in the next section.
Why can't 0001 Embers use pattern mode without modifications?
Embers newer than 0001 have a special cable that connects the main Ember control board to the projector, which allows the control board to switch the projector between Video Mode and Pattern Mode via the I2C protocol. 0001 Embers don't have this cable (we didn't know about Pattern Mode back then), so they can't use Pattern Mode until this cable is installed.
Additionally, the projector used in most 0001 Embers has two tiny resistors on its circuit board that prevent communication, even if you have an I2C cable installed. To use pattern mode, those must be removed with a soldering iron.
Step 1: Check If Your Ember Has the Required Hardware

Occasionally an 0001 Ember has the hardware required to use pattern mode, so here's how to check for that:
- Look down through your projector window while the printer is turned on but not printing anything.
- If you see a dim blue light, you won't be able to use Pattern Mode without modifications.
- If you don't see any light at all (the projector is off), you're lucky, and you can use pattern mode simply by upgrading to the latest firmware (REQUIRES A MICRO SD CARD IF YOUR FIRMWARE IS BELOW VERSION 3.0, OR ELSE YOU WILL DISABLE YOUR MACHINE).
Why does seeing a dim blue light mean I can't use pattern mode?
The same hardware that allows the use of pattern mode also allows Ember to turn the projector on and off. When it's not printing, Ember sends a signal to turn the projector off. If you see a dim blue light, that means the projector didn't receive the signal, because it doesn't have the required hardware (and instead it's projecting "black", which is the next best thing to actually being off).
Ok, I see a dim blue light, so I don't have the required hardware.
If that's the case, you'll need to install an I2C cable and/or desolder the resistors with a soldering iron. This also means you'll need to disassemble your printer, which can be challenging if you're not used to taking things apart, so make sure of the following:
- you actually need pattern mode (i.e. you are trying to make 50-200um features that need to be exact)
- you are willing to go through the procedure required to use it
- you are willing to do the other things that are generally required to get high dimensional accuracy
If so, read on!
Step 2: Check If Your Ember Has the Required Firmware

Press and hold the left button for 5 seconds, then release. The screen will display the firmware version.
If your firmware is 2.0 or above, continue to the next step.
If your firmware is below 2.0, you'll need to do the following in order to continue:
- Buy an AVR programmer
- Use the AVR programmer to update your front panel and motor controller
- Update your Ember firmware to version 3.0 using a MicroSD card
Step 3: Request an I2C Cable

If you're up for taking your printer apart, installing the I2C cable, and desoldering the two resistors on the projector, you'll need to request an I2C cable.
Once you receive the cable, continue to the next step.
Step 4: Disassemble Your Ember

Disassemble your printer by following Steps 1-8 of this Instructable. Once you've removed the central assembly, come back and continue to the next step.
Step 5: Check If Your Projector Has I2C Resistors


Looking down at the projector, with the projector pointing to the left, find the hole on the bottom row that's second-closest to the lower-right corner. It's circled in orange.
In this hole, look for R67 and R68, and see if the I2C resistors are present. The attached images shows a projector with and without the resistors.
If you have the resistors, use a soldering iron to remove them. Firmly press the tip of the iron against each resistor until it comes loose. Make sure it doesn't get lost in the projector electronics (usually it will stick to the soldering iron).
If you don't have resistors, continue to the next step.
Step 6: Install the I2C Cable


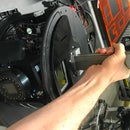
Install the I2C cable, making sure that the end of the cable labeled J1 plugs into the Ember control board, and the end labeled J2 plugs into the projector as shown.
Step 7: Test Before Reassembling
Just to make sure it works, plug in power to your Ember and watch the projector. If all went well, it will project a dim blue light for a minute or so while it powers on, and then the projector light will turn off completely.
Step 8: Reassemble the Printer
This has been quite a journey! Now it's time to head back. Reattach all the cables, then reassemble the printer using all the screws you removed earlier.
Step 9: Update Your Firmware to the Latest Version
Follow this guide to update your Ember firmware to version 3.0, and then to the latest version. If you're already at 3.0 or above, just upgrade to the latest version.
Step 10: Upgrade Your Projector
Follow this guide to upgrade your projector to enable pattern mode.
Step 11: Pattern Mode!!

At last! Follow this guide to use Pattern Mode. Enjoy the sweet, crisp voxels generated by the individual micromirrors in the projector.


