

Introduction: Pier 9 Guide: Othermill "I Made It" PCB Project


This Instructable is for Workshop Users at Pier 9.
This Instructable will teach you how to make a basic PCB (printed circuit board) using the Othermills at Pier 9.
Requirements for using the Othermill at Pier 9:
- Read through this Instructable
- Take basic workshop safety class?
- Clean up after yourself
What is the Othermill?
The Othermill is a tiny but fully-functional 3-axis vertical milling machine. It can mill any material softer than steel, and its specialty is PCBs.
Normally, PCBs can only be made either by DIY chemical etching or by a commercial board house, which uses large industrial manufacturing processes to create PCBs. However, chemical etching is messy and toxic, and board houses take days or weeks to send your PCB. The Othermill can make a PCB in as little as 5 minutes!
Pier 9's Othermills are the very first generation, which came into being through Kickstarter. While later generations of the Othermill can reliably mill 6 mil spacing, the Kickstarter version is mostly limited to 10 mil spacing. See its limitations below:
Kickstarter Othermill Design Rule List
- Minimum trace width: 10 mil
- Minimum trace spacing: 10 mil (can go lower but results are not guaranteed)
- Minimum via/pad annular ring thickness: 10 mil
- Minimum drill size: 16 mil
- Minimum SMD pad size: 10 mil
- Polygon isolation value: 1 mil larger than the largest tool you want to use
- Route traces to through-hole pins on the bottom side only (holes are not plated)
- Slotted/oval holes are not supported
Read on to learn how to make a basic PCB -- use our sample or bring your own, making sure it adheres to the design rules above.
Step 1: Gather Supplies and Tools

To use the Othermill to make a PCB, you'll need the following:
- Your computer
- Othermill
- Power cable
- USB cable
- Othermill wrenches
- 1/32" flat end mill
- 80° engraving bit
- Double-sided tape
- Copper-clad PCB blanks
- Bit fan (optional but very nice to have)
- Eagle or Gerber board files (use your own, or download the sample below)
The end mills, tape, PCB blanks, and bit fan can be found in the drawer under the Othermill
If you want to make your own Gerber files, read this guide.
If you want to learn Eagle for the Othermill, read this guide.
If you want to make a PCB specifically for the Othermill, read this guide to learn the design considerations.
Attachments

Step 2: Othermill Power and USB
Plug in the power cable to the Othermill, then connect the Othermill to your computer with a USB cable.
If you need help with setting up the Othermill, watch this video.
Step 3: Otherplan

Otherplan is the Othermill's control software. As you can tell, Other Machine Co. uses "Other" as much as possible when naming things.
Download Otherplan, then install it and open it.
Step 4: Home the Machine

Homing is a process where the Othermill slowly moves its carriages until they hit the X, Y, and Z limit switches. The limit switches tell the Othermill's controller where "home" is, very similar to a laser cutter.
Click Start Homing to home the Othermill.
Step 5: Import Your Board File

Import your board file (either a single Eagle .brd file or a set of Gerber files from any PCB software):
- Click Open Files
- Choose your board file
After you click Open, your board will be shown in Otherplan.
Step 6: Optional: Import the "faster Tools" Library
Otherplan is designed to prevent users from accidentally destroying their work, which is a good thing. However, this means that it mills slower than it needs to.
Included in this step is a tool library file for the Othermill that contains a 1/32" flat end mill and 80° engraving bit that mill 3-5x faster than the default speeds. They're called "1/32 Faster!" and "80° Engraving Bit Faster!"
Disclaimer: it's possible for your board to come loose when milling this fast. If you have Nitto tape, the chances of the board coming loose are pretty low. Scotch tape, on the other hand, is less reliable.
Attachments
Step 7: Choose Tools

When you import a board file into Otherplan, the default selected tool is a 1/32" flat end mill. This the best all-around Othermill tool: it's small enough to mill medium-sized chip packages and traces, long enough to mill holes and outlines, and strong enough that it won't break no matter how fast you push it in a PCB. If you design your board right, you can mill the entire thing without changing the tool. Very convenient!
However, a 1/32" can't mill everything. If traces or pins are too close together for a 1/32" to mill between them, Otherplan will mark the unmillable area in red. This means you need to add a smaller tool, such as a 80° engraving bit (for 16 mil spacing or larger) or a 30° engraving bit (10 mil spacing or larger reliably, 6 mil spacing or larger not reliably). Otherplan will use this smaller tool to mill areas that the larger tool can't reach.
Note that some boards (such as the one above) will always have unmillable areas, such as internal corners. As long as actual traces aren't bridged, you can ignore those areas.
To add a tool, click one of the dropdown menus labeled "None" and choose a tool. The best all-around combo is a 1/32" flat end mill and an 80° engraving bit.
Step 8: Attach Your PCB to the Spoilboard


We're almost ready to mill, but first we need to attach our PCB blank to the Othermill spoilboard:
- Clean the spoilboard with a vacuum or a brush, making sure there are no chips or dust
- Attach double-sided tape to the bottom of the PCB, making sure it doesn't overlap or wrinkle
- Place the PCB onto the spoilboard, aligned with the lower-left corner of the bed (or bracket if it's installed)
The picture shows clear tape, but if you have access to white Nitto tape, that's much more secure.
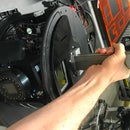
Step 9: Insert a Tool Into the Othermill and Locate It

Before we can mill, we need to insert the tool we're going to use first. In practice, it's easiest to just click Start Milling, and let Otherplan prompt you to insert the correct tool. If you just milled something, it's fine to do that.
However, if no tool is installed, you'll need to perform the following procedure to locate the tool, or else Otherplan will cause the Othermill to mill your board incorrectly or drill into the spoilboard. To be 100% safe, do the following:
- In Otherplan, click the Change button at the top of the right panel. You'll be prompted to change the tool, and the machine will move into position.
- Follow the prompts, and select the smallest of the tools you've chosen to mill your board. If you're only milling your board with a single tool, choose that one.
- Use the wrenches to remove any existing tool, and insert your new tool.
- When prompted, make sure the area of the spoilboard directly under the tool is exposed and clean.
- Click Locate Tool and watch as the machine uses electrical conductivity to locate the tool. Ta-da!
Step 10: Start Milling!

Ok! You've imported a file, attached your PCB blank to the spoilboard, and located a tool. Now you're ready to start milling!
Click Start Milling to start milling.
Hover your finger over the Escape key on your keyboard first the first few seconds of milling, just in case something goes wrong.
Once milling looks good, sit back and enjoy!
As with a laser cutter, stay near the Othermill while it's milling, or ask a friend to watch it for you if you need to leave. If anything goes wrong, hit the red Emergency Stop button on the right side.


