

Introduction: Using Fusion to Make Collaborative Sculptures With Bees

For this series of collaborative sculptures, I wanted to make an organic framework from which my bees could build comb. Since comb is heavy when filled with honey and very fragile when taken from the hive, decided I needed to build a structure strong enough to hold the weight and yet transparent enough to make the fragile nature of the comb visible when the piece was finished.
These steps take us from beginning in Fusion 360 with a model to the finished mold as it goes to the hive to be finished.
Step 1: Materials Used


MDF, 3/4 inch sheets cut and glued with woodglue to make stock
Endlighten Acrylic .157 inch thick
1/8 inch acrylic, white
LED strips, warm white 600
LED connectors
Wall power
tin foil, soldering wire, shrink tubing
#3 bolts and nuts
Cork weatherstripping
Steel wool
sandpaper
Red spraypaint
Dust mask, eye protection, latex gloves
Acrylic cement, syringes
Beeswax
Wood dowels, scrap wood
Tools used:
Fusion 360 and Illustrator
Band saw, table saw
Epilog laser cutter and Coherent metabeam cutter
DMS 5 axis router
Heat gun, soldering iron, dremel
Vacuum former
Strap and trigger clamps
Hand sander, sanding wheel
chisel and mallet
drill, screwdrivers, drill press
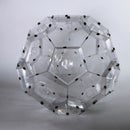
Step 2: Starting in Fusion


I began with placing and then modifying a Quadball while in Sculpt mode in Fusion.
I did this by editing the form and pushing and pulling from the top and bottom points until the shape was more or less an almond shape.
Once I had my almond shape, I made an internal mirror for my shape so that any action I made to one side was automatically repeated on the mirrored side. This is where the fun really began, as I explored the possibilities in Fusion and with my model as I pushed splines in and pulled on points and rotated angles. This is what makes Fusion a very powerful tool for this type of modelling.
Step 3: Create a 1 Part Mold, Called a Plug


For my sculpture I wanted to create a single part mold for the vacuum forming machine, which they call a plug. A few key aspects of a plug are that it must have the curves angles so that you can pull your plug from the vacuumed formed material once it has cooled. Therefore I was careful not to make any undercuts to my model.
Once my model was how I wanted it, I switched into the Model mode in Fusion 360.
There I created a box and used that to cut the almond form so I'd have one half of the almond for my plug.
Step 4: Export Your Model to Fusion CAM


Next I opened the CAM feature that is built right into the Fusion software. In CAM I picked the tools and how they would cut away at my material using a computer-aided router, in this case the DMS 5 axis router we have at the Autodesk Pier 9 Workshop. The CAM program is incredibly easy to use once you've imported a tool library into the program. Set up the model parameters, stock size and entry point. Then scroll through the library and select the tools you'd like then toggle between options for your form and material. The best part is that the toolpaths you choose will generate a toolpath simulation in Fusion so you can watch for errors and possible collisions before you run the program in realtime.
My model came out beautifully in the DMS router.
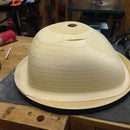
Step 5: Finishing the Plug Mold


To finish the plug mold I had to cut away from the base of the mdf stock I'd used. There are much better ways to do this so that when your model is finished in the router there is no base material, but I'm still learning how to do it, so maybe in the future you'll see a tutorial on that. For now, I had to cut away the extra on the bottom. I used the table saw and a chisel to knock off the bottom, and it was like butter to cut through. MDF is a nasty and yet oh-so-satisfying material to work with.
Once my base was removed I sculpted the bottom edge with a sanding wheel and then sanded the ridges left from the router bits with a small disk sander. When all was finished I painted the plug with red paint to seal it, though it isn't necessary for the vacuum former.
Step 6: Test Vacuum


I ran the plug mold through the small vacuum former at the Pier 9 workshop to test it for fit. I used a thin sheet of clear acrylic to test the fit and how well the two halves fit together and was very pleased with the results.
The vacuum former I used later for the actual piece is much more powerful, and would better mold a thicker material. In the last image I've shown that the vacuum former at Pier 9 doesn't suck in the right way for my purposes.
Step 7: Preparing the Acrylic for Vacuum Forming


Next I altered the surface of the acrylic for the sculpture. Since this piece will be a collaboration between myself and the bees, I needed to give them a honeycomb substrate from which to start.
First I had to cut down the full sheets of acrylic so that they'd fit in the workshop, not an easy task. Mei and Josh helped me wrangle the acrylic onto the table saw and break it down into manageable pieces.
Then it went to the Coherent metabeam to be cut to size.
Lastly, the cut pieces were clamped down in the jigs I made specially for large etching in the Epilog. It took 1.5 hours for each side to be etched in the Epilog, and the machines must be monitored, so there were many hours of audiobooks I listened to while standing in one place.
Step 8: Vacuum Forming the Acrylic


Next I made a trip to Techshop in San Francisco. Its a really great place for makers, with so many cool machines like we have at Autodesk. They have an amazing vacuum former that doesn't get much attention, and whenever I use it someone comes up to ask me what the heck I'm doing. Its a great way to meet people at Techshop, just use a strange machine to make strange art and people will talk to you. I was even interviewed for a Japanese television show on art and technology.
The last two images I took with my thermal imaging camera. The white rainbow is the heating element.
Step 9: Creating Two Halves of a Whole


Once the vacuum forming was finished, it was time to cut away the excess material from the edges to make the two halves fit together. I did this with the band saw and an old sand belt from the belt sander that I mounted on plywood with spray adhesive.
I also used files and rasps where there was too much material. It took a while, so I got used to wearing the dust mask by this point.
Step 10: Glue the Two Halves Together


Next I set to gluing the two halves together. This involved the strap clamps, trigger clamps, acrylic cement, and lots of heat with the heat gun. Oh, and patience.
I'd foreseen the need to have a base to set my almond during this process, so I had made a few in advance.
One problem with using heat to shape the two halves is that the vacuum forming actually stretched the acrylic, and when its heated again it tends to shrink. After a while and some experimenting I was able to use the shrinking to my advantage, and I found that leaving extra material on the edges while gluing is best. Once the two halves are glued, I hit them with the dremel tool and ground the lip overlaps off.
Step 11: Build, Modify and Attach the LED Casing


It took many variations on a theme before I landed on an LED enclosure that mounts to the acrylic with three screws. This feature will help minimize the pressure this assembly will put on the piece when it is hung from it.
I used clear acrylic, and kept cutting and modifying and recutting until I had a piece that fit the shape of my acrylic almond. Then I hit it with the heat gun and molded it to fit the almond. This took a long time and lots of patience, but it worked beautifully once I was able to figure it all out.
Step 12: Coat in Beeswax


Last step for this was to coat it in beeswax. I'd experimented with many different methods to apply beeswax before I settled on the coat and then heat with a heat gun or hairdryer. It doesn't take much to smooth the wax beautifully. I'm not sure this is important to the bees, but it looks better to my eyes, so I did it.
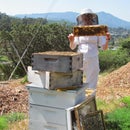
Step 13: Turn It Over to the Bees

Here is the fun part- putting my sculptures in the hive so the bees can finish the process. The almond shape went into the camera hive I made and documented in another Instructable.
We shall see what happens when the bees take up their part of the collaboration....
The best part about this project is that I have a mold that I'll be able to use in multiple ways to create more sculptures. Each hive and different season will will result in a different collaboration, and I'm very excited to see what comes next.
I'll keep you posted.


