

Introduction: Using IFTTT to Create a Live Photo Map From Your IPhone (or Other Devices)


This is a how-to guide to take a picture with your iPhone (or other supported devices), sending the picture to a google spreadsheet, and migrating the data to a Google Fusion Table, and finally producing a map of where the picture was taken. (Note: this tutorial Instructables will cover how to do this with an iPhone).
You will need some third party apps:
Google Drive: https://drive.google.com/
Google Sheets (Found on Google Drive)
Google Fusion Tables (Found on Google Drive)
The IFTTT DO Camera: https://ifttt.com/products/
You should have:
A Google Account: https://drive.google.com/
You will also need:
This tutorial and the script: https://cdn.rawgit.com/fusiontables/fusion-tables-api-samples/master/FusionTablesSheetSync/docs/reference.html
Prerequisites:
A Google Account
Fusion Tables Installed on your Google Drive
An IFTTT account.
It is recommended that you have first checked out my Instructables, Create a Clickable Google Map to Share Geographic Information and Metadata. I cover how to create a Google Drive account, how to create a spreadsheet, and how to install Google Fusion Tables: https://drive.google.com/
Step 1: Download IFTTT DO Camera on Your Device


The first thing you will need is the DO Camera app: https://ifttt.com/products/do/camera
Download it on to your device and sign in to the app with your IFTT account.
Step 2: Create a New Spreadsheet on Your Google Drive

Create a New Spreadsheet on your Google Drive. I labelled my Spreadsheet "Photo Map". In Row One, Label each column as follows:
- Row A: Occured At
- Row B: Caption
- Row C: Lat
- Row D: Long
- Row E: ShareURL
- Row F: Image
- Row G: ImageLocation
- Row H: LocationMapImage
- Row I: LocationMapImageURL
Jot down the name of your spreadsheet and the path (the folder) where your spreadsheet is located.
for example, my spreadsheet named "Photo Map" is located in "/Photo Map"
Step 3: Create a Google Fusion Table


1) Go back to your drive (https://drive.google.com/). Click on the red button that says New, go to "More", and click "Google Fusion Tables".
2) A screen will appear that is titled "Import New Table"
3) Click on "Google Spreadsheets";
4) Click on the spreadsheet that you have just created, and click "Select". You may be asked to authorize Google Fusion's Synchronizing feature. If you are prompted, click "Allow" and select the spreadsheet you have created, and click "Select" You will be brought to a new screen. There is a box next to some text that says "Column names are in row". Make sure that the titles of your columns we just created are selected in the row. If not, select the row with the titles of your columns. Click "Next >>" and then "Finish"
Note: If you haven't created a Google Fusion Table Before, I recommend following my previous Instructables, Create a Clickable Google Map to Share Geographic Information and Metadata
Step 4: Connect IFTTT DO Camera and Google Drive (Part 1)


1) Open the DO Camera App, and create a new recipe
2) Click the search button in the top right-hand corner
3) Search "drive" and select "Add photo and row of data to a Google spreadsheet". (You may need to scroll through recipes).
4) Click "Add"
Step 5: Connect IFTTT DO Camera and Google Drive (Part 2)


5) You will need to connect your Google Drive to the app. If the DO Camera prompts you to connect the app to Google Drive, click Continue.
6) You will be directed to a page in your device's browser to authorize DO Camera to access your Google Account (You may need to sign in). Click "Allow"
7) Once Google Drive is Connected, hit "Done"
Step 6: Configure Do Camera


1) Head to https://ifttt.com/myrecipes/personal and click on "DO"
2) Click on the recipe you created on your device, "Add photo and row of data to a Google spreadsheet" and scroll down.
3) Make sure that the "Spreadsheet Name" matches the name of the spreadsheet you created earlier.
4) Copy and paste the following code into your "Formatted Row" Section:
{{OccurredAt}} ||| {{Caption}} |||{{Latitude}} ||| {{Longitude}} ||| {{ShareURL}} ||| {{PublicPhotoURL}}||| {{PrivatePhotoURL}} ||| {{LocationMapImageURL}}||| {{LocationMapURL}}
5) Ensure that your Drive Folder Path is the same path as the spreadsheet you created earlier
6) Click Update
Step 7: Take Your First Photo


Using the DO Camera, take a photo. The Photo will appear on the spreadsheet you created earlier, along with all its metadata.
Step 8: Automatically Synchronizing Fusion Tables With Google Sheets (Part 1)


Before Proceeding: You should read this guide on how to Synchronizing Fusion Tables with Google Sheets: https://cdn.rawgit.com/fusiontables/fusion-tables-...
1) Open the Google Sheet you are working on and click "Tools" > "Script Editor"
2) Paste the script from the documentation above into the body of the code and click "File" > "Save". Name the script something memorable
Step 9: Automatically Synchronizing Fusion Tables With Google Sheets (Part 2)


3) Open the Fusion Table we were working on earlier and go "File" > "About this Table"
4) Copy the Table ID
Step 10: Automatically Synchronizing Fusion Tables With Google Sheets (Part 3)


5) Return to the script we were working on earlier. Where you see 'YOUR TABLE ID', paste the ID number of your fusion table between the two apostrophes: ' '
6) change the value circled in the image above to false
7) Go to "Resources" > "Advanced Google services..."
8) Scroll down to Fusion Tables API and click "On"; Click "Ok"
9) Hit the "sync" button. (If the script requires authorization click The app will need to be authorized. Click "Continue"; Click "Allow") Your script will fail, but that's okay! Click on details.
10) The message will read:
"Access Not Configured. Fusion Tables API has not been used in project 1029415516663 before or it is disabled. Enable it by visiting https ://console.developers.google.com/apis/api/fusiontables/overview?project=YOURPROJECTNUMBER then retry. If you enabled this API recently, wait a few minutes for the action to propagate to our systems and retry. (line 20, file "Code")"
11) Copy and paste the address located on that error message into a browser window
Step 11: Automatically Synchronizing Fusion Tables With Google Sheets (Part 4)


11) Click the blue "Enable" Button.
12) Close the browser window and return to the script we were working on
13) "Go Resources" > "Current Project Triggers"
14) Click "No triggers set up. Click here to add one now." 15) Match the dropdown menus to the one in the photo and hit "Save"
15) Hit the Sync button again!
Step 12: Go Back to the Google Fusion Table


Return to the Fusion Table we were working on before. The photo we took earlier should be there now.
You will need to tell Google Fusion Tables where the location data is in your spreadsheet. Click on the arrow beside "lat" and click "change"
Next to "Type" you will see that "Text" may be chosen by default. Click on "Text" and change the type to "Location".
Click the check box that says "Two Column Location"
Ensure that the Latitude corresponds to "Lat" column
Ensure that the Longitude corresponds to "Long" column
Hit "Save"
Step 13: Create Map

Click on the Red "+" next to "Cards". Select "'Add map".
Step 14: Format Map


On the map tab, click "Change Info Window"
Click "Custom" and paste the code in the file attached.

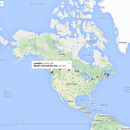
Step 15: You're Done!
Congrats on finishing your map. You can now take pictures and they will show up on your map!
Now that you have completed your map, check out my other Instructables:


