

Introduction: Vacuum Forming Mold Using Shopbot


I made it at TechShop! www.techshow.ws
This is how you can use the ShopBot CNC router to make a mold for vacuum forming.
Step 1: Install End Mill Into Collet


Snap the collet tapered piece into the but, and then insert these pieces into the spindle and tighten snugly with wrenches. Make sure to set the dust collector housing height when you're finished.
Step 2: Load Material


Square up your material and clamp or nail it to the waste board.
Step 3: Zero X and Y


Using the move function, make sure the bit is well above any material, position the spindle to the 0,0 location you chose when you created your tool path. Click the zero axes button, and check only the X and Y boxes. Apologies for the blurry photo.
Step 4: Zero Z


Put the zeroing plate on the surface that corresponds to the zero you set up in your tool path (usually the top or bottom of your material). Also attach the grounding clip as shown. Then press the auto Z button to run the routine.
Step 5: Load the Tool Path and Run


Turn on the dust collector. Load the tool path file, press start, press the start button on the pendant to start the spindle when the prompt appears.
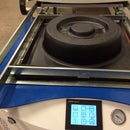
Step 6: Shopbot Machines Your Part :)


Watch it run ready to hit the E-stop if needed. Remove the completed part and break any tabs if needed.


