

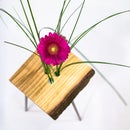
Introduction: Voronoi Legged Walnut Vase


Hi!
Been quite a while since the last time I posted here, but here I am again, ready to share another creation in a way you can easily replicate or remix.
EDIT: Just added some making gifs for your viewing pleasure and better understanding!
Other than that, I've once again found myself in a position of needing a gift. This time - for my friend's wedding. Strangely, the issue here was that I had no real direction of what both of them would like. After a while of thinking and looking around things arranged in my head and I found a good reason to gift them an unique vase (see the reason on the last step).
I have also wanted to try generating voronoi patterns myself for a while and milling a 3D wooden thing was also on my list. All of that and the fact that I recently had the chance to attend a 3D modelling course locally and add some to that with the great 3D printing class here on Instructables meant that it was time to create things myself from scratch.
Read on for the full process with files for printing and milling attached!
Step 1: Prepare the Wooden Stock


I forgot an entire step! Sorry! :(
For CNC milling I used a piece of walnut glued from two plank halves. The plank used was around 28mm thick and 120mm wide.
First I cut the sides of the plank for gluing, then cut to the rough length I would be gluing together. As I intended to make the vase top fit inside an A4 sheet of paper, the wooden piece was a bit bigger, around 250mm wide and 380mm long (A4 is 297x210mm for reference).
The gluing was done with Kleiberit glue. It is polyurethane based, foams up and while drying and forms a waterproof bond. The gluing went fine and there were no gaps on both sides. Excessive clamping paid off.
Step 2: 3D Modelling - Wooden Top


This is where the modelling started and ended with legs being modelled in between.
Tools: Fusion360 software
It went like this:
- I drew some shapes the top could be in on paper
- Picked the one I liked best
- Drew that in Fusion360 as a basic 2D sketch
- Added some construction features like arcs and the desired distance of legs from the edge
- Drew the forms of what I wanted the leg mounts to look like (took longer than expected)
- Modelled legs according to those (see other step for details)
- Extruded the form of the top
- Extruded some additional solids to have faces perpendicular to outer lines
- Used those as sketch planes for a sketch which I later used to make the edge form with the sweep functionality
- Eventually added some fillets and chamfers in places which looked like they need one (subjective)
Key functions you should research for making something like this: sketching in different (including diagonal) planes, combine, extrude and sweep. Most of the work is still done sketching in 2D. See the screenshots in step for a closer look.


Step 3: 3D Modelling - Legs With Voronoi Pattern


Tools: Fusion360 and Meshmixer software
The process here went like this:
- In the midst of modelling the base it became clear what shape should the leg base be
- Then I decided on the leg height according to the printer I used (up to 150mm prints)
- Used an offset plane function with 150mm value on the one where my leg base sketches were
- Drew some circles of random (smaller) diameters on this offset plane above my leg bases
- Using a loft function created a solid extruding from the base and ending in the top circle
- Exported the lofts as .stl files with lowest polygon count I could get
- Imported them to Meshmixer
- Used a set of sculpting tools on them, the most important one is reduce faces
- If you can't reduce face count due to surface too flat, try using other sculpting tools like move or inflate for creating an uneven surface
- After a while you can try applying the Voronoi pattern via Edit>Make pattern>Dual edges (see a screenshot in step)
- I went back and forth with this and reducing/refining mesh until I got the look that I wanted.
The most help in doing this was this video.
There's also a nice tool for those of you who don't mind using a lot of pattern control, yet having a Voronoi pattern generated very quickly - voronator.com.


Step 4: Digital Fabrication


The printing part was pretty straightforward. I printed the legs on Makerbot 5th gen with 0.2 layer thickness and 10% infill and double wall. Infill is pretty much irrelevant for this model and could be reduced or increased as you wish. 0.2 layer may seem high, but the print took 16 hours anyway.
The CAM (preparing for CNC milling) part wasn't straightforward at all. I have only milled things in 2D previously and had no idea what and how to do here. I spent somewhere between 1 to 1 and a half days preparing the file for milling, running simulations, running tests on foam and plywood to get the piece right on the first try since I only had one try on walnut. One of the most important tests was also leg fitment. I already had them and another quick sample for sizing printed, therefore I just ran the outlines for leg mounts on a router until the legs started fitting (that was on some 5th try). For quick adjustment in software you can use the offset function.
In the end, the actual milling process looked like this:
- Using a long 4mm end mill I started the rough profiling and broke the bit somewhere on the 3rd pass.
- Having nothing else used a 6mm ball end for rough profiling
- And also for a bit more of the shaping at 2mm step which left a rough, but manually workable suface
- Then changed it for a 6mm end mill which had barely enough lenght for the edges
- Did some profiling on the top for legs from a 2D file
- Made pilot pits for the holes
- Cut the all around shape (I forgot to put tabs after changing from 4mm bit and it was a rather intense experience with me holding the part down)
Step 5: Cleaning Up the Print


Since I printed the legs at 0.2 layer thickness and on a FDM printer - they had quite a lot of plastic in between the Voronoi holes and on the outside of the legs in the way printer head moved. This had to be cleaned up.
Craft knife to the rescue!
A lot of work and some plastic in my eyes later - there it was - a rather nicely finished voronoi print. There were still thin threads of plastic all around which are tricky to cut off and for that I used a desoldering station at 480 degrees C. Be careful if doing so - the plastic becomes soft and you might even damage the structure if heat is held in a single place for too long, you can burn yourself too of course. It did wonders for the thin plastic threads though!
As a note - I would have printed this in ABS instead and smoothed in acetone vapour, but that Makerbot can't print ABS and the Ultimakers in the makerspace aren't really suited for voronoi patterns due to the bowden tube filament feed.
Step 6: Sanding the Wooden Top


Time was a constraint while milling too, therefore I did not use a ball end to get a perfectly smooth surface, but instead left some texture to sand off manually.
It wasn't the worst choice, but some spots ended up being a little more tricky to sand by hand, therefore I just used a Dremel tool for the rough shaping and later finished hand sanding. The roughest spots were the steep sides up towards where the legs mount (you can see that in media of this step). I would consider another step of CNC milling with a ball end along the outside of this contour now to avoid it.
I started with 180 grit to even out all the places and then sanded with 240 grit before applying the finish.
Step 7: Finishing the Wood


To avoid legs not fitting the designed positions I masked the edges of them off before applying any finish.
To finish the wood I chose to mix my own concoction of equal parts mineral oil and varnish (something similar to Danish oil) for the first 4-5 layers. Then, as it was starting to develop a shine I went for two layers of varnish itself to have the final, glossy surface.
Step 8: The Water Vessels


It's a vase after all so it should have a place to add water as well I guess.
The original idea was to use some laboratory glassware as I have used in one of my previous projects, but the case here was, that I needed 3 vessels all of different and rather specific legths. Also, the laboratory glassware, if cheap, varies in dimensions quite a bit and breaks rather easily when putting into wooden holes (still possible, feel free to ask for advice if you plan to do that).
Due to all of this I chose to buy and use a 20/18mm outer/inner diameter acrylic tube and cut some round end caps to glue in. This was a good choice, the tube has very uniform diameter and fits in the drilled hole perfectly. Cutting some end caps was not difficult either on a laser cutter in the makerspace. If you can't use one, I'd suggest simply printing end plugs or turning some from wood (just don't forget to seal them well).
Step 9: Make and Improve!


I certainly hope this gave you ideas for making your own Voronoi pattern thing or just learning to 3D model something yourself. If you have any further questions - let me know, I can get into more detail on all of the steps, just aren't sure which are the tricky ones for you!
As for the process itself, I'd love to try printing the same legs in bronzefill or a similar filament as that would likely end up looking amazing. If someone decides to try it - please, share the results!
Almost forgot that I promised you the good reason for gifting a vase... So there it goes - For the wife to be happy always fill this vase with flowers. And when the wife will be happy, you will be happy too! Congrats, and be happy of course!
As you may have noticed - pictures are mainly stills from video and that means that there's a brief making video upcoming. I just need to get around to post-producing it. :)
I also magically made it in time for the 3D printing contest, so if you like this, click that vote button on the top, having my own 3D printer would surely help in making even more interesting things!
Also, a special thanks goes to:
- The makers of this great guide on making Voronoi patterns
- Green Garage Makerspace for giving access to all the amazing tools
- My friend Nerijus for helping me with CAM and machining itself (he's making some cool electric longboards, check them out too)
Thanks for reading and looking forward to questions in the comments,
Raitis

Participated in the
3D Printing Contest 2016


