

Introduction: Who Cares What Time Clock!


Hello again, how's things?! Things here are going good, if not slightly chaotic, thanks for asking!
And, for whatever reason it seems I've been making a fair number of things for people who are retiring. So, I wanted to share my take on one of the fun, humorous clocks I've made as a retirement gift!
If you know someone who's retired recently or will be soon, have a look!
Supplies
To make your own version you'll need:
-Design file attached to the next step.
-Something to make a clock out of.
- I used a round-ish piece of wood since I plan to engrave the design.
-Laser, CNC, vinyl cutter, 3D printer, or even just patience + a hobby knife to cut the design for the front of the clock
- Instead of engraving into the material like I did, you could also cut out the design in vinyl or 3D print it and attach it to what you're making your clock out of. A hubcap might be kinda neat.
-A clock mechanism
-Battery to power your clock.
-Something to cutout the clock mechanism pocket if your selected clock medium is thicker than about 1/4" or 6mm.
- I used a trim router with a 1/2" bit to clear out a pocket for the clock. Template attached in step 2.
-Paint to decorate the clock hands.
- I used spray paint.
-Paint to highlight the engraving (optional).
- I used a silver acrylic paint. This type of paint is less prone to bleeding into the woodgrain.
-Small / detail paint brush.
-Finish coat to seal everything
- I used a table top epoxy in this instance, polyurethane or a wood polish would also work to seal everything.
-Mixing containers and stir sticks for the epoxy.
-Heat gun to pop any bubbles in the epoxy.
- I prefer a heat gun over a blowtorch, it's more forgiving IMO.
-Hanger for your clock.
- I used a keyhole style hanger.
-Standard PPE - Ear and eye protection for CNC and router steps. Mask and gloves for painting and epoxy steps.
Late adds, AKA stuff that came up along the way:
-Clear spray paint
-UV resin
-CA / Super glue
Step 1: Design Time


I did the initial design in Inkscape.
Wait. I lied... I drew the circles in Fusion 360 and then imported that .dxf into Inkscape to add the text.
Why'd I do it that way?
Well I find it way easier to make things like circles and squares exactly the size they need to be in Fusion than I do in Inkscape, its like 8 clicks (Create sketch, select sketch plane, c, d, c, d, right click, export dxf). But... I find it easier to change and manipulate text in Inkscape... And maybe I'm lazy and haven't taken the time to figure out how to make circles concentric to each in Inkscaple so I used two programs and yeah that probably takes more time than it would if I'd just figure it out. Good talk, I'll use this instructable as an excuse to finally look into figuring all that out and If I figure it out and add it in the bonus stage/side quest...!
Whew, thanks for listening! Anyhoo, back to the clock design:
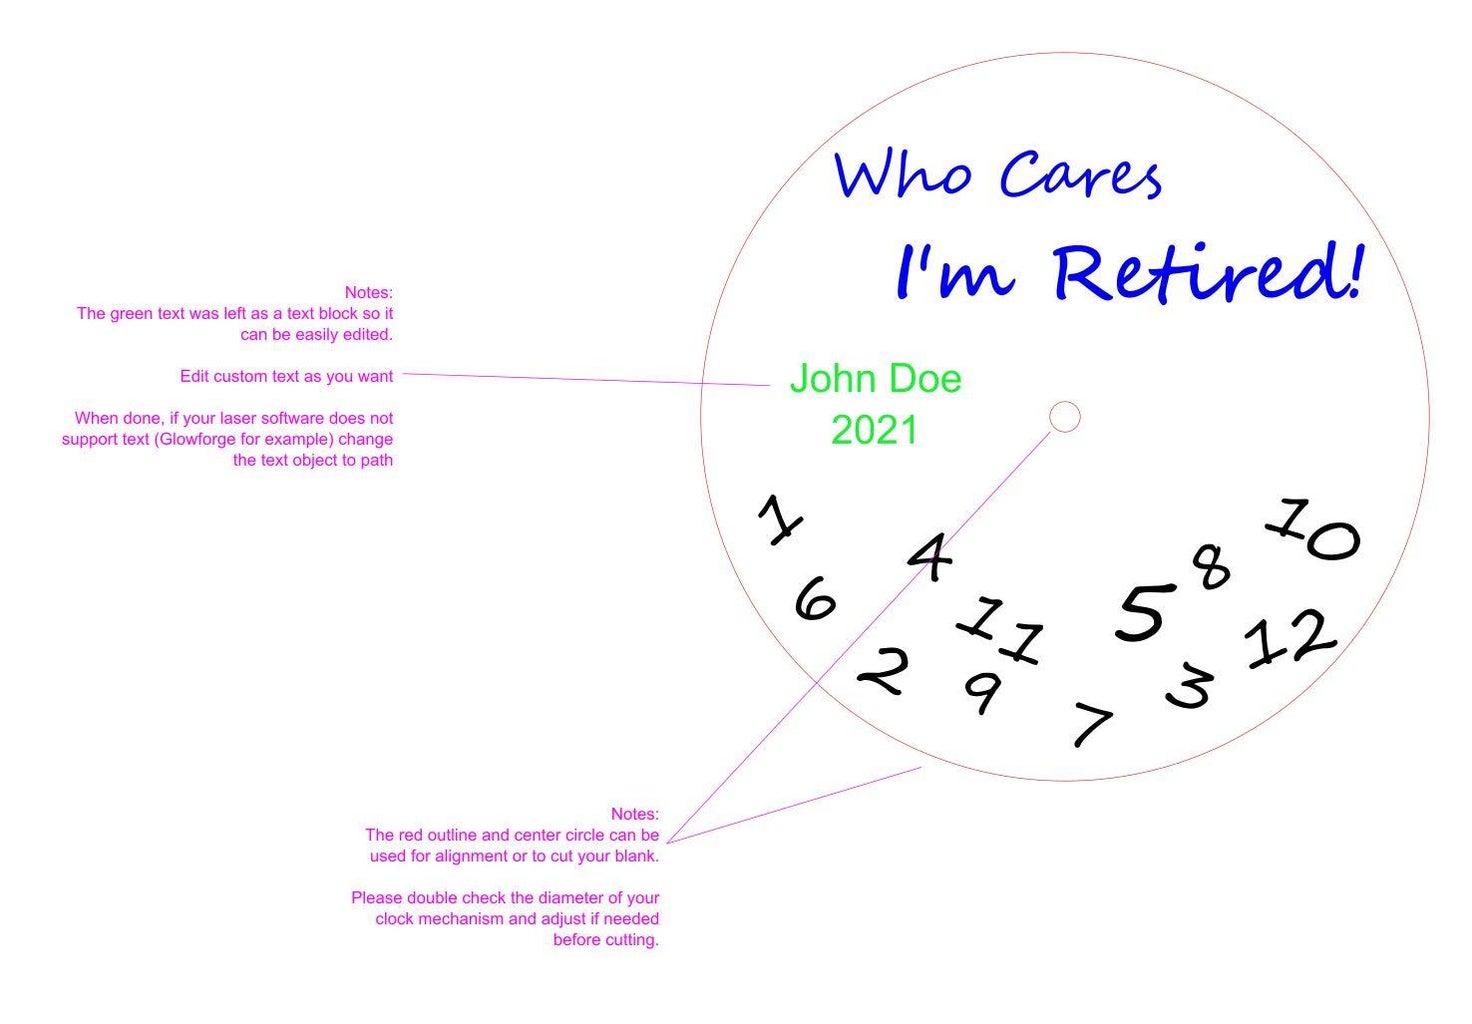
I made a circle. And a smaller circle inside of it.
- The outside circle is more of a guide to size the clock to your material, the inside circle represents the size hole we need for the clock mechanism.
Next, I picked a text I liked and made the words and numbers. I made the the words "Who Cares", "I'm Retired" "Name and Year" and each number as individual text blocks so I could easily change the size/shape/font as I wanted. I went a little crazy with some wild fonts, but in the end @wiferneer and I agreed keeping it simple was probably best...
Then I changed the color to indicate steps I might want to cut differently while engraving. That's why you see red, black, blue and green. This will allow us to easily assign different tools or different laser operations (engrave, score, cut) when we go to actually cut it.
Now the file is done and ready to use! I saved it as an .svg and it's attached to this step.
- If you're feeling generous and would like to help with my coffee fund, the file is also for sale in my Etsy shop, much appreciated! https://www.etsy.com/listing/957243337/svg-digital-file-personalized-retirement
From here all you need to do is update the Name and Year and then we can cut/engrave it or we can import it to Tinkercad to create a file for 3D printing. *Tinkercad is literally the best way to convert an .svg file into a .stl file for 3D printing. I'm not adding this just to tick the Clocks Contest judges prize contest box it's really how I'd recommend doing it.*
- I did not include a .stl since the base file needs to be updated with the correct name and year before creating the .stl but if you'd like to check it out in Tinkercad, here's the link. See pictures in this step for more info on how to use Tinkercad to do this. If you run into import problems, make sure all objects have been converted to paths and re-save the .svg.
Attachments

Step 2: Build Time!


Pick your clock-ish shaped object that you're going to make this from.
I'm making this one out of a heavily spalted birch round. It was a little soft so I decided to use a penetrating epoxy to harden it so the CNC engraving bit I planned to use (90 degree V bit) would cut sharper lines. After the epoxy hardened, I smoothed everything out with 120 grit sandpaper.
I was having a little trouble indexing the design, this is the disadvantage of picking something that's not round or square.
So I made a test cut in some scrap and used that to help me layout the design on my wood round.
- I used a 90 degree bit for the test cut but decided to use a 60 degree bit for the final cut in order to cut a little deeper without washing out the lettering.
Clamping it to the CNC wasteboard was also interesting... Next time I'll probably use the blue tape and glue trick.
To make the robot do it's thing we need some G-code. I'm using an X-Carve pro, and since we already have an .svg file, importing it into the Inventables Easel software was straightforward. I'm planning to zero the machine in the center of the design, so that's what's going on in the picture attached to this step. (We could also use the engrave feature in the manufacturing tab of Fusion 360. Had I done the whole design in Fusion, I likely would have used Fusion to generate the toolpaths/G-code.)
- Cutting the test piece helped me see I needed to bump some of the numbers around to make sure they were on the wood. I made this update in Easel and left the .svg file alone since I plan to re-use it on other more clocky clock shaped items in the future. If you're an Easel user, you can view the project here.
Cutting the design went well, and now we need to cut the pocket for the clock mechanism. If you have a regular shaped object, it's probably best to flip the piece and have the robot cut the pocket. I could have probably had the CNC drill a center hole and "carefully" tried to flip and re-index the part, but I only had one piece of wood and didn't want to risk it. So I made a router template I could attach directly to the wood.
For the router template. I did do the design for this one in Fusion 360 since it was all precise angles and lines, AND I used Fusion's manufacture option to create the toolpaths and output the G-code for the template! I've attached the native Fusion files and a .svg file. Go Team!
- This template is designed to work with a 1/2" diameter bit on a Bosch colt router with the circular plunge base and the clock mechanism I have, other clock mechanisms and router bases may be different. Please measure yours before cutting and using this template.


Step 3: Final Touches


With everything cut, it's time to sand, sand, sand and put the final touches on.
I started by sealing the wood again with clear spray paint since the engraving revealed a few soft spots. I did this so there was no chance of the paint "bleeding" through the engraved lines onto the clock face.
Once that was dry I painted the engraving with a metallic silver acrylic paint. I chose this paint since it isn't as thin as spray paint and is less likely to bleed out of the engraved lines, and I also didn't have to mask or sand off a ton of overspray. I just had to be carful and patient while filling in the letters. Once the silver paint was dry, I sanded everything to 240 grit. This also eliminated any accidental painting outside the lines.
Then I moved onto the clock hands. I was told the recipient of this clock was a WSU Cougar fan, so I painted the clock hands crimson and grey.
While the clock hands were drying I worked on the final test fit of the clock mechanism. Turns out the nut to secure the clock mechanism was only hanging on by a few threads. So I decided to make another pass with the router and template to make the clock mechanism pocket a hair deeper...
- And that's when I found another soft spot with the router and managed to tear out a piece of the pocket... 😬
(I was pretty frustrated at this point and did a poor job of taking pictures while fixing the clock... I'll do my best to describe the fix.)
Deep breath... This is fixable.
Starting over wasn't an option, so I decided to seal the wood again with penetrating epoxy to fix any remaining soft spots. This stabilized the tearout spot enough to prevent any additional damage.
Wiferneer came up with a brilliant idea to tint some UV curing resin with the silver paint from the letters and "cast" a new center section. UV resin was used since we were worried about normal casting epoxy leaking and ruining the rest of the clock. There was a little worry about overheating, so the patch was built up in two layers. Once the tearout spot was fixed, we also coated the whole backside of the clock pocket again with resin to reinforce it.
It Worked!!!
Time to sand and get to finishing this thing! Once everything was sanded smooth again I wiped it off, degreased everything with denatured alcohol , made sure it was on a level surface, mixed up the epoxy topcoat and poured a flood coat of bar top epoxy on the top. This will give it that glossy glass like look we're going for. I did monitor it while curing to pop bubbles with my heat gun and wipe up drips on the back, so there was very minor touchup needed.
Lookin' good! Lets get that keyhole hanger lined up and screwed in. I did pre-drill the holes and since the soft spot has me a little paranoid... decided to put a few drops of CA/Super glue in the holes to make sure the screws bit into the clock.
Lastly just because of how well it went before... lets put the clock mechanism in there and give it a final, final assembly. Whew, done! That was more of an adventure than expected!
Last picture in this step is where it lives now in our friends workshop!
Step 4: Bonus Round!


Bonus lighting stage!
So what else is there to know?!
I've also used a Glowforge laser to engrave this design on a piece of maple, see pictures attached in this step. It worked really well on that wood, the laser burn gave a nice contrast and it was faster to setup since I didn't have to clamp it down. It did take longer overall in machine time and the engraving is not as deep. I really like how this one turned out, but if I was planning to paint or fill the lettering I'd stick with the CNC.
I have not as of yet found an easier way to make perfect concentric circles in Inkscape... Stay tuned, or if you know how to do it, please feel free to comment below.
________________________________________________
If you'd like to see what I'm up to when I'm not Instructable-ing you can also find me at these places:
My Website: https://www.makerneer.com/blog
Instagram: https://www.instagram.com/makerneer
Facebook: https://www.facebook.com/Makerneer/
Pintrest: https://www.pinterest.com/makerneer/
My Etsy Shop: https://www.etsy.com/shop/Makerneer
Note: My posts may contain affiliate links. Which means when you click the product links in my Instructable nothing changes on your end, and I earn a small % on qualifying purchases. Thank you for your support!

Participated in the
Clocks Contest


