

Introduction: Wifi Light Switch Raspberry Pi Web Server


I wanted to control the light switch in my bedroom without having to get out of bed, so I wanted to be able to control it from my phone. I had a few extra constraints, I wanted to be able to control it from any device easily, I wanted to be able to use the light switch as normal and I couldn't make much modification to the hardware as I rent the apartment.
I decided to use a Raspberry Pi to control a servo motor which would move the switch. The Raspberry Pi would run a web server that I could access while on the local network. Links on the website on this server would allow me to turn the switch on and off. By de-energizing the servo between switching I could also still use the lightswitch as normal.
Step 1: Materials
Step 2: Step 1: Set Up the Raspberry Pi
There are various ways of doing this. If you have an HDMI monitor and usb keyboard handy I think it's a bit easier. Otherwise you can do a "headless" setup.
Here's a good tutorial on doing a headless setup on Windows:
http://www.circuitbasics.com/raspberry-pi-basics-...
And one for Mac:
http://www.circuitbasics.com/raspberry-pi-basics-...
But the easiest is to load up an SD card with NOOBS, boot the pi up while connected to a monitor and keyboard and just go through the configuration. This tutorial explain it pretty well:
http://www.circuitbasics.com/raspberry-pi-basics-...
If you didn't do a headless setup you should still get SSH ready, it's necessary for the rest of this. To do this I use Putty. Get it here:
http://www.circuitbasics.com/raspberry-pi-basics-...
And if you don't know your Pi's ip address you can use advanced IP scanner: http://www.circuitbasics.com/raspberry-pi-basics-...
Then just enter the IP address for the pi in input for Host Name/IP address, leave the port at 22 and click open. You'll be prompted for the login.
Step 3: Step 2: Set Up Webserver

To run the web server I used Apache. You can install this use the command:
sudo apt-get install apache2
This should by default give you a splash page when you navigate to your pi's IP address. It should look like the picture below.
Step 4: Step 3: Build the Website


You're going to want to replace the default splash page with your website which can control the servo motor. The first thing to replace is the index file. Your index file for the website should be in /var/www/html. Use your favorite text editor to create the file or just copy the file here using something like winscp. Add "index.php" in this location, you'll have to resave it as php file yourself as I couldn't upload it as such. This php file creates a very basic website with two links, one to "cgi-bin/off.py" and one to "cgi-bin/on.py". These are two python scripts that change the position of the servo motor.
The python scripts have to be put in a different location for Apache to let them run. They will need to be put in the cgi-bin. This is where files go if they are to be run in the Common Gateway Interface which enables scripts on the pi to run. Navigate to /usr/lib/cgi-bin and add the two files "on.py" and "off.py".

Step 5: Step 4: Mount the Motor

I found a great part by another maker to mount a servo such that it can flip a standard light switch. You can find the 3d files for it here:
https://github.com/suyashkumar/smart-lights
This is for a standard size servo as listed in the parts section. Print this out or get it printed and then mount it up to your light switch.
Step 6: Step 5: Wire the Pi and Motor

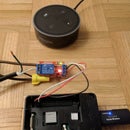
I powered the pi with a micro usb. I split off another micro usb and connected the ground and power for the servo to this. I shared the ground between the pi and the servo. I then connected the signal pin for the servo to GPIO18 on the Pi.
Step 7: Step 6: Configure Scripts

You'll need to play around with your setup a bit to find out what values correspond to On and Off for you. The Pi allows you to write to the gpio from the command line using pretty simple commands. to make gpio 18 a pwm pin use the command:
gpio -g mode 18 pwm
then configure the pwm with:
gpio pwm-ms
gpio pwmc 192
gpio pwmr 2000
These are just reasonable values for pwm frequency configuration. Next use:
gpio -g pwm 18 120
Where you change 120 around to find appropriate values for the on and off position.
Once you have found the appropriate values for off and on use a text editor to change these values in the respective scripts for the two positions. The place to make the change is highlighted in the picture.
Step 8: Step 7: Test It Out!

Go to the ip address of the pi you should see a web page with a link for on and off. Each page will also have a link for the other page.
It's handy to add a shortcut to these pages to your phone home screen for easy access.

Participated in the
Raspberry Pi Contest 2017

Participated in the
Wireless Contest

![Tim's Mechanical Spider Leg [LU9685-20CU]](https://content.instructables.com/FFB/5R4I/LVKZ6G6R/FFB5R4ILVKZ6G6R.png?auto=webp&crop=1.2%3A1&frame=1&width=306)


