

Introduction: 3D Printing the San Francisco Sewers


This part of my series of Instructables on the Water Works project.
Water Works is a data-visualization and mapping of the San Francisco water infrastructure: the pipes, hydrants and treatment plants that comprise the circulatory network for this city.
This Instructable will cover the general process for creating a 3D printed artwork based on sewer data of San Francisco.
The Water Works project is part of a larger Creative Code Fellowship, supported by Gray Area, Stamen Design and Autodesk.
Step 1: Obtain Dataset

I worked closely with the Department of Public Works in San Francisco, an agency that does the engineering for the San Francisco sewer system, which is managed by the San Francisco Public Utilities Commission.
We spoke at length about the project and after I obtained the Creative Code Fellowship, they provided me with a dataset that is pretty amazing: the sewer node and pipe connections for all of San Francisco. Right now, the data isn't available on San Francisco's data portal, but hopefully some day it will be.
The data consists of many, many fields but the important ones are the manholes (nodes) and the pipes that connect them. The nodes are geolocated, which means that I can map it out as X,Y values in the 3D space.
And, each pipe indicates an upstream and downsteam node, so there are connections between the diffferent nodes. There's a lot more granular information for the nodes and pipes, but this is the basic data I need to build a data-based 3D model.
Step 2: Clean Datasets

This was an iterative process and eventually I got it sorted out but not without a lot of hours and headaches.
The main issue with the data is that:
(1) it wasn't entirely clean, meaning that the pipe data didn't match up with all the nodes. There were some id strings that were duplicated, missing and more. Mostly it was fine, but it needed algorithmic care.
(2) when I assembled the nodes, there were a lot of small, isolated sub-networks instead of one giant network of data. I started with about 30,000 data points and the "primary" network was about 28,000 points. I ended up having all sorts of mini-networks of pipe data: anywhere from 2-100 in size. As a 3d-printed object, these need to be a single, cohesive object, otherwise the 3D print will fall apart.
My parser code does its best to clean up the data and discard what I don't need.
I wrote code in Java, which is not the most effective engine: it is both slow and code-heavy, but it's a language that I know well are there are many convenient JSON libraries for it such as the gson library.
The json libs in OpenFrameworks — the open-source C++ toolkit — would have been speedy, but require a lot of extra compiling. Also once they're running, they didn't end up giving me the customizability that I have in the Javas data field exports.
Python offers good parsing tools, but not a decent enough UI. Javascript is probably the best solution, but I don't know the environment well enough (yet).
Step 3: Generate CSV Files for OpenFrameworks
Using a separate chunk of parser code, I generate two CSV data files with node and pipe data, which I will later import into for OpenFrameworks.
There's not much original data in the dataset I want to keep, but the important fields are: lat and longitude location, ground level (z-elevation) and volume of the manhole chambers and pipes.
Step 4: Map Into 3D Space


Here was the a-ha moment where I mapped this into 3D space. When this first worked, I let out an audible yelp.
Using OpenFrameworks, I built out two classes which contain ofMesh renderings. I used cubes to represent the nodes and cylinders for the pipes. Both were scaled proportionally to the area of the nodes (the manhole chambers) and the diameter of the pipes.
What made me happy was seeing the San Francisco terrain reflected in the node and pipe data.
Step 5: Customize the Lat/long Export

There are 28,000 nodes — too large for a 20" x 16" export, which is the maximum size of the Objet 500 printers that I was working with.
I wrote some tools in my OpenFrameworks code to select just a section of the city for 3D-printing using Reza Ali's ofxUI addon.
Step 6: Substitute STLs for Nodes

Before exporting, I ran a render, which will swap out the cube with this model, which I built in Fusion 360 with the help of Taylor Stein.
I worked on the form for a long time before coming up with this one. Because we don't really know what a manhole chamber looks like, I had to do some guesswork. I like the end results. The manhole chambers are both non-specific and directional, so that they can be oriented along the city gridlines.
Step 7: Export and Verify STL

Using the ofxSTL addon for OpenFrameworks and some of my custom modifications to vertex-ordering for STL-based meshes, I exported two STL files: one for the nodes and one for the pipes.
Checking it out in Meshlab, I verified that the geometry was correct and didn't need any repair.
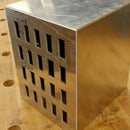
Step 8: Make Test Prints


Before running out the final version, I made several test prints for color and for structural testing. These are just a few samples.
I printed these at the Pier 9 facility, using the Objet 500 printers. These let you print in multiple materials and I made various grayscales by blending VeroBlack with VeroWhite resin.
Step 9: 3D Print

I queued the print and let it run. This one took 40 hours to print and used a lot of material.
All I can say is thank you to Autodesk and their Air program for supporting this work.
Fortunately the print ran without any hitches. Big phew.
Step 10: Clean

This was another process that took many, many hours. It wasn't as difficult to do as I thought it would be, since the print was very sturdy and I wasn't worried about breaking it.
Using dental tools and high-pressure water, I rinsed all the support material from the print.
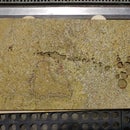
Step 11: Mount on Wooden Base

I laser-etched a map to use as the wooden base for the Sewer Works 3D print.
I'm going to cover the details of how I did this in a future Instructable for the whole Water Works project, so stay tuned.
The etching came out beautifully — I used cherry wood.
Step 12: Done!

Once it's mounted on the wood, it looks like this and came out beautifully.
I hope this was helpful!
Scott Kildall
For more on the Water Works project, you can find me here:
@kildall or www.kildall.com/blog
My Git repo is here, where I have some of the Water Works project code, though have quite a bit more to clean and add.


