

Introduction: Arduino GPRS Weather Station - Part 1


With the threat of increasingly erratic weather patterns circulating the skies of our planet, day after day of unceasing rain, floods, droughts, hail storms and who knows what else, a weather station seems to be a useful and necessary household accessory.
Global warming may be upon us, but that is no reason to shrivel up in fear of the mightiness of nature as she exacts her revenge upon us humans. Rather, with the right equipment, we may marvel at the forces she will unleash, gaze in wonder at our computer monitors as she summons up storms powerful enough to blow our puny cars and ride on mowers down the highways of the land like pieces of dried up tumble weed. Indeed, rather than be victims of our own success, we should praise and venerate the Mother as she rushes around the house with her broomstick smashing up all the silly trinkets on our shelves.
Ok, enough of the mela drama, but seriously, living on a remote island in the middle of the Irish Sea I could be excused for being obsessed with the weather if it were not for the fact that it can easily become a life or death situation. Winds can reach in excess of 100 mph, tearing down trees and power lines and throwing all kinds of debris through the air. One of my neighbour's had a solid steel shipping container in his garden blown 20 ft UP a hill one night!
The fear of death on such occasions is only alleviated by the thrill of seeing the indicator needles on my current gauges bending past their elastic limit in a extremely violent storm. But now is the time to replace my antiquated weather station with a custom built GPRS enabled autonomous device that will send data straight to my website for displaying to the whole world (and beyond) via PHP, MYSQL and the interweb.
Apart from providing a psychological antidote to global warming, this is also a really useful gadget for farmers or anybody really serious or fanatical about growing vegetables. Having up to date local information about rain fall, soil moisture and soil temperature is particularly useful, especially for sowing carrot seeds, which need a minimum soil temperature of at least 10 degrees C or they will not germinate properly.
Here is my real time online weather page: CLICKY LINKY
Step 1: Project Challenges

After using my current weather station for about 5 years, I realised that the overiding limitation of the system was the way the data was transmitted and processed rather than the actual sensors and other hardware. There is not normally a lot of ice where I live, so elaborate heated wind sensors are not needed, but when I tried to position the sensors in the middle of a field to get the best wind readings, I realised that standard radio transmission and wifi were not up to the job. A possibility was to have cables buried in the ground, but I eventually opted for GPRS data handling on the local 2G mobile phone network.
I was not quite sure if 2G would be able to handle the amount of data so I built this part of the project first and in the end I need not have worried as for one, it was relatively easy to build and two, the data kbs are a lot smaller than we might think.
The next part that I looked at was the very end - how the data would be processed. My current weather station has it's own proprietory data processing system which has to be manually uploaded to a PC and is not accessible to share, distribute or generally fiddle about with. The hardest part of the project was not getting the data into a database, but getting the data out of it again and displaying it in a meaningful and accessible way.
Other than the aforementioned, it has been a constant let down to have batteries die at key moments, like in the middle of an exciting violent storm, so I have chosen to have the sensors and GPRS system running off a big car battery powered by a stupidly large solar panel which will keep things going in the never ending dark weeks of Winter. Just for piece of mind, I added a simple voltmeter to the array of sensors so that I could keep check on the battery.
The actual sensors themselves were not too difficult to fathom. One of the main challenges were the RJ11 connectors used on the rain and wind gauges - these plugs are incredibly fiddly to mess about with so I redesigned my Hackable Prototyping Board to have 2 x RJ45 socket locations (RJ45 is an 8 pin version of RJ11, which is 6 pins). Redisigning this board is always fairly risky as it's incredibly easy to make a mistake and have short circuits and other mishaps causing mayhem in the electrical circuitry.
After some vigorous exercise within my own personnal grey matter, I realised that, if I was not careful, the most exciting events in the weather such as a severe gust of wind, could easily be missed if I did not consider the time frame elements of my design. My old weather station let me down quite spectacularly one day. It was February the 4th 2015 and a terrific storm had blown in. There was a huge crash outside as 30 panes of glasshouse disintegrated and looking out of the window I spotted my neighbour's ride on mower sailing through the air towards my house. In a gesture of total dedication to the science of weather measurement, and my love for my neighbour, I immediately headed to my weather station console, expecting to see the gust displayed as approximately 80 MPH but ....... Nothing ....... The %^"<**!>%%:@+!| machine had missed it!
I was really hoping that I could console my neighbour's loss by informing him of the exact windspeed at which his lawn mower took flight!
Obviously, the wind speed must therefore be constantly monitored, not just taking a reading every 5 seconds as many systems do. I thought this could be achieved by having a dedicated micro processor just to monitor wind speed, recalculating the maximum value every 1/10 of a second or so over a 60 second period and regurgitating the value to another micro processor number one at ten minute intervals.
As I got further into the project, new challenges presented themselves. One of these was the power requirements of the system. Fortunately I had already split my system into two microprocessors - an Arduino Mega and a Atmega328P chip from an Uno. The GPRS module used quite a bit of power so I used the 328 to send the fona and the mega into 'sleep mode' for nine minute intervals.
Programming both the 328 and the Mega posed some new challenges for me as, for one, no 'delay' functions could be used in the 328 and everything had to be timed using the 'millis' utility, which involved some pretty serious head scratching! Programming the Mega was all about getting the data sent to my website database and communication with the 328P, which supplied some of the key data and also communicating with the fona GPRS module which was going to send all the data into cyberspace.
I originally envisaged that this project would take about 5 days to complete, but this proved to be wildly inaccurate as the work involved proved to be about 10 times what I thought it would be. Surely it would be just a case of hooking up a dozen or so sensors and getting the data transmitted via GPRS? Errrrrrr ....... I wish it was that simple! As soon as I started to delve into the depths of this project many hidden obstacles started to reveal themselves and I started to feel very much like Indiana Jones going into the temple of doom to rescue some valuable treasure from a bunch of psychopathic munchkins.
Possibly the worst problem was the rain gauge. Not that there's anything wrong with the plastic rain gauge, just that whatever way I tried I could not get the rain data to travel down the I2C pathway. I ended up taking everthing to bits to try and find the problem when in the end it was something I can only explain as a 'Black Hole' in the Arduino memory framework. After struggling for 3 whole days I ended up doing a PHP work around which is very clumsy compared to the solution that I should have found. It was something to do with the fact that the Arduino would not keep a small value eg. '1' for nine minutes in it's memory and make it available for transmission at the end of it. It was happy to keep other small numbers in memory as long as they were refreshed regularly. It would have been ok if the number was not then reset to zero after 10 minutes so I just allowed it to keep growing bigger and bigger without resetting it. Another strange chamber in the Temple of Doom.
So where to start and how much detail to go into? Another question is when to stop, as I think that I could develop this project a lot more.
Step 2: Weather Station Features


- GPRS data transmission via 2G mobile cellular network.
- MySQL database.
- Solar powered for remote autonomous operation.
- Internet display panel with gauges and graphs to display the data.
- Constant uninterrupted monitoring of wind speed, wind direction and rainfall.
- Humidity, temperature, atmospheric pressure measurements at ten minute intervals.
- Soil temperature and Moisture measurements for farmers/gardeners: https://www.instructables.com/id/Arduino-Soil-Probe-Using-DS18B20-and-DIY-Moisture-/
- Digital wind vane: https://www.instructables.com/id/8-Bit-Digital-Weather-Vane/
- Sleep mode to conserve power.
- Volts gauge to check that power is adequate.
Step 3: How It Works

To be as brief as possible, the weather station has two microprocessors in it's main box - an Atmega328P, which is commonly found in the Arduino Uno and a complete Arduino Mega 2560 board.
Wind and rain measurements are recorded by the 328P, which works as a 'master' and controls the Mega 2560 'slave' via i2c communication protocol. All other sensors are controlled by the 2560.
Every ten minutes, the 328P turns on the rest of the circuitry and sends the Mega 2560 a load of data. The 2560 then starts communicating with the FONA 800L cellular module via serial and turns on the GPRS function. It then waits to see if transmission into cyberspace was successful or not. If transmission failed, it keeps the data in memory and adds it to the next set of data ten minutes later.
The 328P then turns off the 2560 and the FONA to save energy as the whole system is powered by solar power which could be in short supply in the middle of winter.
Meanwhile, the data is flying through the airwaves via the mobile cellular 2G network and eventually goes into the internet and finds it's way to a computer in London which hosts my website. Inside this computer is software called PHP and MySQL which gets the data loaded into a database for safe keeping. MySQL is solely responsible for working the database whereas PHP can do a lot of more complex calculations and helps get the data on our computer monitors. My webpage actually displays a big table of raw PHP data below the main graphs.
Just to complicate things, as if there were not enough challenges already, I added a homemade Digital Weather Vane: Digital Weather Vane which has a tiny arduino nano built into it. This was an astonishing improvement over the cheap and nasty plastic version in the photo.
At some stage somebody might want to see if it's time to plant their carrots, so they search for the weather station in their village ( llanbedrgoch weather station ) in their favourite search engine. When they access my web page, a whole load of javascript (supplied by Amcharts) is used to convert the data into nice pretty gauges and graphs.
The software stream is roughly this: MySQL >>>> PHP >>>> JavaScript >>>> HTML.
Step 4: Building and Installing the Pole for Wind and Rain Sensors and GPRS Antenna


The wind speed, wind direction and rain gauge sensors used were originally the generic ones commonly used in most of the cheaper weather stations available. They are also the ones that Sparkfun sell in the USA. I bought mine from Maplin UK via ebay.
The wind sensors need to be mounted in thin walled stainless steel tube as there is no mild steel tube available in the UK, at least, with the right internal dimensions.
The rain gauge is fastened to the main 1" BSP pipe with munsen rings. A plate for the magnetic GPRS antenna is fastened to the 1/2" BSP tube by another set of munsen rings.
The lower part of the pole is threaded 1" BSP stainless 308 and is embedded in a generous quantity of concrete to keep it upright.
Step 5: Mounting the Solar Panel
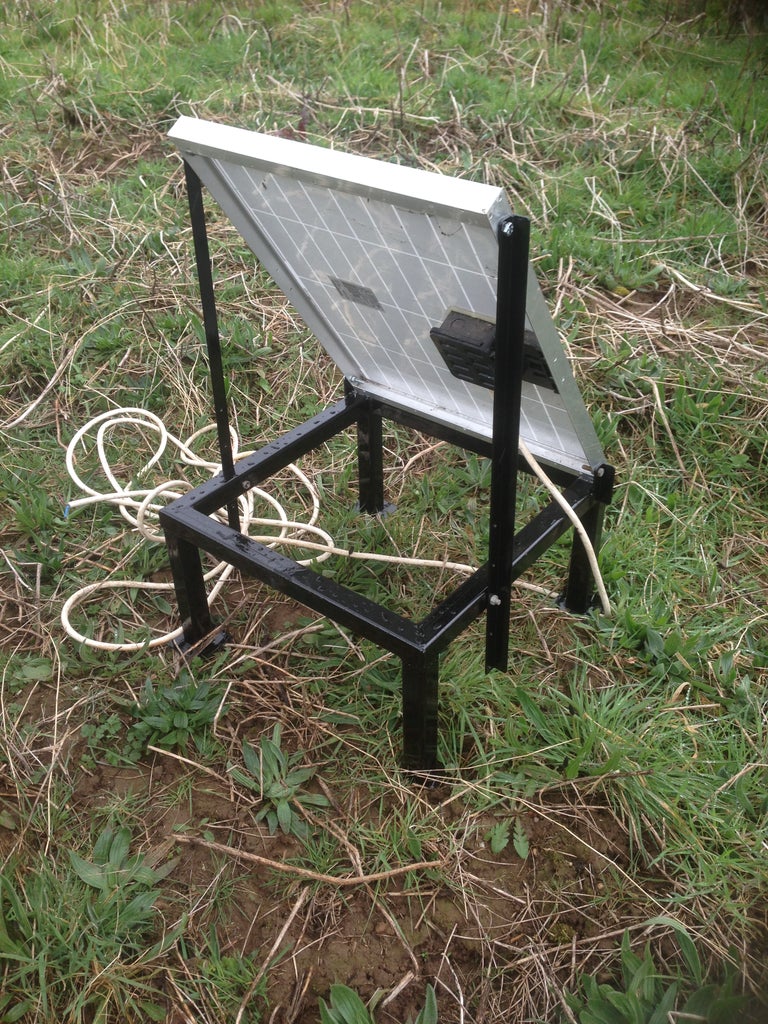


I used some nice heavy 40 x 40 mm box section for the panel frame and gave it a very generous coat of paint for protection against the elements. Don't forget to give it feet to stop it from sinking into the ground!
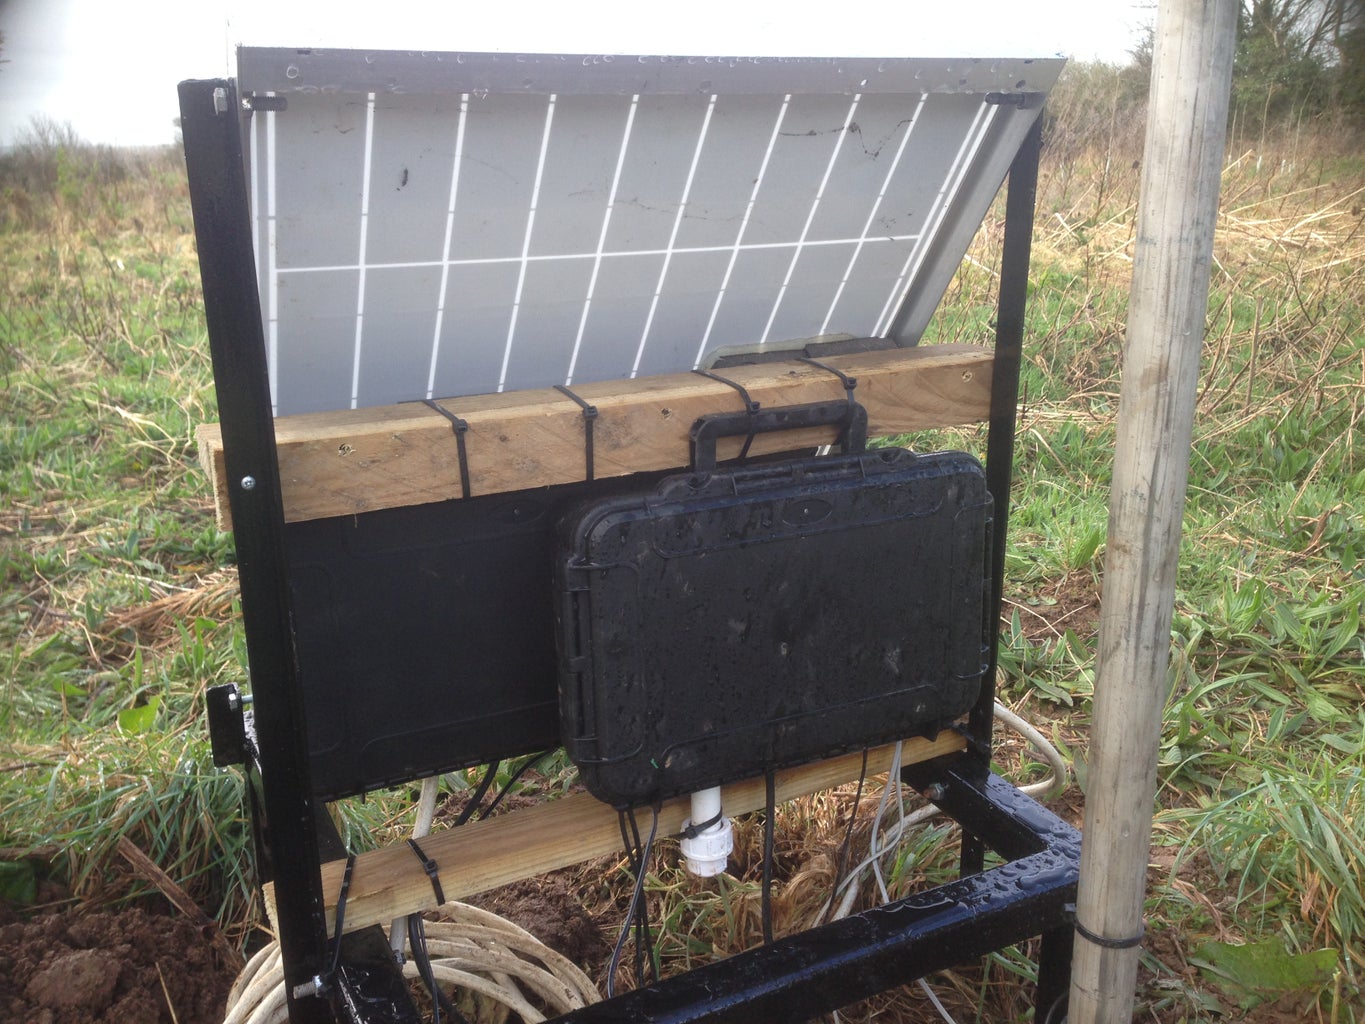
Step 6: Making a 'Pocket' for the Humidity Sensor


There's no point in having the humidity sensor inside the main box with the other electronics as the heat generated by the other components will make it give false reading. Also, we don't want it floating around on the end of a cable as it will get wet and damaged. It therefore has to be mounted in a pocket coming downwards out of the main box.
The pocket is made from waste water fittings and the end cap is drilled with a few holes as shown.
Step 7: Protecting the Solar Charging Regulator

The Regulator is a fairly generic 20A type found on ebay and is mounted in it's own waterproof box with strain relief glands on the cable entries as shown.
Step 8: Electronics Parts List and Schematic


- Hackable Prototyping Board
- DS18B20 x 2
- Resistor 4.7k x 3
- Resistor 10k x 10
- Resistor 1k x 10
- Resistor 100k x 1
- DH22 humidity sensor
- ZTX450 NPN transistor
- Arduino Mega 2560 board
- ATMEGA 328P chip
- Capacitor 25uF x 1
- Capacitor 100uF x 1
- Capacitor 1uF x 1
- Capacitor 100nF x 2
- LM7805 regulator
- Heat sink for above
- FONA 800L
- Wind speed, Wind direction, Rain gauge
- BMP 180 atmospheric pressure
- IN4002 diode
- LEDs x 4
- Solar regulator
- Waterproof cases x 2
- 16Mhz resonator
- 100nF capacitor x 2
Step 9: Power Supply


The solar regulator brings the panel voltage down from anywhere from 20 volts down to about 13.5 volts for charging the lead acid battery. It has electronics that monitor the charging and basically pulses voltage into the battery via PWM. This can cause problems for the sensor electronics and so a power supply is built onto the main board for regulating and filtering the voltage.
The main component is the good 'ol 7805 Regulator which is itself an integrated circuit composed of various transistors and resistors to bring the voltage down to a constant 5.0 volts from anywhere from between 8 and 35 volts. The data sheet is well worth having a quick look at. It does get pretty hot so a heat sink is essential.
Whilst the 7805 is pretty good at filtering out the solar panel pulses, it still benefits from a couple of capacitors shown in the schematic. It's not worth trying to put very large capacitors on the input or output as theses can cause problems when disconnecting the supply as they will store lots of charge.
There's a diode included in the schematic which protects the 7805 from damage during disconnection.
Attachments

Step 10: DS18B20 Temperature Measurement
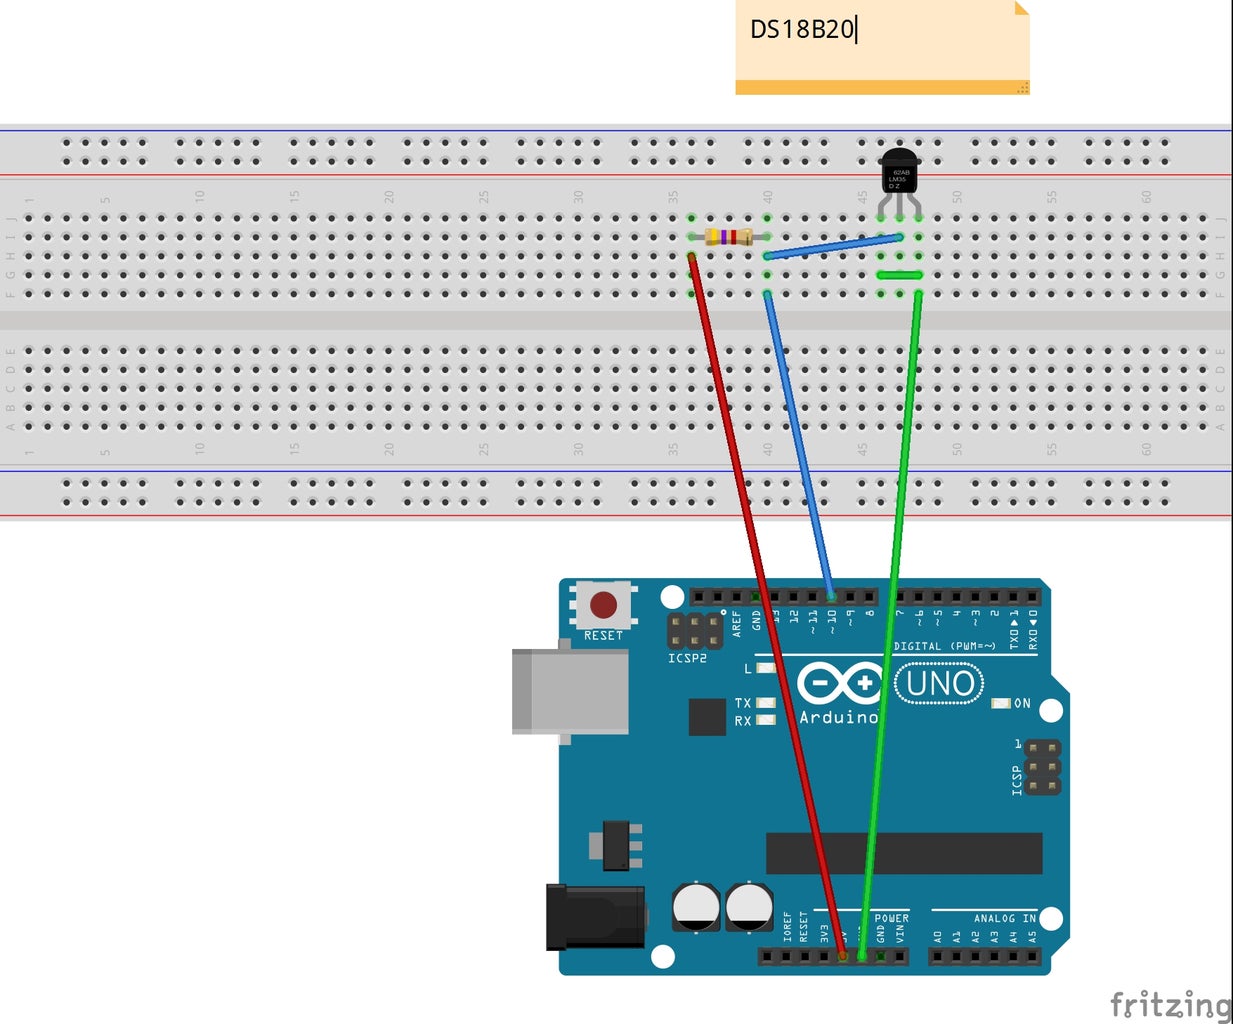


The DS18B20 is relatively easy to set up but the wiring is totally counter intuitive and so can cause some confusion. There are two ways to wire it - either using my fritzing sketch of the hand drawn sketch.
The first step is to run some code on the Arduino to test the device and get the device address. For this, we must download and install the libraries and run one of the example sketches from the Dallas library, 'one wire search'.
#include <OneWire.h>
#include <DallasTemperature.h>

The address should look something like this:
DeviceAddress Probe03 =  { 0x28, 0x7C, 0x8A, 0x5D, 0x05, 0x00, 0x00, 0xFD };
Each address is unique so don't try to use my addresses, unless you have stolen my DS18B20!
Step 11: Voltage Measurement

This is probably the easiest measurement to set up, but care is needed to make sure that the resistors are not the wrong way around or you will destroy the Arduino.
The volts reading needs to be calibrated with a multimeter and converted to a large integer with no decimal place for transmission.
<p>volts = analogRead(0)*4.688; // All decimals are converted to integers as we don't want to send the decimal place character thru HTTP.</p>
Step 12: Wind and Rain Sensors Layout


The Wind and rain sensors, on the face of it, are easy to install. However, when we look at them in more detail, they do have their problems.
The simplest is the wind speed gauge, but this has to be monitored without using any 'delay' functions in the code to avoid missing any data.
The rain gauge must also have no delay code, but does need 'debouncing' code and a 1 micro farad capacitor.
The wind direction sensor is a total pain in the proverbial and needs to be mapped according to the value picked up at A0 and each particular wind direction. It also needs to be pulsed with a short amount of power to save energy and this has to be done with the 'millis' function and NOT the 'delay' function, which makes it slightly more complicated to code.
Pulsing the wind direction sensor:
<p>///////////////////////////////////////////////////////////////////////////////////////////////////////////////////////////////////////////       <br>       if (currentMillis - previousShortMillis <= veryShortInterval)    ///  This sends a 5V pulse to wind direction sensor for a very short interval.
       {
       digitalWrite(powerToWindDirPin,HIGH);
       windDirection3 = analogRead(0);
       tone(6,(windDirection3+300));
       }
       else
       {
       digitalWrite(powerToWindDirPin,LOW);
       noTone(6);
       }
///////////////////////////////////////////////////////////////////////////////////////////////////////////////////////////////////////////</p>
Some more code excerpts are given here:
//////////////////////////////////////////////////////////////////////////////////////////////////////////////
void windCounter() {val = digitalRead(windSpeedInputPin);
if (val == HIGH) {
  if (windCounterStatus == LOW)
  {
  windCounterStatus = HIGH;
   digitalWrite(ledPin,HIGH);
          rats = rats +1;
  }
  }
else
  {
  if (windCounterStatus == HIGH)
  {
   windCounterStatus = LOW;
   digitalWrite(ledPin,LOW);
}
}
}

//////////////////////////////////////////////////////////////////////////////////////////////////////////////
void rainCounter (){val2 = digitalRead(rainInputPin);                                       // read input value
if (val2 == HIGH) {                                               // checking if the input is HIGH
  if (rainCounterStatus == LOW)
  {                                                                // we have just turned on
  rainCounterStatus = HIGH;
  digitalWrite(ledPin,HIGH);
          mice = mice +1;
  }
  }
else
  {
  if (rainCounterStatus == HIGH)
  {
   rainCounterStatus = LOW;
   digitalWrite(ledPin,LOW);
}
}
// Debounce (we suspect that mice is too high) :
unsigned long currentMillis = millis();
if ((mice > 0)&&(  (currentMillis - previousShortMillis) > (shortInterval - 10)    ))
{
     rain = rain + 1;
     mice = 0;
}
}

//////////////////////////////////////////////////////////////////////////////////////////////////////////////
void windDirectionCalc (){
  if ( (windDirection3 > -1) && (windDirection3 < 20) )
  {
  windDirection2 = 1;
  }
  if ( (windDirection3 > 20) && (windDirection3 < 60) )
  {
  windDirection2 = 2;
  }
  if ( (windDirection3 > 60) && (windDirection3 < 120) )
  {
  windDirection2 = 3;
  }
  if ( (windDirection3 > 200) && (windDirection3 < 250) )
  {
  windDirection2 = 4;
  }
  if ( (windDirection3 > 345) && (windDirection3 < 400) )
  {
  windDirection2 = 5;
  }
  if ( (windDirection3 > 310) && (windDirection3 < 345) )
  {
  windDirection2 = 6;
  }
  if ( (windDirection3 > 250) && (windDirection3 < 310) )
  {
  windDirection2 = 7;
  }
  if ( (windDirection3 > 120) && (windDirection3 < 200) )
  {
  windDirection2 = 8;
  }
}
Step 13: Wind and Rain Calculations
void myMode() // Calculates the mode wind direction (The value that occurrs most often).
{
if (windDirection2 == 1){one = one + 1;}
if (windDirection2 == 2){two = two + 1;}
if (windDirection2 == 3){three = three + 1;}
if (windDirection2 == 4){four = four + 1;}
if (windDirection2 == 5){five = five + 1;}
if (windDirection2 == 6){six = six + 1;}
if (windDirection2 == 7){seven = seven + 1;}
if (windDirection2 == 8){eight = eight + 1;}
if ( (one>two)&&(one>three)&&(one>four)&&(one>five)&&(one>six)&&(one>seven)&&(one>eight)&&(one>answerB) ){answerB = one; answerA = 1;}
if ( (two>one)&&(two>three)&&(two>four)&&(two>five)&&(two>six)&&(two>seven)&&(two>eight)&&(two>answerB) ){answerB = two; answerA = 2;}
if ( (three>one)&&(three>two)&&(three>four)&&(three>five)&&(three>six)&&(three>seven)&&(three>eight)&&(three>answerB) ){answerB = three; answerA = 3;}
if ( (four>one)&&(four>two)&&(four>three)&&(four>five)&&(four>six)&&(four>seven)&&(four>eight)&&(four>answerB) ){answerB = four; answerA = 4;}
if ( (five>one)&&(five>two)&&(five>three)&&(five>four)&&(five>six)&&(five>seven)&&(five>eight)&&(five>answerB) ){answerB = five; answerA = 5;}
if ( (six>one)&&(six>two)&&(six>three)&&(six>four)&&(six>five)&&(six>seven)&&(six>eight)&&(six>answerB) ){answerB = six; answerA = 6;}
if ( (seven>one)&&(seven>two)&&(seven>three)&&(seven>four)&&(seven>five)&&(seven>six)&&(seven>eight)&&(seven>answerB) ){answerB = seven; answerA = 7;}
if ( (eight>one)&&(eight>two)&&(eight>three)&&(eight>four)&&(eight>five)&&(eight>six)&&(eight>seven)&&(eight>answerB) ){answerB = eight; answerA = 8;}
Serial.print("My Mode value is: ");Serial.println(answerA);
}
Attachments
Step 14: Master and the Slave (I²C)


There are three reasons why I have set the controllers up as master and slave:
- Creating a 'sleep mode' so that energy is saved.
- Ensuring that the wind and rain data is never interrupted by the slower communications with the GPRS module. Setting up the GPRS seems to take about 20 seconds.
- Reliability: Sometimes the Mega 2560 crashes.
The main principle used for this communication is called I²C, (Inter-Integrated Circuit), pronounced I-squared-C, which is well documented here:
https://www.arduino.cc/en/Tutorial/MasterWriter
In my code, the 328P spends 10 minutes gathering data in 5 second intervals, at the end of which it sends that data via I²C to the Arduino Mega 2560 board for subsequent delivery to the internet via GPRS etc. The code for doing this is quite simple as long as the integers are each less than 255. This means absolutely no decimal places and we can't send a value such as 270 for the wind direction. None of this is a problem as we change all the wind angles to simple numbers eg. 4 == 180 degrees.
Here is a code excerpt for the wire transmission:
else  {
  avWindPulseRate = addingWindPulseRate/n;
  windDirection = answer;

  Serial.print("Median Wind direction for Wire =   ");Serial.println(windDirection);
  Wire.beginTransmission(9); // transmit to device #9     // Make sure the order is the same in master and slave.
  digitalWrite(moisturePowerPin, HIGH);
  delay(10);

  Wire.write(maxWindPulseRate/10);                         // Values must not be greater than 255 (1 byte).
  delay(10);
  Wire.write(windDirection);                               // A median number between 1 and 8 inclusive.
  delay(10);
  Wire.write(rain);
  moistureValue = analogRead(moisturePin)*0.102;           // The sensor is calibrated by multiplying by 0.102.
  delay(10);
  Wire.write(avWindPulseRate/10);
  delay(10);
  Wire.write(moistureValue);

  delay(10);
  digitalWrite(moisturePowerPin, LOW);
  Wire.endTransmission();    // stop transmitting

  resetMyMode();                                       // For debugging this function should not be in resetEverything if statement.
  previousLongMillis = currentMillis;
  addingWindPulseRate = 0;
  avWindPulseRate = 0;
  n=0;
  r=r+1;                                                  // counts up to a time period at which fona is reset in multiples of whatever long interval is set to.
  }
Here is a code excerpt for receiving the data on the Mega 2560:
void receiveEvent(int bytes) {       // Make sure the order is the same in master and slave.  delay(10);
  maxWindPulseRate = Wire.read();
  delay(10);
  windDirection = Wire.read();
  delay(10);
  rain = Wire.read();
  delay(10);
  avWindPulseRate = Wire.read();
  delay(10);
  moistureValue = Wire.read();
  delay(10);
  z=1;
  moisture = moistureValue;
}
Step 15: Sending Data Via GPRS and HTTP

The physical connections between the Mega 2560 and the FONA 800L are quite simple, except that something weird is going on with the lithium battery and the way it charges. I actually ended up using the small connector in the middle of the FONA board for my connection to 5V otherwise it would do strange things like turn itself off at seemingly random moments. Maybe the upgraded 'H' version is better?
The code that I used is loosely based on the Adafruit test code in the FONA library except for a piece that wrote myself for changing the data into a character format acceptable to the FONA chip.
Firstly, in setup, we need to define the APN:
<p>fona.setGPRSNetworkSettings(F("pp.vodafone.co.uk"), F("wap"), F("wap")); // Change these settings! (Network APN, username ,password)</p>Then we need a PHP ready to accept the data:
<p>const char webAddress[180] = <a href="http://www.goatindustries.co.uk/weather/send.php?">http://www.goatindustries.co.uk/weather/send.php?</a>;</p>
Notice that I have used 'send' in the above code. Never use send.php as your file name as it's too easy for someone to guess. Use a long series of letters and numbers instead, for security purposes.
<p>///////////////////////////////////////////////////////////////////////////////////////////////////////////////////////        <br>// This is where the data is compiled into a character ....
  dataString =  initiator + webAddress +"windspeed="+windspeed +"&windgust="+windgust  +"&windway="+windway  +"&tempout="+tempout  +"&tempsoil="+tempsoil  +"&rain="+rain  +"&humidity="+humidity  +"&pressure="+pressure  +"&volts="+volts  +"&moisture="+moisture  +"&tempint="+tempint  +"&ferrets="+ferrets ;
  int n = dataString.length();
  Serial.print("Data string to send:     ");Serial.println(dataString);
  Serial.print("Size of string:  ");Serial.println(n);
  // Builds the url character:
      for (int aa=0;aa<=n;aa++)
      {
          url[aa] = dataString[aa];
      }
  Serial.print("Character data to send:  ");Serial.println(url);
  Serial.println("");
///////////////////////////////////////////////////////////////////////////////////////////////////////////////////////
//..... and sent out via HTTP to a PHP file called send.php ready to recieve it.
        Serial.print("Sending url .... ");
        Serial.print("Compiled url is: ");Serial.println(url);
        Serial.println(F("****"));
        if (!fona.HTTP_GET_start(url, &statuscode, (uint16_t *)&length)) {
          Serial.println("Failed!");
        }
        while (length > 0) {
          while (fona.available()) {
            char c = fona.read();
            // Serial.write is too slow, we'll write directly to Serial register!
#if defined(__AVR_ATmega328P__) || defined(__AVR_ATmega168__)
            loop_until_bit_is_set(UCSR0A, UDRE0); /* Wait until data register empty. */
            UDR0 = c;
#else
            digitalWrite(5, HIGH);   // Call back to Master to say that tranmission was successful.
            tone(7,((windway*15)+400),1000);
            noTone(7);
            Serial.write(c);
////////////////////////////////////////////////////////////////////////////////////////////////////////////////////////</p>
In the above code, we've sent our data to send.php and put in a call back to tell us if it was successful or not. This call back triggers a buzzer tone on pin D7 and sends a pulse on pin D7 to tell the 328P master that transmission was ok.
Step 16: Sleep Mode


In the main void loop of the 328P master code, there is a counter called 'n' that counts the number of 5 second periods that have elapsed. The 'sleepModeFunction' uses this counter to decide whether to wake up the sleeping components or to send them back to sleep once they have done their job:
<p>void sleepModeFunction ()<br>{
if (   (n > 110)||(n<10)   )
    {
    digitalWrite(sleepModePin,HIGH);
    }
    else
    {
    digitalWrite(sleepModePin,LOW);
    }
}</p>
Notice in the schematic that we're using a simple NPN power transistor to turn the power on and off.
Step 17: Reset FONA

Sometimes I noticed that the FONA 800L locked up for no apparent reason and needed to be manually reset so I put in a reset function to do this automatically every 24 hours:
<p>void resetFonaFunction ()<br>{
if (r>143)                                            // resets fona once every 24 hours. This needs to be changed back to r>143.
    {
    digitalWrite(resetFonaPin,HIGH);
    delay(100);
    digitalWrite(resetFonaPin,LOW);
    r=0;
    }
}</p>
The hardware uses a sugar cube type relay to do this as transistors alone do not work.
Step 18: PHP Code for Transmitting Data to the Server
This is the code for sending the data to the MySQL database. Obviously, the database needs to be created before hand.
<p><?php<br-->// Create connection
$username = "donaldtrump";
$password = "bananas";
$hostname = "localhost";
$databasetable = "welovebeer";
$dbhandle = mysql_connect($hostname, $username, $password)
or die("Unable to connect to MySQL");
$selected = mysql_select_db("paddygoa_weather",$dbhandle)
or die("Could not select database");

$result = mysql_query("INSERT INTO $databasetable(windspeed,windgust,windway,tempout,tempsoil,rain,humidity,pressure,volts,moisture,tempint,elephants) VALUES (
'" . $_GET[windspeed] . "'/100,
'" . $_GET[windgust] . "'/100,
'" . $_GET[windway] . "',
'" . $_GET[tempout] . "'/100,
'" . $_GET[tempsoil] . "'/100,
'" . $_GET[rain] . "',
'" . $_GET[humidity] . "',
'" . $_GET[pressure] . "'/100,
'" . $_GET[volts] . "'/100,
'" . $_GET[moisture] . "',
'" . $_GET[tempint] . "',
'" . $_GET[elephants] . "')",
$dbhandle);
<p>
mysql_close($dbhandle);
?></p>
Some of the values are changed/blanked out for security reasons.
You'll notice that the $_GET command is used and so there will be a bit of work to be done to make the database secure. First thing is to permanently delete your log file and make sure it is never published anywhere on your site. This may have a negative impact on your search engine ranking though. Other security measures should be researched and implemented.
Step 19: Main Web Page

See the weather station live in action at:
Step 20: HTML and PHP Code Used With Amcharts Javascript
Here is the code for loading data for the moisture gauge into the Amcharts dataloader function:
The Amcharts javascript for the charts is here: https://www.amcharts.com/
<p>$username = "donaldtrump";<br>$password = "bananas";
$hostname = "localhost";
$databasetable = "welovebeer";
$dbhandle = mysql_connect($hostname, $username, $password)
or die("Unable to connect to MySQL");
$selected = mysql_select_db("paddygoa_weather",$dbhandle)
or die("Could not select database");
   $moisturemax = -100;
   $moisturemin = 100;
   $moisture = 0;
/////////////////////////////////////////////////////////////////////////////
//////  Use the while loop to further sort the data as SELECT wont do it ////
   $query4="SELECT * FROM weather ORDER BY id DESC LIMIT 1008";
   $result4=mysql_query($query4);
while($row4=mysql_fetch_array($result4))
   {
   if ($row4['moisture'] > $moisturemax)
   { $moisturemax = $row4['moisture']; }
   if ($row4['moisture'] < $moisturemin)
   { $moisturemin = $row4['moisture']; }
   }
////////////////////////////////////////////////////////////////////////////
////////////////////////////////////////////////////////////////////////////
   $query5="SELECT * FROM weather ORDER BY id DESC LIMIT 1";
   $result5=mysql_query($query5);
while($row5=mysql_fetch_array($result5))
   {
   $moisture = $row5['moisture'];
   }

$orange = '  "color": "#ffa500", ';
$red = '  "color": "#FF0000", ';
$blue =  '  "color": "#0000FF", ';
$green =  '  "color": "#008000", ';
$black =  '  "color": "#000000", ';
$radius01 = '  "radius": "90%", ';
$radius02 = '  "radius": "50%", ';
$prefix = '';
echo "[\n";
//while ( $row = mysql_fetch_assoc( $result ) ) {

  echo $prefix . " {\n";
  echo $red;
  echo '  "value": ' . $moisturemax . '},{' . "\n";
  echo $black;
  echo '  "value": ' . $moisture . '},{' . "\n";
  echo $blue;
  echo '  "value": ' . $moisturemin . '' . "\n";
  echo " }";
  $prefix = ",\n";
//}
  echo "\n]";
// close MySQL connection
mysql_close();
 ?>
</p>
The full code for the main webpage is attached as a file below. Note, that there is a javascript 'set interval' loop that I put in myself which seems to consume quite a bit of browser memory.
Attachments

Step 21: Full Code for ATMEGA 328P Chip
// MASTER See attached text file for full details.<br>#include
#include
long startMS;  // This will hold the start time in milliseconds
int windCounterStatus = LOW;
int rainCounterStatus = HIGH;
int resetStatus = LOW;
int val = 0;
int val1 = 0;
int val2 = 0;
int rats =0;  // number of rats detected
int mice =0;  // number of mice detected
unsigned long rain = 0;
unsigned long previousRain =0;
int windSpeedInputPin =       2;
int rainInputPin=             3;
int resetWatcherPin =         4;               // Recieves a pulse from pin 5 on the slave.
int powerToWindDirPin =       7;
int sleepModePin =            8;
int resetFonaPin =            9;
const int ledPin =            13;
unsigned long rainPulses= 0;
unsigned long windPulseRate = 0;
unsigned long maxWindPulseRate = 0;
unsigned long avWindPulseRate = 0;
unsigned long addingWindPulseRate = 0;
int resetEverything = 0;
int moisturePin = A1;
int moisturePowerPin = 10;
unsigned long moistureValue = 0;
unsigned long futureRainDebounceValue =0;
int n = 0;
int r = 0;
int i = 0;
int ledState = LOW;
int sleepMode = LOW;
unsigned long previousLongMillis = 0;
unsigned long previousShortMillis = 0;
unsigned long previousMillis = 0;
const long veryShortInterval = 50;
const long shortInterval = 5000;
const long longInterval = 600000;       // 60000 = 1 minute
const long rainDebounceValue = 10000;
int windDirection = 0;
int windDirection2 = 0;
int windDirection3 = 0;
int one =0;
int two =0;
int three =0;
int four =0;
int five =0;
int six =0;
int seven =0;
int eight =0;
int answer = 0;
void setup() {
  Wire.begin();
  pinMode(ledPin, OUTPUT);
  pinMode(sleepModePin, OUTPUT);
  pinMode(powerToWindDirPin, OUTPUT);
  pinMode(resetFonaPin, OUTPUT);
  pinMode(windSpeedInputPin, INPUT_PULLUP);
  pinMode(rainInputPin, INPUT_PULLUP);
  pinMode(resetWatcherPin, INPUT_PULLUP);
  pinMode(moisturePowerPin, OUTPUT);
  digitalWrite(sleepModePin,HIGH);
  digitalWrite(powerToWindDirPin,LOW);
  delay(2000);
  tone(6,500,1000);
  digitalWrite(resetFonaPin,HIGH);
  delay(100);
  digitalWrite(resetFonaPin,LOW);
  Serial.begin(115200);
  Serial.println("Starting wind and rain recording .......");
}
////////////////////////////////////////////////////////////////////////////////////////////////////////////////////////
void loop() {<p>  unsigned long currentMillis = millis();   // Millis goes back to zero after 50 days

  windCounter();                                                 // Wind pulse counting function
  rainCounter();
  resetCounter();
  sleepModeFunction();
  resetFonaFunction();
  windDirectionCalc();


if (currentMillis - previousLongMillis <= longInterval)      // Note that we never use the 'delay' function during this 'if' statement.
  {
///////////////////////////////////////////////////////////////////////////////////////////////////////////////////////////////////////////
       if (currentMillis - previousShortMillis <= veryShortInterval)    ///  This sends a 5V pulse to wind direction sensor for a very short interval.
       {
       digitalWrite(powerToWindDirPin,HIGH);
       windDirection3 = analogRead(0);
       tone(6,(windDirection3+300));
       }
       else
       {
       digitalWrite(powerToWindDirPin,LOW);
       noTone(6);
       }
///////////////////////////////////////////////////////////////////////////////////////////////////////////////////////////////////////////
       if (currentMillis - previousShortMillis >= shortInterval)
       {
///////////////////////////////////////////////////////////////////////////////////////////////////////////////////////////////////////////
       //  if ((n>10)&&(n<120)){tone(6,((answer*15)+400));} else {noTone(6);}      // use for debugging wind direction sensor.
///////////////////////////////////////////////////////////////////////////////////////////////////////////////////////////////////////////
         windPulseRate = 100 * rats/(shortInterval/1000);
         addingWindPulseRate = addingWindPulseRate + windPulseRate;
         n = n+1;
         myMode();      // Calculates the mode wind direction.
         Serial.println("");
         Serial.print("moisture value is:  ");Serial.print(moistureValue);Serial.println(" %");
         Serial.print("Millis =   ");Serial.println(currentMillis);
         Serial.print("Wind pulse rate per micro second= ");Serial.println(windPulseRate);
         Serial.print("Average wind pulse rate per micro second= ");Serial.println(avWindPulseRate);
         Serial.print("n =   ");Serial.println(n);
         Serial.print("r =   ");Serial.println(r);
         Serial.print("Maximum wind pulse rate per micro second =  ");Serial.println(maxWindPulseRate);
         Serial.print("Rain fall =  ");Serial.println(rain);
         Serial.print("resetEverything = ");Serial.println(resetEverything);
         Serial.print("Wind direction =   ");Serial.println(windDirection2);
////////////////////////////////////////////////////////////////////////////////////////////////////////////////////////
/////////////////////////////////////////////////////////////////////////////////////////////////////////////////////////

         previousShortMillis = currentMillis;
         i = 0;
         rats = 0;

      }
      if (windPulseRate > maxWindPulseRate)
      {
         maxWindPulseRate = windPulseRate;
         Serial.print("Maximum wind pulse rate per micro second =  ");Serial.println(maxWindPulseRate);
      }
      if (rain > previousRain)
      {
         previousRain = rain;
      }
  }
  else
  {
  avWindPulseRate = addingWindPulseRate/n;
  windDirection = answer;

  Serial.print("Median Wind direction for Wire =   ");Serial.println(windDirection);
  Wire.beginTransmission(9); // transmit to device #9     // Make sure the order is the same in master and slave.
  digitalWrite(moisturePowerPin, HIGH);
  delay(10);

  Wire.write(maxWindPulseRate/10);                         // Values must not be greater than 255 (1 byte).
  delay(10);
  Wire.write(windDirection);                               // A median number between 1 and 8 inclusive.
  delay(10);
  Wire.write(rain);
  moistureValue = analogRead(moisturePin)*0.102;           // The sensor is calibrated by multiplying by 0.102.
  delay(10);
  Wire.write(avWindPulseRate/10);
  delay(10);
  Wire.write(moistureValue);

  delay(10);
  digitalWrite(moisturePowerPin, LOW);
  Wire.endTransmission();    // stop transmitting

  resetMyMode();                                       // For debugging this function should not be in resetEverything if statement.
  previousLongMillis = currentMillis;
  addingWindPulseRate = 0;
  avWindPulseRate = 0;
  n=0;
  r=r+1;                                                  // counts up to a time period at which fona is reset in multiples of whatever long interval is set to.
  }
  if(resetEverything > 0)                                 // This is the call back to say successful data transmission to HTTP.
  {
     tone(6,((answer*15)+400),1000);
     maxWindPulseRate = 0;
     rain = 0;
     previousRain = 0;
     resetEverything = 0;
  }
}
//////////////////////////////////////////////////////////////////////////////////////////////////////////////////////////
//////////////////////////////////////////////////////////////////////////////////////////////////////////////////////////////////////
void windCounter() {
val = digitalRead(windSpeedInputPin);                                       // read input value
if (val == HIGH) {                                               // checking if the input is HIGH
  if (windCounterStatus == LOW)
  {                                                                // we have just turned on
  windCounterStatus = HIGH;
   digitalWrite(ledPin,HIGH);
//  Serial.print("Pulses = ");Serial.println(rats);
          rats = rats +1;
  }
  }
else
  {
  if (windCounterStatus == HIGH)
  {
   windCounterStatus = LOW;
   digitalWrite(ledPin,LOW);
}
}
}
//////////////////////////////////////////////////////////////////////////////////////////////////////////////////////////////////////////
//////////////////////////////////////////////////////////////////////////////////////////////////////////////////////////////////////
void resetCounter() {
val1 = digitalRead(resetWatcherPin);                                       // read input value
if (val1 == HIGH) {                                               // checking if the input is HIGH
  if (resetStatus == LOW)
  {                                                                // we have just turned on
  resetStatus = HIGH;
//   digitalWrite(ledPin,HIGH);
 //  Serial.print("resetEverything = ");Serial.println(resetEverything);
          resetEverything = 1;
  }
  }
else
  {
  if (resetStatus == HIGH)
  {
   resetStatus = LOW;
//   digitalWrite(ledPin,LOW);
}
}
}
//////////////////////////////////////////////////////////////////////////////////////////////////////////////////////////////////////////
void rainCounter (){
val2 = digitalRead(rainInputPin);                                       // read input value
if (val2 == HIGH) {                                               // checking if the input is HIGH
  if (rainCounterStatus == LOW)
  {                                                                // we have just turned on
  rainCounterStatus = HIGH;
  digitalWrite(ledPin,HIGH);
          mice = mice +1;
  }
  }
else
  {
  if (rainCounterStatus == HIGH)
  {
   rainCounterStatus = LOW;
   digitalWrite(ledPin,LOW);
}
}
// Debounce (we suspect that mice is too high) :
unsigned long currentMillis = millis();
if ((mice > 0)&&(  (currentMillis - previousShortMillis) > (shortInterval - 10)    ))
{
     rain = rain + 1;
     mice = 0;
}
}
//////////////////////////////////////////////////////////////////////////////////////////////////////////////////////////////////////////////
void windDirectionCalc ()
{
  if ( (windDirection3 > -1) && (windDirection3 < 20) )
  {
  windDirection2 = 1;
  }
  if ( (windDirection3 > 20) && (windDirection3 < 60) )
  {
  windDirection2 = 2;
  }
  if ( (windDirection3 > 60) && (windDirection3 < 120) )
  {
  windDirection2 = 3;
  }
  if ( (windDirection3 > 200) && (windDirection3 < 250) )
  {
  windDirection2 = 4;
  }
  if ( (windDirection3 > 345) && (windDirection3 < 400) )
  {
  windDirection2 = 5;
  }
  if ( (windDirection3 > 310) && (windDirection3 < 345) )
  {
  windDirection2 = 6;
  }
  if ( (windDirection3 > 250) && (windDirection3 < 310) )
  {
  windDirection2 = 7;
  }
  if ( (windDirection3 > 120) && (windDirection3 < 200) )
  {
  windDirection2 = 8;
  }

}
///////////////////////////////////////////////////////////////////////////////////////////////////////////////////////////
void sleepModeFunction ()
{
if (   (n > 110)||(n<10)   )
    {
    digitalWrite(sleepModePin,HIGH);
    }
    else
    {
    digitalWrite(sleepModePin,LOW);
    }
}
//////////////////////////////////////////////////////////////////////////////////////////////////////////////////////////////////////
void resetFonaFunction ()
{
if (r>143)                                            // resets fona once every 24 hours. This needs to be changed back to r>143.
    {
    digitalWrite(resetFonaPin,HIGH);
    delay(100);
    digitalWrite(resetFonaPin,LOW);
    r=0;
    }
}
/////////////////////////////////////////////////////////////////////////////////////////////////////////////////////
/////////////////////////////////////////////////////////////////////////////////////////////////////////////////////////////
void myMode()   // Calculates the mode wind direction (The value that occurrs most often).
{
if (windDirection2 == 1){one = one + 1;}
if (windDirection2 == 2){two = two + 1;}
if (windDirection2 == 3){three = three + 1;}
if (windDirection2 == 4){four = four + 1;}
if (windDirection2 == 5){five = five + 1;}
if (windDirection2 == 6){six = six + 1;}
if (windDirection2 == 7){seven = seven + 1;}
if (windDirection2 == 8){eight = eight + 1;}
if (  (one>two)&&(one>three)&&(one>four)&&(one>five)&&(one>six)&&(one>seven)&&(one>eight)                ){answer = 1;}
if (  (two>one)&&(two>three)&&(two>four)&&(two>five)&&(two>six)&&(two>seven)&&(two>eight)                ){answer = 2;}
if (  (three>one)&&(three>two)&&(three>four)&&(three>five)&&(three>six)&&(three>seven)&&(three>eight)    ){answer = 3;}
if (  (four>one)&&(four>two)&&(four>three)&&(four>five)&&(four>six)&&(four>seven)&&(four>eight)          ){answer = 4;}
if (  (five>one)&&(five>two)&&(five>three)&&(five>four)&&(five>six)&&(five>seven)&&(five>eight)          ){answer = 5;}
if (  (six>one)&&(six>two)&&(six>three)&&(six>four)&&(six>five)&&(six>seven)&&(six>eight)                ){answer = 6;}
if (  (seven>one)&&(seven>two)&&(seven>three)&&(seven>four)&&(seven>five)&&(seven>six)&&(seven>eight)    ){answer = 7;}
if (  (eight>one)&&(eight>two)&&(eight>three)&&(eight>four)&&(eight>five)&&(eight>six)&&(eight>seven)    ){answer = 8;}
Serial.print("My Mode value is:  ");Serial.println(answer);
}
void resetMyMode()
{
 one =0;
 two =0;
 three =0;
 four =0;
 five =0;
 six =0;
 seven =0;
 eight =0;
 answer = 0;
}</p>
Attachments
Step 22: MEGA 2560 Full Code
<p>// SLAVE See attached text file for full details.<br>#include
#include "Adafruit_FONA.h"
#include
#include
#include
#include
#include
#include "DHT.h"
#define FONA_RX 2
#define FONA_TX 10
#define FONA_RST 4
#define ONE_WIRE_BUS_PIN 11
#define DHTPIN 4
//#define DHTTYPE DHT11   // DHT 11
#define DHTTYPE DHT22   // DHT 22  (AM2302), AM2321
// Pin 5   //Sends a call back signal to the master when successful data transmission.
DHT dht(DHTPIN, DHTTYPE);
OneWire oneWire(ONE_WIRE_BUS_PIN);
DallasTemperature sensors(&oneWire);
DeviceAddress Probe01 =  { 0x28, 0xFF, 0xA3, 0x4D, 0x00, 0x16, 0x03, 0xEC };  // These are the addresses of the temp probes DS18B20
DeviceAddress Probe02 =  { 0x28, 0x4E, 0xCA, 0x80, 0x04, 0x00, 0x00, 0xA0 };
DeviceAddress Probe03 =  { 0x28, 0x7C, 0x8A, 0x5D, 0x05, 0x00, 0x00, 0xFD };
const long ferrets = 179224;
int n = 0;
int z = 0;
int moisture = 0;
unsigned long heatindex = 0;
unsigned long humidity = 0;
unsigned long tempDHT22 =0;
unsigned long windspeed = 0;
unsigned long windgust = 0;
unsigned long avWindPulseRate = 0;
unsigned long maxWindPulseRate = 0;
unsigned long rain = 0;
unsigned long windDirection = 0;
unsigned long windway = 0;
unsigned long moistureValue = 0;
unsigned long pressure = 0;
unsigned long volts = 1200;        // multiplied by 100.
unsigned long tempint;
unsigned long tempout;
unsigned long tempsoil;
unsigned long previousMillis = 0;
const long interval = 10000;
// this is a large buffer for replies
char replybuffer[255];
String initiator, dataString;
const char webAddress[180] = "http://www.goatindustries.co.uk/weather/send.php?";
char url[180];
#include
SoftwareSerial fonaSS = SoftwareSerial(FONA_TX, FONA_RX);
SoftwareSerial *fonaSerial = &fonaSS;
Adafruit_FONA fona = Adafruit_FONA(FONA_RST);
Adafruit_BMP085_Unified bmp = Adafruit_BMP085_Unified(10085);
uint8_t readline(char *buff, uint8_t maxbuff, uint16_t timeout = 0);
uint8_t type;
/////////////////////////////////////////////////////////////////////////////////////////////////////////////////////////////////////
void setup() {
  Serial.begin(115200);
  pinMode(5, OUTPUT);                                    //Sends a call back signal to the master when successful data transmission.
  pinMode(6, OUTPUT);                                    // Resets FONA
  digitalWrite(6,LOW);
//  delay (1000);
//  digitalWrite(6,HIGH);
//  delay (100);
//  digitalWrite(6,LOW);


  dht.begin();
  if(!bmp.begin())
  {
    /* There was a problem detecting the BMP085 ... check your connections */
    Serial.print("Ooops, no BMP085 detected ... Check your wiring or I2C ADDR!");
    while(1);
  }

  Wire.begin(9);
  Wire.onReceive(receiveEvent);

  while (!Serial);                           // Use this for initiating program by opening of serial monitor. Delete in normal operation.
  Serial.println(F("FONA basic test"));
  Serial.println(F("Initializing....(May take 3 seconds)"));
  sensors.begin();                       // Temperature sensors DS18B20.
  sensors.setResolution(Probe01, 11); /////// Was on pin 10 in version 09
  sensors.setResolution(Probe02, 11);
  sensors.setResolution(Probe03, 11);
  fonaSerial->begin(4800);
  if (! fona.begin(*fonaSerial)) {
    Serial.println(F("Couldn't find FONA"));
    while (1);
  }
  type = fona.type();
  Serial.println(F("FONA is OK"));
  Serial.print(F("Found "));
  switch (type) {
    case FONA800L:
      Serial.println(F("FONA 800L")); break;
    case FONA800H:
      Serial.println(F("FONA 800H")); break;
    case FONA808_V1:
      Serial.println(F("FONA 808 (v1)")); break;
    case FONA808_V2:
      Serial.println(F("FONA 808 (v2)")); break;
    case FONA3G_A:
      Serial.println(F("FONA 3G (American)")); break;
    case FONA3G_E:
      Serial.println(F("FONA 3G (European)")); break;
    default:
      Serial.println(F("???")); break;
  }
  networkStatus();   // Check the network is available. Home is good.

  // Test FONA by printing module IMEI number.
  char imei[15] = {0}; // MUST use a 16 character buffer for IMEI!
  uint8_t imeiLen = fona.getIMEI(imei);
  if (imeiLen > 0) {
    Serial.print("Module IMEI: "); Serial.println(imei);
  }
        Serial.println("");
        Serial.println("Checking that GPRS is turned off to start with .........");
  fona.setGPRSNetworkSettings(F("pp.vodafone.co.uk"), F("wap"), F("wap"));   // Change these settings! (Network APN, username ,password)
delay (1000);
        // Turn off GPRS:
        if (!fona.enableGPRS(false))
        Serial.println(F("No - Failed to turn off"));
        Serial.println("If the line above says OK, then GPRS has just been turned off");
delay (1000);

        Serial.println("");
        Serial.println("Waiting for data from i2c  ...........");
        Serial.println("");
}
////////////////////////////////////////////////////////////////////////////////////////////////////////////////////////////////
void loop() {
    if (  z>0)                          // This loop is initiated if z is greater than 1. The value of z is given by the reciept
  {                                     // of i2c data. There needs to be a second z evaluation to enable fona to turn on it's GPRS
    networkStatus();                    // and prevent data loss in the time gap.
      volts = analogRead(0)*4.688;               // All decimals are converted to integers as we don't want to send the decimal place character thru HTTP.

//////////////////////////////////////////////////////////////////////////////////////////////////////////////////////////////////////
  // Reading temperature or humidity takes about 250 milliseconds!
  // Sensor readings may also be up to 2 seconds 'old' (its a very slow sensor)
  float h = dht.readHumidity();
  // Read temperature as Celsius (the default)
  float t = dht.readTemperature();
  // Read temperature as Fahrenheit (isFahrenheit = true)
  float f = dht.readTemperature(true);
  delay (3000);
  // Check if any reads failed and exit early (to try again).
  if (isnan(h) || isnan(t) || isnan(f)) {
    Serial.println("Failed to read from DHT sensor!");
    return;
  }
  // Compute heat index in Fahrenheit (the default)
  float hif = dht.computeHeatIndex(f, h);
  // Compute heat index in Celsius (isFahreheit = false)
  float hic = dht.computeHeatIndex(t, h, false);
  humidity = h;
  tempDHT22 = t;
  heatindex = hic;
///////////////////////////////////////////////////////////////////////////////////////////////////////////////////////////////////////////////
    sensors_event_t event;
    bmp.getEvent(&event);
    if (event.pressure)
    {
    pressure = (event.pressure) *100;
    }
///////////////////////////////////////////////////////////////////////////////////////////////////////////////////////////////////

    sensors.requestTemperatures();         // DS18B20s
    windspeed = avWindPulseRate *20;
    windgust = maxWindPulseRate *20;
    windway = windDirection;
    moisture = moistureValue * 1.08;

    printData();                            // Prints all the data to serial for debugging.

  Serial.print(F("FONA> "));
    turnOnGPRS();
    turnOnGPRS();

        // read website URL
        uint16_t statuscode;
        int16_t length;
        char url[180];
        flushSerial();
        //weatherData();
///////////////////////////////////////////////////////////////////////////////////////////////////////////////////////
// This is where the data is compiled into a character ....
  dataString =  initiator + webAddress +"windspeed="+windspeed +"&windgust="+windgust  +"&windway="+windway  +"&tempout="+tempout  +"&tempsoil="+tempsoil  +"&rain="+rain  +"&humidity="+humidity  +"&pressure="+pressure  +"&volts="+volts  +"&moisture="+moisture  +"&tempint="+tempint  +"&ferrets="+ferrets ;
  int n = dataString.length();
  Serial.print("Data string to send:     ");Serial.println(dataString);
  Serial.print("Size of string:  ");Serial.println(n);
  // Builds the url character:
      for (int aa=0;aa<=n;aa++)
      {
          url[aa] = dataString[aa];
      }
  Serial.print("Character data to send:  ");Serial.println(url);
  Serial.println("");
///////////////////////////////////////////////////////////////////////////////////////////////////////////////////////
//..... and sent out via HTTP to a PHP file called send.php ready to recieve it.
        Serial.print("Sending url .... ");
        Serial.print("Compiled url is: ");Serial.println(url);
        Serial.println(F("****"));
        if (!fona.HTTP_GET_start(url, &statuscode, (uint16_t *)&length)) {
          Serial.println("Failed!");
        }
        while (length > 0) {
          while (fona.available()) {
            char c = fona.read();
            // Serial.write is too slow, we'll write directly to Serial register!
#if defined(__AVR_ATmega328P__) || defined(__AVR_ATmega168__)
            loop_until_bit_is_set(UCSR0A, UDRE0); /* Wait until data register empty. */
            UDR0 = c;
#else
            digitalWrite(5, HIGH);   // Call back to Master to say that tranmission was successful.
            tone(7,((windway*15)+400),1000);
            noTone(7);
            Serial.write(c);
////////////////////////////////////////////////////////////////////////////////////////////////////////////////////////
////////////////////////////////////////////////////////////////////////////////////////////////////////////////////////
#endif
            length--;
            if (! length) break;
          }
        }
        Serial.println(F("\n****"));
        fona.HTTP_GET_end();
        Serial.println("Wait for 10 seconds ...........");
        delay(500);
        digitalWrite(5, LOW);
        delay (10000);

        // Turn off GPRS:
        if (!fona.enableGPRS(false))
        Serial.println(F("No - Failed to turn off"));
        Serial.println("GPRS turned off?");
        Serial.println("Waiting for data from i2c  ...........");

  // flush input
  flushSerial();
  while (fona.available()) {
    Serial.write(fona.read());
  }
    z=0;
  }
}
// End of main loop.
///////////////////////////////////////////////////////////////////////////////////////////////////////////////////////////////////
// Functions:
void flushSerial() {
  while (Serial.available())
    Serial.read();
}
char readBlocking() {
  while (!Serial.available());
  return Serial.read();
}
uint16_t readnumber() {
  uint16_t x = 0;
  char c;
  while (! isdigit(c = readBlocking())) {
    //Serial.print(c);
  }
  Serial.print(c);
  x = c - '0';
  while (isdigit(c = readBlocking())) {
    Serial.print(c);
    x *= 10;
    x += c - '0';
  }
  return x;
}
uint8_t readline(char *buff, uint8_t maxbuff, uint16_t timeout) {
  uint16_t buffidx = 0;
  boolean timeoutvalid = true;
  if (timeout == 0) timeoutvalid = false;
  while (true) {
    if (buffidx > maxbuff) {
      //Serial.println(F("SPACE"));
      break;
    }
    while (Serial.available()) {
      char c =  Serial.read();
      //Serial.print(c, HEX); Serial.print("#"); Serial.println(c);
      if (c == '\r') continue;
      if (c == 0xA) {
        if (buffidx == 0)   // the first 0x0A is ignored
          continue;
        timeout = 0;         // the second 0x0A is the end of the line
        timeoutvalid = true;
        break;
      }
      buff[buffidx] = c;
      buffidx++;
    }
    if (timeoutvalid && timeout == 0) {
      //Serial.println(F("TIMEOUT"));
      break;
    }
    delay(1);
  }
  buff[buffidx] = 0;  // null term
  return buffidx;
}
/////////////////////////////////////////////////////////////////////////////////////////////////////////////////////
void receiveEvent(int bytes) {       // Make sure the order is the same in master and slave.
  delay(10);
  maxWindPulseRate = Wire.read();
  delay(10);
  windDirection = Wire.read();
  delay(10);
  rain = Wire.read();
  delay(10);
  avWindPulseRate = Wire.read();
  delay(10);
  moistureValue = Wire.read();
  delay(10);
  z=1;
  moisture = moistureValue;
}
///////////////////////////////////////////////////////////////////////////////////////////////////////////////////////////////
void printSoilTemperature(DeviceAddress deviceAddress)
{
float temp = sensors.getTempC(deviceAddress);
tempsoil = temp*100;
   if (tempsoil == -127.00)
   {
   Serial.print("Error getting temperature  ");
   }
   else
   {
   Serial.print(tempsoil);    Serial.print(" degrees C *100");
   }
}
void printOutsideTemperature(DeviceAddress deviceAddress)
{
float temp = sensors.getTempC(deviceAddress);
tempout = temp*100;
   if (tempout == -127.00)
   {
   Serial.print("Error getting temperature  ");
   }
   else
   {
   Serial.print(tempout);    Serial.print(" degrees C *100");
   }
}
void printInsideTemperature(DeviceAddress deviceAddress)
{
float temp = sensors.getTempC(deviceAddress);
tempint = temp;
   if (tempint == -127.00)
   {
   Serial.print("Error getting temperature  ");
   }
   else
   {
   Serial.print(tempint);    Serial.print(" degrees CC *100");
   }
}
//////////////////////////////////////////////////////////////////////////////////////////////////////////////////////////
void networkStatus()
{
          // read the network/cellular status
        uint8_t n = fona.getNetworkStatus();
        Serial.println("");
        Serial.print(F("Network status "));
        Serial.print(n);
        Serial.print(F(":           "));
        if (n == 0) Serial.println(F("Not registered"));
        if (n == 1) Serial.println(F("Registered (home)"));
        if (n == 2) Serial.println(F("Not registered (searching)"));
        if (n == 3) Serial.println(F("Denied"));
        if (n == 4) Serial.println(F("Unknown"));
        if (n == 5) Serial.println(F("Registered roaming"));
        Serial.println("The network status must be 'Registered' 'home' in the line above");
        Serial.println("");
}
//////////////////////////////////////////////////////////////////////////////////////////////////////////////////////////////
void turnOnGPRS()
{
        Serial.println("Now attempting to turn on GPRS .........");
        if (!fona.enableGPRS(true))
        Serial.println(F("No - Failed to turn on"));
        Serial.println("GPRS is on if the line above shows 'OK'");
        Serial.println("Wait for 10 seconds to make sure GPRS is on ...........");
        delay (10000);
}
////////////////////////////////////////////////////////////////////////////////////////////////////////////////////////////////
void printData()
{
    Serial.print("Probe01 (outside) temp:     ");
    printOutsideTemperature(Probe01);
    Serial.println();
    Serial.print("Probe02 (soil) temp:        ");
    printSoilTemperature(Probe02);
    Serial.println();
    Serial.print("Probe03 (tempint) temp:     ");
    printInsideTemperature(Probe03);
    Serial.println();
    Serial.print("Main battery voltage:       ");Serial.println(volts);
    Serial.print("i2c maxWindPulseRate:       ");Serial.println(windgust);      // Not calibrated yet.
    Serial.print("i2c avWindPulseRate:        ");Serial.println(windspeed);
    Serial.print("i2c windDirection:          ");Serial.println(windDirection);
    Serial.print("i2c rain:                   ");Serial.println(rain);
    Serial.print("i2c moistureValue:          ");Serial.println(moistureValue);
    Serial.print("Atmospheric pressure:       "); Serial.print(pressure); Serial.println(" hPa *100");
    Serial.print("Humidity:                   ");
    Serial.print(humidity);
    Serial.println(" %\t");
    Serial.print("DHT22 temp:                 ");
    Serial.print(tempDHT22);
    Serial.println(" *C ");
    Serial.print("Heat index:                 ");
    Serial.print(heatindex);
    Serial.println(" *C ");
    Serial.println("");
}</p>
Attachments
Step 23: Final

I can't really believe that many people will want to build this whole project, but parts of it may be useful. If, in the remote chance that you do want to make it, please let me know as I will soon have some custom made weather station development PCBs for sale.
This project will be continued in Part 2, so watch this space. There will be a significant upgrade of the wind speed and wind vane sensors, kindly donated by Vector Instruments and a much better PCB layout with a 1.8" TFT display and, yes, connections for 3 separate arduinos!
Enjoy your weather!

Participated in the
Sensors Contest 2016


