

Introduction: Arduino Stepper Motors


When we need precision and repeatability, a stepper motor is always the solution. With the way it is designed, a stepper can only move from one step to the next and fix in that position. A typical motor has 200 steps per revolution; if we tell the motor to go 100 steps in one direction, it will turn exactly 180 degrees. It gets interesting when we only tell it to go one step and it turns exactly 1.8 degrees.
Stepper motors are found in printers, scanners, industrial robot arms, 3D printers, and pretty much in every precision motion device.
There are two types of stepper motors: unipolar and bipolar. Unipolar stepper motors are easy to control at the cost of low efficiency and power. Bipolar stepper motors have much higher efficiency and torque; however they are much harder to control. To fully control one, two H-bridges are required. Luckily there are multiple Arduino compatible bipolar stepper drivers out there. Here we will explore a few options.
We can control a bipolar stepper motor using the Arduino Motor Shield. Here is what we need:
- An Arduino board connected to a computer via USB
- An Arduino Motor Shield
- A bipolar stepper motor, available at Sparkfun, Pololu, Adafruit or in an old printer.
This is a simple guide on identifying the type. A four-cable stepper motor is usually bipolar. With six cables, it is most probably unipolar where the two center coil cables have to be connected together. There are some versions with only five cables that are also unipolar and already have the two center coils connected together internally. Also, there are stepper motors with eight cables, but they are incredibly rare. They are also unipolar and the four center cables have to be connected together.
This instructable and many more can be found in my Arduino Development Cookbook available here. :D
Step 1: How to Connect Them
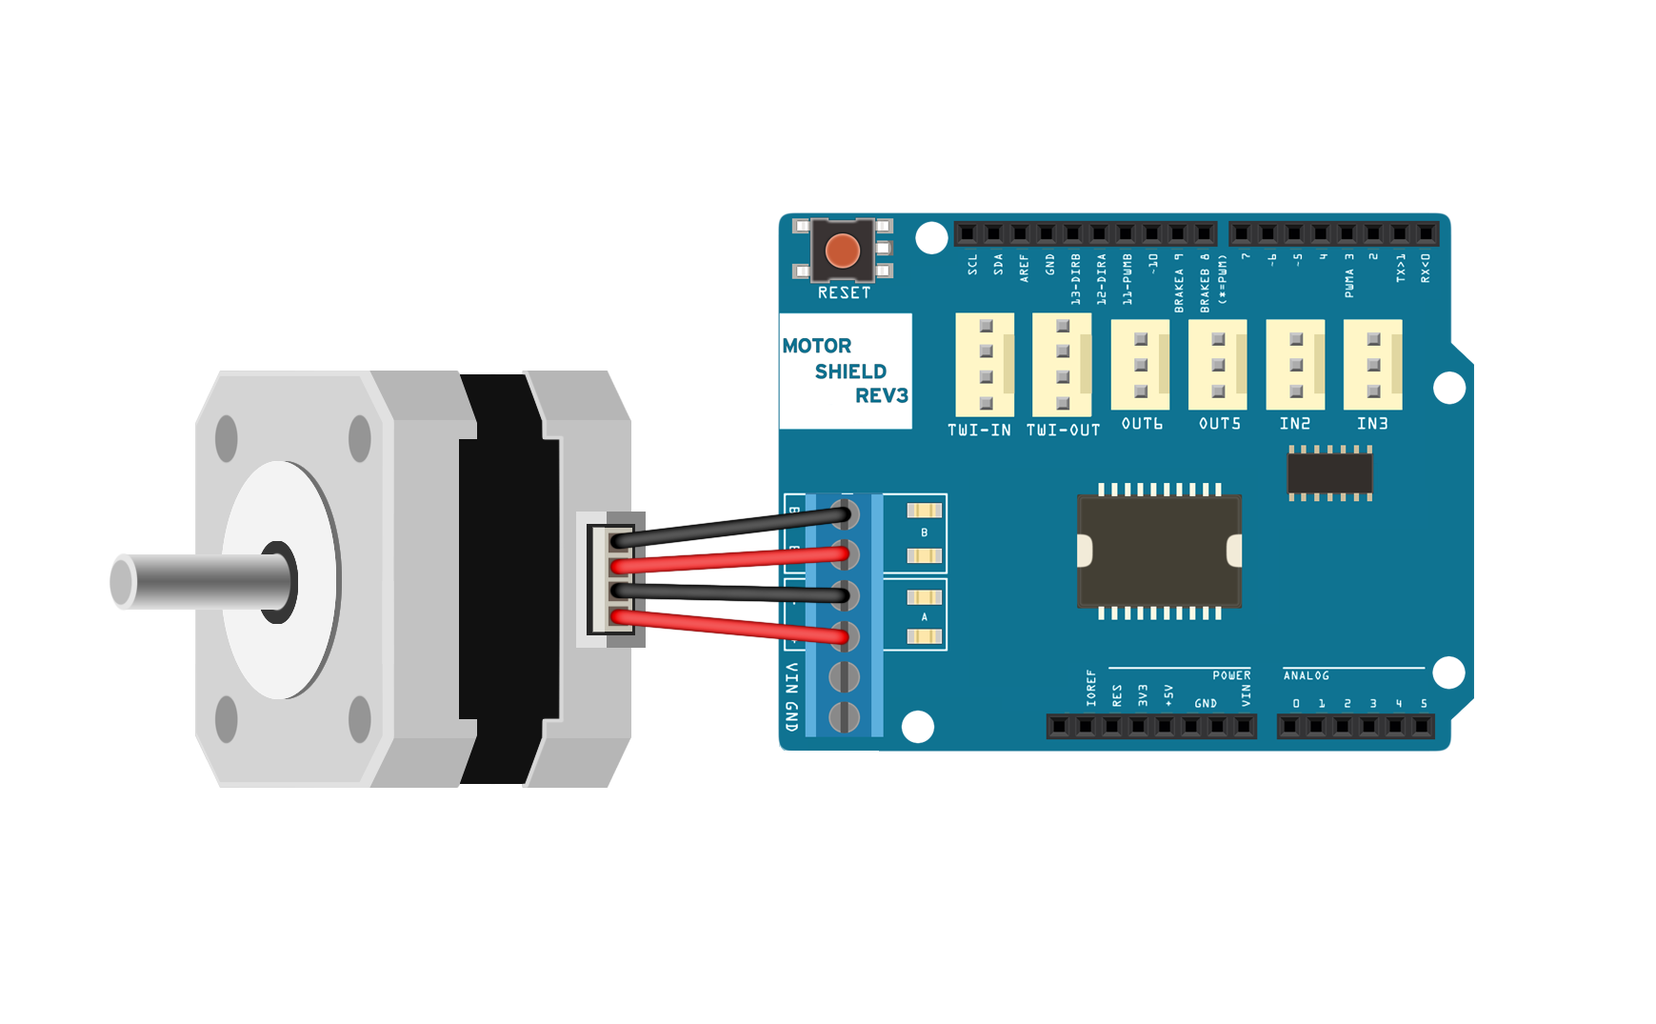
We connect the stepper motor to the shield using the following steps:
- Carefully mount the Arduino Motor Shield on top of the Arduino. Be careful not to bend any pins.
- Identify the two coils. Use a multimeter to measure the resistance between all the wires. The ones with a low resistance in between are the coils.
Connect the four stepper wires to the main terminal output of the Shield. One coil goes to one motor output and the other one to the other output.
Check the image for how it should look.
Step 2: Code
The following code will spin the stepper motor 100 steps in one direction and 100 steps in the other:
// Include the Stepper library<br>#include
// Declare the used pins
int dirA = 12;
int dirB = 13;
int pwmA = 3;
int pwmB = 11;
// Declare a Stepper motor with 200 steps
Stepper stepper1(200, dirA, dirB);
void setup() {
  // PWM pins require declaration when used as Digital
  pinMode(pwmA, OUTPUT);
  pinMode(pwmB, OUTPUT);

  // Set PWM pins as always HIGH
  digitalWrite(pwmA, HIGH);
  digitalWrite(pwmB, HIGH);

  // Set stepper motor speed
  stepper1.setSpeed(60);
}
void loop(){
  // Turn the stepper 100 steps which means 180 degrees
  stepper1.step(100);
  // Wait half second
  delay(500);

  // Turn the stepper 100 steps back which means 180 degrees
  stepper1.step(-100);
  // Wait half second
  delay(500);
}
Step 3: Code Breakdown
The code declares a stepper motor, selects a speed, and makes it turn in both directions.
Here, we declare the stepper motor. The syntax requires the number of steps of the motor as the first parameter and then the pins to which we connected the motor. We only need to declare the two direction pins of the Arduino Motor Shield. The direction pins sets which direction the coils will be excited in:
Stepper stepper1(200, dirA, dirB);
In a normal DC motor operation of the Motor Shield, the two PWM pins select how much power we attribute to each motor. However, as this is a stepper, we always want full power; so we will simplify and directly set the PWM pins always as HIGH:
// PWM pins require declaration when used as Digital<br>pinMode(pwmA, OUTPUT);
pinMode(pwmB, OUTPUT);

// Set PWM pins as always HIGH
digitalWrite(pwmA, HIGH);
digitalWrite(pwmB, HIGH);
Another important step is declaring the speed at which we want the motor to turn. If, for example, we set a speed of 60 RPM as in this case, and the motor has 200 steps, it will take around 5 milliseconds to increment one step. The speed of the motor can be changed at any time.
stepper1.setSpeed(60);
Lastly, to make the motor move, we need to order the number of steps to increment. If we feed a negative number of steps, it will move in the opposite direction. Note that the step() function will pause the execution of the program until the motor spins completely. If, for example, we set 200 steps at a speed of 1 RPM, it will take one full minute until the Arduino will continue execution.
stepper1.step(-100);
Arduino assumes the stepper moves while it orders it to move. The stepper
has no feedback circuit, so if we hold the shaft of the motor, the Arduino will believe it is moving though the stepper might not be moving.
Step 4: More About Steppers
Stepper motors differ from normal DC motors in that, rather than just spinning in one direction or another, they move in small increments in a given direction. These small increments are called steps. We can tell a stepper to go one or more steps in one particular direction. They are not necessarily fast, but they have high precision and quite some torque. For example, the paper feeder on a printer uses a stepper motor. 3D printers and CNC machines use them for very high precision and repeatability.
A bipolar stepper motor only has two coils with no center tap, in contrast to a unipolar design. This means that the coils have to be turned on in both directions at different times. As a comparison, a bipolar stepper is exactly like two DC motors which always have to be controlled in the opposite direction at the same time. When one coil is excited in one direction, the other one has to be reversed. By shifting this, we generate a pulse which makes the stepper spin.
More topics regarding motors such as brushless, transistor drivers or motor speed control can be found in my Arduino Development Cookbook available here. :D


