

Introduction: Bent Plywood Paper Holder


This desktop paper organizer uses leafs of bent plywood to keep things in order. Simple in design, the pieces of curved plywood are reminiscent of book pages. The bottom portion of the paper holder has small openings to keep pencils or other small tools.
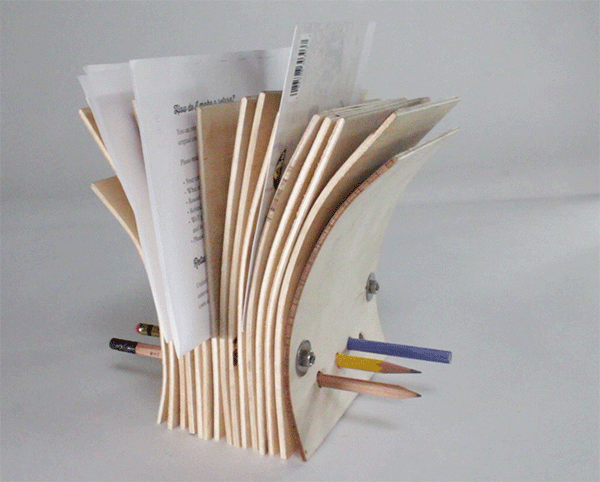
I managed to use scrap pieces of 1/8" plywood for my design, and think the irregular nature of the pieces adds to the look. This project can be scaled up or down to accommodate all kinds of things, from notes to magazines, and uses only 2 threaded rods to keep everything together.
Ready? Let's make!
Step 1: Trim Plywood

I had a pile of 1/8" plywood off-cuts that was taking up space. These scraps were mostly unusable for larger projects, but there was still plenty of good wood in each sheet.
Using a bandsaw I trimmed the plywood scraps until they were about 7" square.
Step 2: Sanding

I cleaned up the surface of the plywood pieces with a 120 grit sandpaper on an orbital sander. Sanding the surfaces cleans up the surface, and smooths out any inconsistencies in the rough plywood.
Step 3: Steamer Basket


An easy and effective way to bend plywood is to steam the wood until it's pliable. You can easily do this with a large pot with a steamer basket, or any combination of pots and pans that make an apparatus that separates your wood from being soaked while being steamed.
You want the plywood to be bathed in steam, but not touching the water.
Fill your pot partway with water and place steamer basket inside, if any water comes through the basket then remove some water until the basket is completely out of the water. Insert plywood pieces into steamer basket and arrange them so that steam can get access to each piece - I stacked my pieces vertically.
Cover the pot and set to boil. I steamed these plywood pieces for about 7 minutes. This is enough time to make them soft and bendy, but not too long and making the wood delaminate.
Step 4: Check Wood

Using tongs, check the wood after 4 minutes and see if you can easily bend it by hand. If not, let steam for a few more minutes. Steam is very hot, the wood will also be hot, this will burn you if you're not careful!
Use tongs to remove the plywood pieces, then use dry cloths to grip the plywood pieces and check how pliable the wood is.
Step 5: Get Bendy


Using dry cloths to grip the plywood, gently apply pressure to bend the plywood into a arc. For this project we want different radii for each curve, so there's no reason to be precise in how far you bend each piece. The import thing is to have some pieces that have a sharper radius than others.
After bending, hold the bent pieces for a minute in the final shape you want while the plywood cools. This will solidify the bend. Work one piece at a time, leaving the remainder in the steamer basket. Repeat this process for each piece until all plywood pieces have been bent.
Step 6: Let Cool

After the shape has been set the wood will need a little while to cool completely.
Step 7: Arrange Bent Pieces

The bent plywood pieces were arranged with the most curved pieces on the outside and the less bent pieces closer to the middle. I swapped around the plywood pieces, flipped them over, and turned them upside down until I had an arrangement I was satisfied with.
It's okay if your arrangement isn't perfect, there will be spacers between the pieces that will separate them and make the arrangement look pleasing.
Step 8: Clamp and Drill


Once the pieces have been arranged I tamped the stack on the bottom to make the pieces even, then clamped them together using a spring clamp.
I measured about 2" form the bottom and 3/4" from the edge and drilled a 1/4" opening through the entire stack. The spring clamp was moved and a matching opening was drilled on the other side of the stack.
Step 9: Threaded Rod

I cut an 2 ample sections of threaded rod, longer than the plywood stack is thick. This rod will be fed through the drilled hole and be used to mechanically fasten the plywood pieces together.
Step 10: Re-stack With Washers


One end of each threaded rod was capped with a locking nut and then a washer. The pieces of bend plywood were stacked onto the threaded rod, each piece of plywood was separated with 2 washers to create a standoff between the sheets.
Continue the process of alternating between a piece of plywood and 2 washers until the stack of complete, then cap off with lock nuts to secure the stack.
Step 11: Tighten


Two wrenches were used to tighten the nuts on the threaded rod. I partially tightened one threaded rod, then moved to the other to help distribute the pressure across the stack.
Step 12: Trim Rod


Using a rotary tool with a cutting wheel the excess threaded rod was trimmed off. You may need to touch up the sanding job around where the nuts were trimmed to remove any debris or dust created from cutting.
Step 13: Drill Pencil Slot


I decided to use the space at the bottom of the stack to hold pencils.
I measured and marked an array of 4 openings in the bottom area of my plywood stack, then used drill bit slightly larger than the diameter of a pencil to create the openings. Going slow here will prevent tearout. Any debris from drilling can be easily cleared from between the sheets because of the washer spacers.
Step 14: Store Your Stuff!


Your plywood paper stacker is ready for your desk at home, or the office! The plywood can be coated with varnish, or left natural.
Your plywood paper stacker can be made as large or small as you like, maybe scale it up even bigger to fit magazines or use as a stool!
I'd love to see your version of this project, so share a picture in the comments below!
Happy making :)


