

Introduction: Build a Camera Shutter Speed Timer


If you're into film photography using vintage mechanical cameras, you might expect that after 50 years of existence they don't often work as well as they might have originally. Lubricant dries out, dirt seeps into the mechanisms and eventually things start to go wrong.
When the delicate timing mechanisms of the shutter begin to deteriorate, the shutter times can change, and this results in incorrect image exposures. Sometimes the inaccuracy iis substantial and clearly noticeable, but at higher shutter speeds, it is difficult to tell the difference between 1/500th of a second and 1/1000th of a second. However, to the film that difference is substantial.
When doing camera shutter repair, having a way to measure the timings can help give you insight into what might be wrong, and also lets you test as you tinker with things to see if you're making things better or worse, and how close you are getting to your desired shutter accuracy. It's an invaluable tool for any aspiring camera repair tinkerer to have.
This project is based on the PIC18F2525 microcontroller, and an HD44780 16x2 character LCD. It uses an OPT101 photodiode with integrated trans-impedance amplifier for the sensor, and a 1 watt red LED for the light source.
Step 1: Tools and Materials


For this project I had access to some pretty elaborate tools, but its nothing that can't be done with simple hand tools, it just takes longer.
Materials:
- 6.5" x 4.5" x 2" Aluminum project enclosure
- Chemistry bolt-down retort stand base
- 8" stainless steel retort stand rod
- Retort stand clamp x 3
-1/4" thick aluminum plate
- 1" length of 1/4" aluminum or steel rod
- 1.5" length of 1/8" steel rod x 3
- 1/2" hole rubber grommet x 2
- Various screws, nuts, washers
- Epoxy
Circuit Components:
- 16x2 character HD44780-based LCD
- PIC18F2525 microcontroller
- 28 pin IC socket
- 10k trimpot
- 7805 voltage regulator
- 100nF capacitor x 3
- 10k resistor
- 4.7 ohm 2 watt resistor
- 8MHz crystal
- 15pF ceramic capacitor x 2
- Male header pins
- Female header pins
- Various lengths of wire
- OPT101 photodiode IC
- 8 pin IC socket
- 1W red LED
- SPST toggle switch
- Panel-mount pushbutton
- Panel-mount DC jack
- Heatshrink
Tools:
- Drill
- Various drill bits
- Mill (if possible)
- Soldering iron
- Solder
- Wire stripper
- Wire cutter
- File
- Center punch
- Hammer
- Tap and die set
Step 2: Schematic and Code

Below is the schematic, it is also available in the attached PDF in high resolution. The C files and a pre-compiled .hex file are also included.
The files:
flex_lcd_photogate_final.c A modified HD44780 LCD driver with the LCD pins set up as shown in the schematic. Simply modify the location at the top of the program to match the location of this file on your hard drive.
photogate_final.c The program code.
photogate_final.hex The compiled code for the PIC, just waiting to be programmed into it with a USB or serial programmer.
Code explanation:
The code is fairly simple. The sensor is connected to a hardware interrupt pin. When the unit turns on, the external interrupt register is prepared to look for a LOW-TO-HIGH change. When the sensor receives light, the voltage increases until it is in the logic HIGH range. This triggers the interrupt, and the interrupt routine enables a 100us overflow timer. It also sets the external interrupt register to now be looking for a HIGH-TO-LOW change.
While the state is high, every 100us the timer increments a counter. When the HIGH-TO-LOW event occurs, the external interrupt routine disables the timer, and the timer's count value is converted to milliseconds and sent to the display.


Step 3: Build the Circuit

A good place to start is building the circuit. I built mine on stripboard, but perfboard or your preferred circuit assembly method is absolutely fine. An important thing to keep in mind is that the wires running from the crystal to the PIC need to be as short as possible so that the timing signal is not subjected to excessive signal noise.
I used various connectors on the board to make assembly easier. I would very highly recommend using male/female header pins as a board connector for the LCD, it makes it much easier to assemble and debug the circuit.
The circuit includes a 5V regulator, so the input power to the circuit can be between 6V and 24V without issue. Any DC wall adapter should work without trouble.
The schematic for the OPT101 sensor and LED are also included in the top left corner of the schematic.
How to know it's working:
When power is applied, the screen will display "Film Shutter Speed Timer" and waits for you to press the ready button. When ready is pressed the screen displays "Ready" and the sensor is waiting for light!
Step 4: Preparing the Enclosure


The enclosure is a 6.5" x 4.5" x 2" aluminum project box. A good way to mark the locations for drilling is to stick masking tape on the surface of the box and draw on top with pencil. After marking the locations for drill holes, mark them with the center punch. Once all the locations are punched the masking tape can be peeled off.
A good way to mark the square for the LCD is to draw a rectangle on the masking tape, take a sharp knife and use a straight edge to cut along the lines you drew, and peel away the tape. The razor blade will have marked the surface of the box directly.
If using a mill to cut the rectangle, begin by drilling a hole and inserting a cutter through the hole, then make your way around the perimeter of the rectangle. After the rectangle is clear, remove the tool radii from the corners of the cutout with a file.
If using a drill to cut the rectangle, start by punching closely-spaced markings 1/4" apart all the way around the inside of the rectangle. Drill with a 1/4" bit so that almost no material remains to hold the center material in place. Break the center out with a hammer or file. Then, file the jagged edges smooth and square the corners.
Step 5: Assembling the Sensors


To have a range of freedom for the sensor and LED so that cameras of different size and shape can be accommodated, I made two aluminum segments to have a number of sensor positions. They could also be made of wood if you prefer.
To make sensor mounts, cut and file two strips of 1/4" aluminum plate, 1/2" wide by 2" long. Drill five holes spaced 1/4" apart down the center, and drill with a 3/16" drill bit. Drill a 1/8" hole into the edge of the piece as shown in the picture below. Epoxy a 1.5" long 1/8" steel rod into the hole on the edge. The mounts are now complete.
To prepare the LED, solder + and - wires to the LED's star base so that it won't need to be heated again. Heat might damage the epoxy if it hasn't fully cured yet. Then, epoxy a screw on the back.
To prepare the sensor, I protected the circuitry from the screw head with some hot glue. After the hot glue cooled, I glued the screw on top of the hot glue with some epoxy, and coated everything else with epoxy.
Step 6: Camera Mount


To mount the camera to a stand clamp, I decided to thread the end of a 1" segment of aluminum rod and screw it into the bottom of the camera mount, then it would be placed into the clamp and held by a set screw.
Take the 1" length of aluminum rod and thread the first 1/4" with a 1/4-20 die. This is the industry standard camera tripod mount thread. It should screw tight into the camera bottom.
The retort stand clamps that I had required 3/16" diameter rods, so the hole has to be expanded. This is done by simply drilling out the 3/16" hole with a 1/4" drill bit. The camera mount is now ready.
Step 7: Assembly

I started with the electronics. First, place a little bit of tape on the inside of the enclosure where the LCD connector pins will be, to make sure they don't touch the enclosure. I used hot glue to hold the LCD in place, but nuts and bolts could be used too. Place the switch and button and solder them to the board. Make some sensor cables out of wire, female header pins and heat shrink tubing. Insert the grommets in their holes and pass the connectors through them. Connect them to the PCB pin headers. Since the PCB is on a connector, its easy to work on it and then attach it to the LCD when finished.
Use some bolts, tooth-washers and nuts to attach the retort stand base to the top of the enclosure. Insert the retort stand rod into the base and put the clamps in place. Insert the sensor holders and sensors, and connect the sensor cables.
Step 8: Finished!


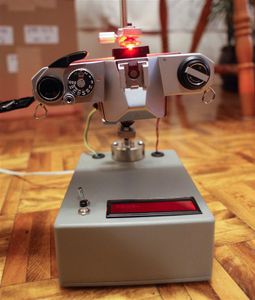

To set the device up for camera testing, first, position the sensor at the base of the stand. Next, insert the threaded rod into the camera and then the rod into the clamp. Move the camera into alignment just above the sensor and clamp it tightly. If you are testing an SLR without the lens, make sure that the sensor will not collide with the mirror as it flips up. Open the back of the camera and move the LED into position just above the shutter. Turn the device on and cock the camera lever. Set your shutter speed. Press the ready button and fire the shutter. I recommend doing at least 10 tests on each speed to make sure that the speeds are consistent and accurate.
From concept to completion this project took about 5 weeks. If anyone has any suggestions, questions or comments I would love to hear them. Thanks very much for reading and I hope that this Instructable was helpful, informative and interesting to you.
Please turn to the next page to see the results of my first test run!
Step 9: Results


Below are the results generated my my Pentax K1000. You can see there is an issue on the last line of the data, the shutter speed is much much faster than it is intended to be.
What does this mean?
I know from additional investigating that there is a problem with this camera. at 1/500th of a second the shutter only opens 80% of the way before closing, this means that the time measurements are correct, but in actual fact you would only produce 80% of a picture using this speed. At 1/1000th, the shutter only opens 20% of the way, so the light getting to the sensor was cut off quite quickly, resulting in a reading of 400us instead of the expected 1ms. This problem is likely due to dried lubricant in the shutter mechanism making it open incorrectly at high speeds.

Participated in the
Microcontroller Contest


![Tim's Mechanical Spider Leg [LU9685-20CU]](https://content.instructables.com/FFB/5R4I/LVKZ6G6R/FFB5R4ILVKZ6G6R.png?auto=webp&crop=1.2%3A1&frame=1&width=306)


